|
Архитектура Аудит Военная наука Иностранные языки Медицина Металлургия Метрология Образование Политология Производство Психология Стандартизация Технологии |
|
|
Архитектура Аудит Военная наука Иностранные языки Медицина Металлургия Метрология Образование Политология Производство Психология Стандартизация Технологии |
S pring Flowers Table Runner 5x7 6x10 8x12 instructionsСтр 1 из 5Следующая ⇒
S pring Flowers Table Runner 5x7 6x10 8x12 instructions FABRIC REQUIREMENTS X7 (13cm x 18cm) Fabric A – 17cm x 23cm (7” x 9”) background of panels – cut one for each panel Lily of the Valley panel Small pieces of applique for all the flowers Tulip Panel Fabric B – 6.5cm x 8cm (2.5” x 3”) middle petal Fabric C - 9cm x 13cm (3.5” x 5”) large side petals Fabric D – 9cm x 15cm (3.5” x 6”) leaf Small pieces of applique for the back petal and side petals Daffodil panel Fabric E - 10cm x 16.5cm (4” x 6.5”) bottom petals Fabric F – 6.5cm x 8cm (2.5” x 3”) corona Fabric G - 8cm x 9cm (3” x 3.5”) top of corona Cherry Blossom panel Fabric H – 6.5cm x 8cm (2.5” x 3”) bottom flower Fabric I - 5cm x 8cm (2” x 3”) top flower Fabric J - 8cm x 9cm (3” x 3.5”) middle flower Small pieces of applique for the flower bud Pansy panel Fabric K – 8cm x 10cm (3” x 4”) leaves Fabric L - 8cm x 13cm (3” x 5”) back petals Fabric M - 8cm x 13cm (3” x 5”) middle petals Fabric N - 8cm x 10cm (3” x 4”) front petals Fabric O - 8cm x 10cm (3” x 4”) detail petals in the centre Fabric P – cut 2 - 10cm x 23cm (4” x 9”) end borders – cut later (measure your joined panels first) Fabric Q – cut 2 - 10cm x 87cm (4” x 34”) side borders – cut later (measure your joined panels first) Fabric R – cut 1 - 40cm x 87cm (16” x 34”) the backing – cut later (measure your joined panels first) Batting 1 – 18cm x 23cm (7” x 9”) – cut one for each panel Batting 2 – cut 2 - 10cm x 23cm (4” x 9”) end borders Batting 3 – cut 2 - 10cm x 87cm (4” x 34”) side borders Finished dimensions – 79cmL x 33cmW (31” x 13”) X10 (16cm x 26cm) Fabric A – 20cm x 30cm (8” x 12”) background of panels – cut one for each panel Lily of the Valley panel Small pieces of applique for all the flowers Tulip Panel Fabric B - 9cm x 11.5cm (3.5” x 4.5”) middle petal Fabric C - 10cm x 18cm (4” x 7”) large side petals Fabric D – 11.5cm x 20cm (4.5” x 8”) leaf Small pieces of applique for the back petal and side petals Daffodil panel Fabric E - 13cm x 20cm (5” x 8”) bottom petals Fabric F - 8cm x 9cm (3” x 3.5”) corona Fabric G - 10cm x 10cm (4” x 4”) top of corona Cherry Blossom panel Fabric H - 8cm x 10cm (3” x 4”) bottom flower Fabric I - 10cm x 13cm (4” x 5”) top flower Fabric J - 9cm x 10cm (3.5” x 4”) middle flower Small pieces of applique for the flower bud Pansy panel Fabric K – 11.5cm x 14cm (4.5” x 5.5”) leaves Fabric L - 10cm x 15cm (4” x 6”) back petals Fabric M - 10cm x 15cm (4” x 6”) middle petals Fabric N - 10cm x 13cm (4” x 5”) front petals Fabric O - 10cm x 13cm (4” x 5”) detail petals in the centre Fabric P – cut 2 - 10cm x 30cm (4” x 12”) end borders – cut later (measure your joined panels first) Fabric Q – cut 2 - 10cm x 101cm (4” x 40”) side borders – cut later (measure your joined panels first) Fabric R – cut 1 - 22cm x 101cm (14” x 40”) the backing – cut later (measure your joined panels first) Batting 1 – 20cm x 30cm (8” x 12”) – cut one for each panel Batting 2 – cut 2 - 10cm x 30cm (4” x 12”) end borders Batting 3 – cut 2 - 10cm x 101cm (4” x 40”) side borders Finished dimensions – 89cmL x 39cmW (35” x 15”) X12 (20cm x 30cm) Fabric A – 24cm x 34cm (10” x 14”) background of panels – cut one for each panel Lily of the Valley panel Small pieces of applique for all the flowers Tulip Panel Fabric B - 12cm x 15cm (5” x 6”) middle petal Fabric C - 13cm x 20cm (5” x 8”) large side petals Fabric D – 13cm x 25cm (6” x 10”) leaf Small pieces of applique for the back petal and side petals Daffodil panel Fabric E - 16cm x 25cm (6” x 10”) bottom petals Fabric F - 10cm x 10cm (4” x 4”) corona Fabric G - 13cm x 13cm (5” x 5”) top of corona Cherry Blossom panel Fabric H - 10cm x 13cm (4” x 5”) bottom flower Fabric I - 10cm x 13cm (4” x 5”) top flower Fabric J – 10.5cm x 16cm (4.5” x 6”) middle flower Small pieces of applique for the flower bud Pansy panel Fabric K – 13cm x 16cm (5” x 6”) leaves Fabric L - 13cm x 18cm (5” x 7”) back petals Fabric M - 13cm x 18cm (5” x 7”) middle petals Fabric N - 10cm x 18cm (4” x 7”) front petals Fabric O - 13cm x 16cm (5” x 6”) detail petals in the centre Fabric P – cut 2 - 10cm x 36cm (4” x 14”) end borders – cut later (measure your joined panels first) Fabric Q – cut 2 - 10cm x 129cm (4” x 49”) side borders – cut later (measure your joined panels first) Fabric R – cut 1 - 48cm x 101cm (19” x 49”) the backing – cut later (measure your joined panels first)
Batting 1 – 24cm x 34cm (10” x 14”) – cut one for each panel Batting 2 – cut 2 - 10cm x 36cm (4” x 14”) end borders Batting 3 – cut 2 - 10cm x 129cm (4” x 49”) side borders Finished dimensions – 117cmL x 46cmW (46” x 18”) INSTRUCTIONS Lily of the Valley panel
Load the design.
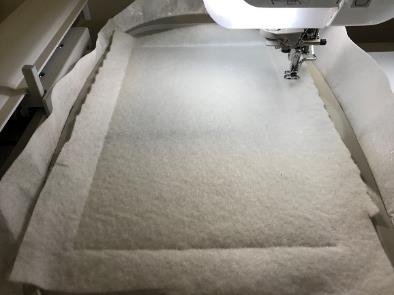
The first step, which is sewing the batting down and trimming it, is optional. It is so no batting is in the seam, making the blocks easier to join. If you prefer the batting in the seam just skip STEP 1 and proceed straight to STEP 2. Place batting 1 on top of the hoop.
STEP 1 Stitch the batting down.
Remove the hoop from your machine and trim the batting about 1-2mm from the stitching.
Place fabric A right side up on top of the hoop.
STEP 2 Stitch the fabric down.
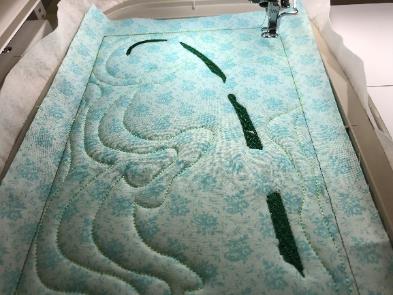
STEP 3 Stitch the quilting in the background
STEP 4 Embroider the large stem.
STEP 5 Stitch the placement lines for pieces 5. (These are the insides of two of the flowers on the diagram).
Cut a piece of fabric large enough to cover the placement lines and place it right side up on top of the hoop covering the placement lines completely. Note, if your background fabric shows through, you can always double your applique fabric.
STEP 6 Stitch the fabric down.
Remove the hoop and trim the fabric as close to the stitching as you can without cutting the stitching (use applique scissors if you have them.)
STEP 7 & 8 Repeat the applique process for piece 7.
STEP 9 Embroider the stamen ( no.9 ).
STEP 10 & 11 Repeat the applique process for piece 10.
STEP 12 Embroider the stamen ( no.12 ).
STEP 13 & 14 Repeat the applique process for piece 13.
STEPS 15 & 16 Repeat the applique process for piece 15.
STEPS 17 & 18 Repeat the applique process for piece 17.
STEPS 19 & 20 Repeat the applique process for piece 19.
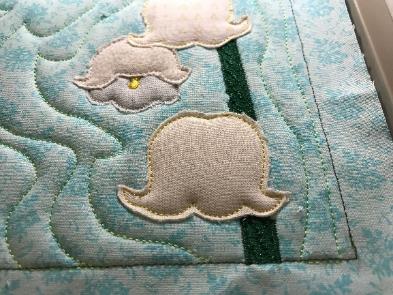
STEP 21 Embroider the satin stitch around pieces 5.
STEP 22 Embroider the satin stitch around pieces 7, 10 and 13.
STEP 23 Embroider the stems connecting the flowers to the main stem.
STEP 24 Embroider the satin stitch around pieces 15, 17 and 19.
STEP 25 & 26 Repeat the applique process for pieces 25 (The top flower buds).
STEP 27 Embroider the satin stitch around pieces 25.
Remove your work from the hoop.
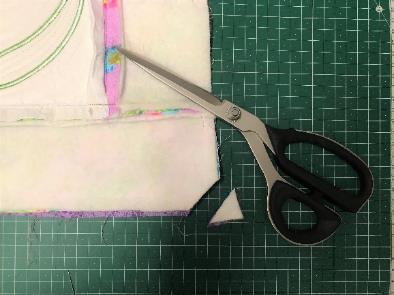
Trim the batting out of the seams if you skipped STEP 1.
Trim the seam to about ½ an inch.
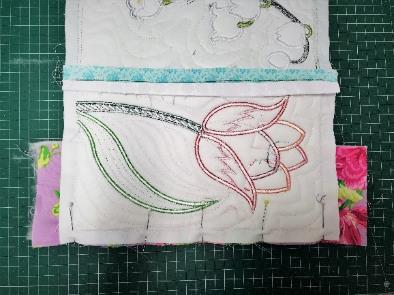
Tulip panel
Load the design.
The first step, which is sewing the batting down and trimming it, is optional. It is so no batting is in the seam, making the blocks easier to join. If you prefer the batting in the seam just skip STEP 1 and proceed straight to STEP 2. Place batting 1 on top of the hoop.
STEP 1 Stitch the batting down.
Remove the hoop from your machine and trim the batting about 1-2mm from the stitching.
Place fabric A right side up on top of the hoop.
STEP 2 Stitch the fabric down.
STEP 3 Stitch the quilting in the background
STEP 4 Embroider the large stem
STEP 5 Stitch the placement line for the back petal
Cut a piece of fabric large enough to cover the placement line and place it right side up on top of the hoop covering the placement line completely.
STEP 6 Stitch the fabric down.
Remove the hoop and trim the fabric as close to the stitching as you can without cutting the stitching (use applique scissors if you have them).
STEP 7 & 8 Repeat the applique process for the two small side petals (Use a piece of fabric large enough to fabric enough to cover placement lines).
STEP 9 & 10 Repeat applique process for the middle petal using Fabric B.
STEP 11 & 12 Repeat applique process for the large side petals using Fabric C.
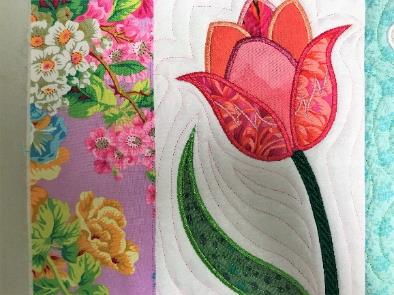
STEP 13 Embroider the satin stitch around the back petal.
STEP 14 Embroider the satin stitch around the two small side petals.
STEP 15 Embroider the satin stitch around the middle petal.
STEP 16 Embroider the petal detailing on the two large side petals.
STEP 17 Embroider the satin stitch around the two large side petals.
STEP 18 & 19 Repeat the applique process for the leaf, using fabric D. Leave the excess fabric in the seams (bottom of leaf).
STEP 20 Embroider the quilting on the leaf.
STEP 21 Embroider the satin stitch around the leaf.
Remove your work from the hoop.
Trim the batting out of the seams if you skipped STEP 1.
Trim the seam to about ½ an inch.
Daffodil panel
Load the design.
The first step, which is sewing the batting down and trimming it, is optional. It is so no batting is in the seam, making the blocks easier to join. If you prefer the batting in the seam just skip STEP 1 and proceed straight to STEP 2. Place batting 1 on top of the hoop.
STEP 1 Stitch the batting down.
Remove the hoop from your machine and trim the batting about 1-2mm from the stitching.
Place fabric A right side up on top of the hoop.
STEP 2 Stitch the fabric down.
STEP 3 Stitch the quilting in the background
STEP 4 Embroider the large stem
STEP 5 Embroider the spathe on the stem.
STEP 6 Stitch the placement line for the petals.
Place Fabric E right side up on top of the hoop covering the placement line completely.
STEP 7 Stitch the fabric down.
Remove the hoop and trim the fabric as close to the stitching as you can without cutting the stitching (use applique scissors if you have them.)
STEP 8 & 9 Repeat the applique process for the corona, using Fabric F.
STEP 10 & 11 Repeat the applique process for the top of the corona, using Fabric G.
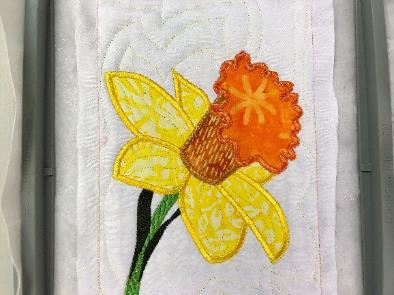
STEP 12 Embroider the quilting and satin stitch for the petals.
STEP 13 Embroider the quilting and satin stitch for the corona.
STEP 14 Embroider satin stitch around the top of the corona.
STEP 15 Embroider satin stitch inside the top of the corona.
Remove your work from the hoop.
Trim the batting out of the seams if you skipped STEP 1.
Trim the seam to about ½ an inch.
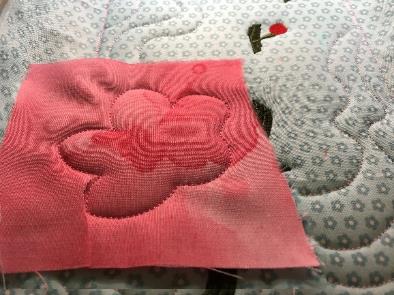
Cherry Blossom panel
Load the design.
The first step, which is sewing the batting down and trimming it, is optional. It is so no batting is in the seam, making the blocks easier to join. If you prefer the batting in the seam just skip STEP 1 and proceed straight to STEP 2. Place batting 1 on top of the hoop.
STEP 1 Stitch the batting down.
Remove the hoop from your machine and trim the batting about 1-2mm from the stitching.
Place fabric A right side up on top of the hoop.
STEP 2 Stitch the fabric down.
STEP 3 Stitch the quilting in the background
STEP 4 Embroider the branches in the background
STEP 5 Embroider the bottom of the top flower.
STEP 6 Stitch the placement line for the flower at the bottom
Place Fabric H right side up on top of the hoop covering the placement line completely.
STEP 7 Stitch the fabric down.
Remove the hoop and trim the fabric as close to the stitching as you can without cutting the stitching (use applique scissors if you have them.)
STEP 8 & 9 Repeat the applique process for the flower at the top, using fabric I.
STEP 10 & 11 Repeat the applique process for the middle flower, using fabric J.
STEP 12 & 13 Repeat the applique process for the bud, using a piece of fabric large enough to cover the placement line.
STEP 14 Embroider the satin stitch around all the petals and the bud.
STEP 15 Embroider the stamens for the top flower.
STEP 16 Embroider the inside of the top flower.
STEP 17 Embroider the bottom section of the bud, as well as the insides of the middle and bottom flowers.
STEP 18 Embroider the stamens for the middle flower.
STEP 19 Embroider the stamens for the bottom flower.
Remove your work from the hoop.
Trim the batting out of the seams if you skipped STEP 1.
Trim the seam to about ½ an inch.
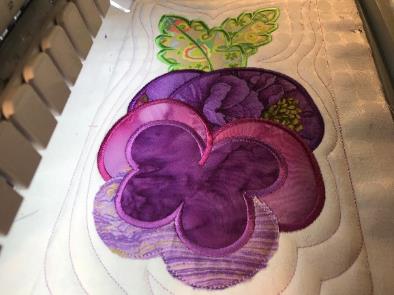
Pansy panel
Load the design.
The first step, which is sewing the batting down and trimming it, is optional. It is so no batting is in the seam, making the blocks easier to join. If you prefer the batting in the seam just skip STEP 1 and proceed straight to STEP 2. Place batting 1 on top of the hoop.
STEP 1 Stitch the batting down.
Remove the hoop from your machine and trim the batting about 1-2mm from the stitching.
Place fabric A right side up on top of the hoop.
STEP 2 Stitch the fabric down.
STEP 3 Stitch the quilting in the background
STEP 4 Stitch the placement line for leaves.
Place Fabric K right side up on top of the hoop covering the placement line completely.
STEP 5 Stitch the fabric down.
Remove the hoop and trim the fabric as close to the stitching as you can without cutting the stitching (use applique scissors if you have them.)
STEP 6 & 7 Repeat the applique process for the back petals, using Fabric L.
STEP 8 & 9 Repeat the applique process for the middle petals, using fabric M.
STEP 10 & 11 Repeat the applique process for the front petals, using fabric N.
STEP 12 & 13 Repeat the applique process for the detail petals in the centre, using fabric O.
STEP 14 Embroider the satin stitch around the leaves.
STEP 15 Embroider the satin stitch around the back petals.
STEP 16 Embroider the satin stitch around the detail petals in the centre.
STEP 17 Embroider the satin stitch around the middle petals.
STEP 18 Embroider the outer section of the centre of the flower
STEP 19 Embroider the inner section of the centre of the flower
STEP 20 Embroider the satin stitch around the bottom petals
Remove your work from the hoop.
Trim the batting out of the seams if you skipped STEP 1.
Trim the seam to about ½ an inch.
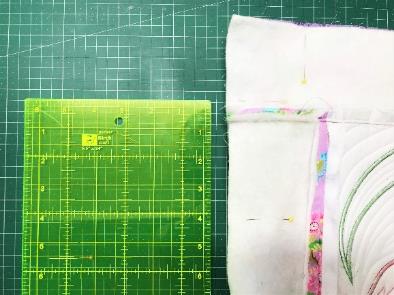
Join all the panels.
Then place the first two panels right sides together. Pin and sew a half inch seam, sewing just inside the border lines already on the panels.
Open the seams and iron them flat.
Then continue joining the other panels in the same fashion.
Add the end borders.
Cut fabric P and batting 2.
Then place one end of the runner on top of fabric P and batting 2 wrong side up. Have the excess of both batting 2 and fabric P towards the centre of the table runner.
Pin in place and stitch with a half inch seam. Stitch inside the border line on the runner so this line of sewing does not show on the front of the runner.
Repeat on the other end of the runner.
Add the side borders. Add the side borders in the same way using Fabric Q and batting 3.
Cut the backing
Place your sewn runner on top of Fabric R. Right sides together.
Pin together lightly and trim the backing so it matches the shape of your runner.
With the front and back of your runner still right sides together. Pin together more securely and make sure you leave an opening of about 15cm (6 inches) for turning.
Stitch the seam remembering to leave the opening.
Clip the corners for more pointed ones when turned. (Making sure you do not cut the stitching).
Then turn the right way out through the opening. Use a chopstick to help push out the corners
Iron.
Hand stitch (or use fabric glue) the opening closed.
Stitch in the ditch of the seams to attach the backing. (Use the same colour bobbin as your backing).
You have now finished your Spring Flowers table runner!
Enjoy!!
S pring Flowers Table Runner 5x7 6x10 8x12 instructions FABRIC REQUIREMENTS X7 (13cm x 18cm) Fabric A – 17cm x 23cm (7” x 9”) background of panels – cut one for each panel Lily of the Valley panel |
Последнее изменение этой страницы: 2019-05-04; Просмотров: 222; Нарушение авторского права страницы