|
Архитектура Аудит Военная наука Иностранные языки Медицина Металлургия Метрология Образование Политология Производство Психология Стандартизация Технологии |
|
|
Архитектура Аудит Военная наука Иностранные языки Медицина Металлургия Метрология Образование Политология Производство Психология Стандартизация Технологии |
Handmade from the Heart Tote Bag 4x4 5x5 6x6 instructionsСтр 1 из 7Следующая ⇒
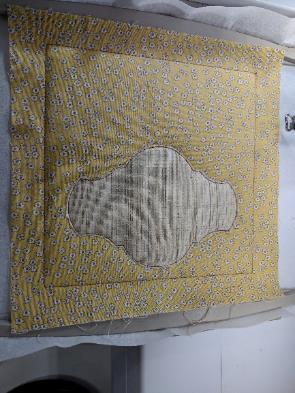
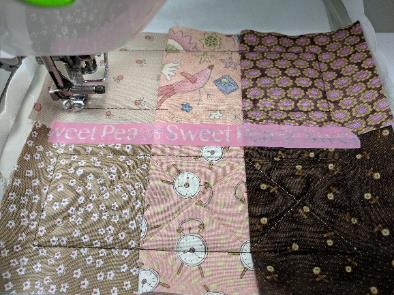
Handmade from the Heart Tote Bag 4x4 5x5 6x6 instructions FABRIC REQUIREMENTS You will require 12 blocks and 6 border blocks in total for the tote bag.
X4 (10cm x 10cm) ALL BLOCKS - (Blocks 1 – 6 & Quilted Block) Fabric A - 16cm x 16cm (6” x 6”) background Batting 1 - cut 1 x 16cm x 16cm (6”x 6”) per block BLOCK 1 Fabric B - 8cm x 10cm (3” x 4”) shape Small pieces of fabric for the applique: heart BLOCK 2 Small pieces of fabric for the applique: bird’s body, wing and tail feathers and shape in the corner BLOCK 3 Small pieces of fabric for the applique: label BLOCK 4 Fabric B - 5cm x 10cm (2” x 4”) shape Small pieces of fabric for the applique: bird, flower and flower centre
BLOCK 5 Fabric B - 8cm x 9cm (3” x 3.5”) heart
BLOCK 6 Small pieces of fabric for the applique: 3 flowers and 2 flower centres and shape BORDER BLOCK (MAKES ONE BLOCK PER HOOPING) Fabric A - cut 1 x 6cm x 8cm (2.5” x 3”) first background Fabric B - cut 1 x 6cm x 8cm (2.5” x 3”) second background Fabric C - cut 1 x 6cm x 8cm (2.5” x 3”) last background
REST OF THE BAG Fabric D - cut 1 x 13cm x 38cm (5”x 15”) To be cut later (measure your joined blocks first) bottom border Fabric E - cut 2 x 13cm x 33cm (5”x 13”) To be cut later (measure your joined blocks first) side borders Fabric F - cut 1 x front lining - * To be cut later - approximately 46cm x 57cm (18”x 22.5”) Fabric G - cut 1 x back lining - * To be cut later - approximately 36cm x 38cm (14”x 15”) Fabric H - cut 2 x 8cm x 58cm (3”x 23”) straps
Batting 2 - cut 1 x 13cm x 38cm (5”x 15”) bottom border Batting 3 - cut 2 x 13cm x 33cm (5”x 13”) side borders · Fusible interfacing – optional X5 (13cm x 13cm) ALL BLOCKS - (Blocks 1 – 6 & Quilted Block) Fabric A - 18cm x 18cm (7” x 7”) background Batting 1 - cut 1 x 18cm x 18cm (7”x 7”) per block BLOCK 1 Fabric B - 10cm x 13cm (4” x 5”) shape Small pieces of fabric for the applique: heart BLOCK 2 Small pieces of fabric for the applique: bird’s body, wing and tail feathers and shape in the corner BLOCK 3 Small pieces of fabric for the applique: label BLOCK 4 Fabric B - 8cm x 16cm (3” x 6”) shape Small pieces of fabric for the applique: bird, flower and flower centre
BLOCK 5 Fabric B - 10cm x 13cm (4” x 5”) heart
BLOCK 6 Small pieces of fabric for the applique: 3 flowers and 2 flower centres and shape BORDER BLOCK (MAKES TWO BLOCKS) Fabric A - cut 2 x 8cm x 9cm (3” x 3.5”) first background Fabric B - cut 2 x 8cm x 9cm (3” x 3.5”) second background Fabric C - cut 2 x 8cm x 9cm (3” x 3.5”) last background
REST OF THE BAG Fabric D - cut 1 x 13cm x 53cm (5”x 18”) To be cut later (measure your joined blocks first) bottom border Fabric E - cut 2 x 13cm x 43cm (5”x 15”) To be cut later (measure your joined blocks first) side borders Fabric F - cut 1 x front lining - * To be cut later - approximately 51cm x 64cm (20”x 25.5”) Fabric G - cut 1 x back lining - * To be cut later - approximately 41cm x 46cm (16”x 18”) Fabric H - cut 2 x 8cm x 58cm (3”x 23”) straps
Batting 2 - cut 1 x 13cm x 46cm (5”x 18”) bottom border Batting 3 - cut 2 x 13cm x 38cm (5”x 15”) side borders · Fusible interfacing – optional
X6 (16cm x 16cm) ALL BLOCKS - (Blocks 1 – 6 & Quilted Block) Fabric A - 20cm x 20cm (8” x 8”) background Batting 1 - cut 1 x 20cm x 20cm (8”x 8”) per block BLOCK 1 Fabric B - 12cm x 16cm (4.5” x 6”) shape Small pieces of fabric for the applique: heart BLOCK 2 Small pieces of fabric for the applique: bird’s body, wing and tail feathers and shape in the corner BLOCK 3 Small pieces of fabric for the applique: label BLOCK 4 Fabric B - 8cm x 16cm (3” x 6”) scroll shape Small pieces of fabric for the applique: bird, flower and flower centre
BLOCK 5 Fabric B - 13cm x 16cm (5” x 6”) heart
BLOCK 6 Small pieces of fabric for the applique: 3 flowers and 2 flower centres and shape
BORDER BLOCK (MAKES TWO BLOCKS) Fabric A - cut 2 x 9cm x 20cm (3.5” x 4”) first background Fabric B - cut 2 x 9cm x 20cm (3.5” x 4”) second background Fabric C - cut 2 x 9cm x 20cm (3.5” x 4”) last background
REST OF THE BAG Fabric D - cut 1 x 13cm x 53cm (5”x 21”) To be cut later (measure your joined blocks first) bottom border Fabric E - cut 2 x 13cm x 43cm (5”x 17”) To be cut later (measure your joined blocks first) side borders Fabric F - cut 1 x front lining - * To be cut later - approximately 56cm x 73cm (22”x 28.5”) Fabric G - cut 1 x back lining - * To be cut later - approximately 46cm x 53cm (18”x 21”) Fabric H - cut 2 x 8cm x 58cm (3”x 23”) straps
Batting 2 - cut 1 x 13cm x 53cm (5”x 21”) bottom border Batting 3 - cut 2 x 13cm x 43cm (5”x 17”) side borders · Fusible interfacing – optional Finished sizes of the bag (approx.): 4x4 = 30cm wide x 24cm high x 10cm deep (12" x 9.75" x 4“) 5x5 = 38cm wide x 30cm high x 10cm deep (15" x 12" x 4“) 6x6 = 46cm wide x 35.5cm high x 10cm deep (18" x 14" x 4“)
INSTRUCTIONS
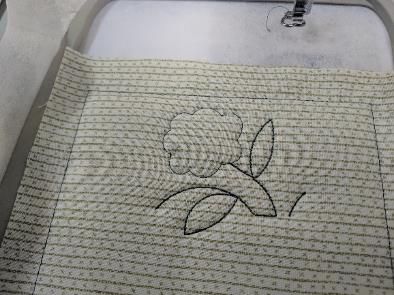
HOW TO MAKE BLOCK 1 The first step, which is sewing the batting down and trimming it, is optional. It is so no batting is in the seam, making the blocks easier to join. If you prefer the batting in the seam just skip STEP 1 and proceed straight to STEP 2.
Place batting 1 on top of the hoop.
STEP 1 Stitch the batting down.
Remove the hoop from your machine and trim the batting about 1-2mm from the stitching.
STEP 2 Place fabric A on top of the hoop right side up covering the batting. Stitch down.
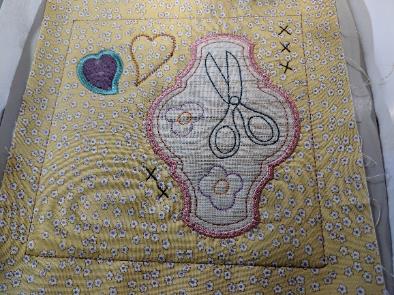
STEP 3 Stitch the placement line for the shape.
STEP 4 Place fabric B on top of the hoop right side up covering the placement line. Stitch down.
Remove the hoop from your machine and trim the fabric about 1-2mm from the stitching.
STEPS 5 & 6 Repeat the applique process with the heart using a piece of fabric large enough to cover the placement line.
STEP 7 Embroider the crosses.
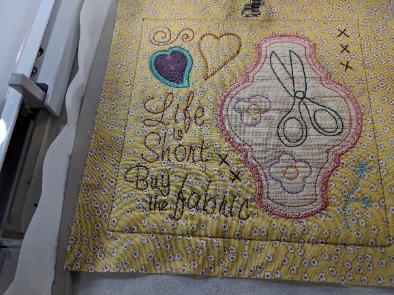
STEP 8 Embroider the scissors.
STEP 9 Embroider the triple stitch inside the shape.
STEP 10 Embroider the satin stitch and then blanket stitch around the shape.
STEP 11 Embroider the satin stitch around the heart.
STEP 12 Embroider the stem stitch heart.
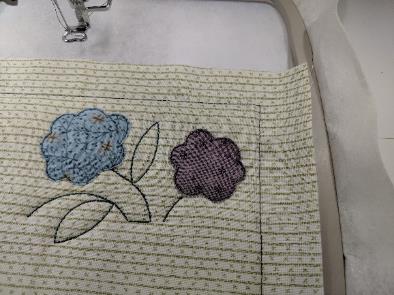
STEP 13 Embroider the two flowers.
STEP 14 Embroider the insides of the flowers.
STEP 15 Embroider the flower in the corner.
STEP 16 Embroider the swirl in the corner and the words ‘Life is Short’.
STEP 17 Embroider the words ‘Buy the Fabric’.
Remove your work from the hoop.
Trim the batting out of the seams if you skipped STEP 1.
Trim the seams to about ½ an inch.
HOW TO MAKE BLOCK 2 The first step, which is sewing the batting down and trimming it, is optional. It is so no batting is in the seam, making the blocks easier to join. If you prefer the batting in the seam just skip STEP 1 and proceed straight to STEP 2.
STEPS 1 & 2 Repeat the STEPS 1 & 2 on Block 1.
STEP 3 Stitch the placement line for birds’ body.
STEP 4 Cut a piece of fabric large enough to cover the placement line and place it on top of the hoop right side up covering the placement line. Stitch down.
Remove the hoop from your machine and trim the fabric about 1-2mm from the stitching.
STEPS 5 & 6 Repeat the applique process with the first tail feather using a piece of fabric large enough to cover the placement line.
STEPS 7 & 8 Repeat the applique process with the second tail feather.
STEPS 9 & 10 Repeat the applique process with the wing.
STEPS 11 & 12 Repeat the applique process with the shape in the corner.
STEP 13 Embroider the two flowers.
STEP 14 Embroider the inside of one of the flowers.
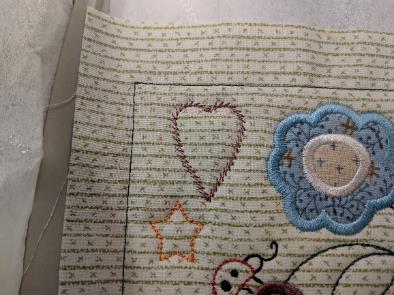
STEP 15 Embroider the star.
STEP 16 Embroider the stem stitch.
STEP 17 Embroider the satin stitch around the first tail feather.
STEP 18 Embroider the satin stitch around the second tail feather.
STEP 19 Embroider the satin stitch around the body.
STEP 20 Embroider the satin stitch around the wing.
STEP 21 Embroider the eye.
STEP 22 Embroider the satin stitch around the shape.
STEP 23 Embroider the cross stitch around the shape.
STEP 24 Embroider the leaves.
Remove your work from the hoop.
Trim the batting out of the seams if you skipped STEP 1.
Trim the seams to about ½ an inch.
HOW TO MAKE BLOCK 3 The first step, which is sewing the batting down and trimming it, is optional. It is so no batting is in the seam, making the blocks easier to join. If you prefer the batting in the seam just skip STEP 1 and proceed straight to STEP 2.
STEPS 1 & 2 Repeat the STEPS 1 & 2 on Block 1.
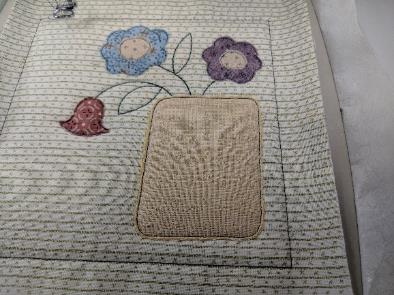
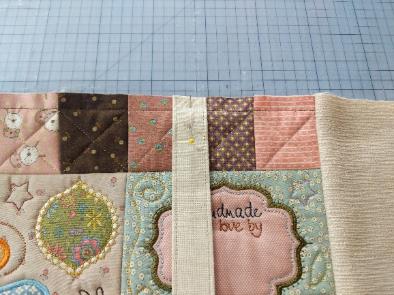
STEP 3 Stitch the placement line for the label.
STEP 4 Cut a piece of fabric large enough to cover the placement line and place it on top of the hoop right side up covering the placement line. Stitch down.
Remove the hoop from your machine and trim the fabric about 1-2mm from the stitching.
STEP 5 Embroider the satin stitch and blanket stitch around the label.
STEP 6 Embroider the triple stitch inside the label.
STEP 7 Embroider the thread.
STEP 8 Embroider the needle.
STEP 9 Embroider the thimble.
STEP 10 Embroider the leaves.
STEP 11 Embroider the flowers.
STEP 12 Embroider the flower insides.
STEP 13 Embroider the words ‘handmade’.
STEP 14 Embroider the words ‘with love by’.
STEP 15 Embroider the star.
Remove your work from the hoop.
Trim the batting out of the seams if you skipped STEP 1.
Trim the seams to about ½ an inch.
HOW TO MAKE BLOCK 4 The first step, which is sewing the batting down and trimming it, is optional. It is so no batting is in the seam, making the blocks easier to join. If you prefer the batting in the seam just skip STEP 1 and proceed straight to STEP 2.
STEPS 1 & 2 Repeat the STEPS 1 & 2 on Block 1.
STEP 3 Stitch the placement line for the scroll shape.
STEP 4 Place fabric B on top of the hoop right side up covering the placement line. Stitch down.
Remove the hoop from your machine and trim the fabric about 1-2mm from the stitching.
STEPS 5 & 6 Repeat the applique process with the bird using a piece of fabric large enough to cover the placement line.
STEPS 7 & 8 Repeat the applique process with the flower.
STEPS 9 & 10 Repeat the applique process with the centre of the flower.
STEP 11 Embroider the crosses.
STEP 12 Embroider the stem at the bottom of the block.
STEP 13 Embroider the two back tail feathers.
STEP 14 Embroider the main tail feather.
STEP 15 Embroider the butterfly’s body.
STEP 16 Embroider the butterfly’s wings.
STEP 17 Embroider the satin stitch around the scroll shape.
STEP 18 Embroider the satin stitch and wing of the bird.
STEP 19 Embroider the eye.
STEP 20 Embroider the stem.
STEP 21 Embroider the satin stitch around the flower.
STEP 22 Embroider the satin stitch around the centre of the flower.
STEP 23 Embroider the stars.
STEP 24 Embroider the flowers.
STEP 25 Embroider the centre of the flower.
STEP 26 Embroider the word ‘Handmade’.
Remove your work from the hoop.
Trim the batting out of the seams if you skipped STEP 1.
Trim the seams to about ½ an inch.
HOW TO MAKE BLOCK 5 The first step, which is sewing the batting down and trimming it, is optional. It is so no batting is in the seam, making the blocks easier to join. If you prefer the batting in the seam just skip STEP 1 and proceed straight to STEP 2.
STEPS 1 & 2 Repeat the STEPS 1 & 2 on Block 1.
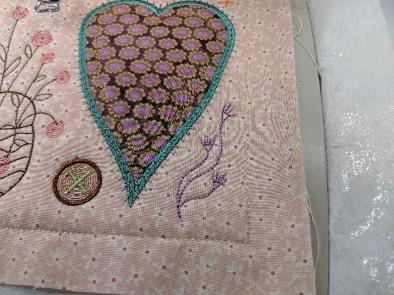
STEP 3 Stitch the placement line for the heart.
STEP 4 Place fabric B on top of the hoop right side up covering the placement line. Stitch down.
Remove the hoop from your machine and trim the fabric about 1-2mm from the stitching.
STEP 5 Embroider the satin stitch and blanket stitch around the heart.
STEP 6 Embroider the triple stitch inside the heart.
STEP 7 Embroider the crosses.
STEP 8 Embroider the basket.
STEP 9 Embroider the stems.
STEP 10 Embroider the flowers.
STEP 11 Embroider the button.
STEP 12 Embroider the thread on the button.
STEP 13 Embroider the flowers in the corners.
STEP 14 Embroider the cross stitch.
STEP 15 Embroider the stem stitch.
Remove your work from the hoop.
Trim the batting out of the seams if you skipped STEP 1.
Trim the seams to about ½ an inch.
HOW TO MAKE BLOCK 6 The first step, which is sewing the batting down and trimming it, is optional. It is so no batting is in the seam, making the blocks easier to join. If you prefer the batting in the seam just skip STEP 1 and proceed straight to STEP 2.
STEPS 1 & 2 Repeat the STEPS 1 & 2 on Block 1.
STEP 3 Embroider the stems.
STEP 4 Stitch the placement line for the first flower.
STEP 5 Cut a piece of fabric large enough to cover the placement line and place it on top of the hoop right side up covering the placement line. Stitch down.
Remove the hoop from your machine and trim the fabric about 1-2mm from the stitching.
STEPS 6 & 7 Repeat the applique process with the second flower using a piece of fabric large enough to cover the placement line.
STEPS 8 & 9 Repeat the applique process with the third flower.
STEPS 10 & 11 Repeat the applique process with the flower centres.
STEPS 12 & 13 Repeat the applique process with the shape in the corner.
STEP 14 Embroider the crosses and star.
STEP 15 Embroider the stamens on the third flower.
STEP 16 Embroider the ends of the stamens.
STEP 17 Embroider the satin stitch around the centres of the flowers.
STEP 18 Embroider the satin stitch around the third flower.
STEP 19 Embroider the satin stitch around the first flower.
STEP 20 Embroider the satin stitch around the last flower.
STEP 21 Embroider the legs, face and spots on the ladybug
STEP 22 Embroider the body of the ladybug
STEP 23 Embroider the satin stitch around the shape.
STEP 24 Embroider the words ‘Live, Love, Laugh’.
STEP 25 Embroider the stem stitch heart.
Remove your work from the hoop.
Trim the batting out of the seams if you skipped STEP 1.
Trim the seams to about ½ an inch.
The first step, which is sewing the batting down and trimming it, is optional. It is so no batting is in the seam, making the blocks easier to join. If you prefer the batting in the seam just skip STEP 1 and proceed straight to STEP 2. STEPS 1 & 2 Repeat the STEPS 1 & 2 on Block 1.
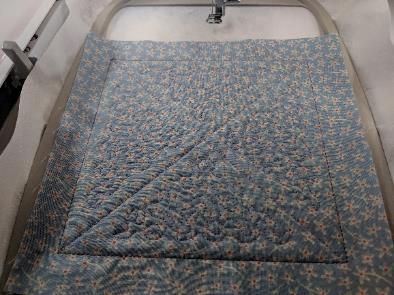
STEP 3 Embroider the quilting.
Remove your work from the hoop.
Trim the batting out of the seams if you skipped STEP 1.
Trim the seams to about ½ an inch.
Hoop cutaway stabiliser in the hoop depending on which size you are sewing. Note: The 4x4 size only makes one block per hooping. You will need to make 6 blocks which will be 6 hoopings for the 4x4. The other sizes will only require 3 hoopings. The first step, which is sewing the batting down and trimming it, is optional. It is so no batting is in the seam, making the blocks easier to join. If you prefer the batting in the seam just skip STEP 1 and proceed straight to STEP 2.
Place batting 1 on top of the hoop.
STEP 1 Stitch the batting down.
Remove the hoop from your machine and trim the batting about 1-2mm from the stitching.
STEP 2 Stitch the placement line for the first background piece starting on the top block.
STEP 3 Place fabric A on top of the hoop right side up covering the placement line. Stitch down.
Remove the hoop from your machine and trim the fabric about 1-2mm from the stitching. Don’t trim the fabric in the seams.
STEP 4 Using the right stitch line on Fabric A as a placement line, place Fabric B on top of the hoop wrong side up with ¼” crossing over the placement line and the excess pointing towards the left side of the hoop. Stitch down.
STEP 5 Fold over and stitch down. Trim leaving excess fabric in the seams.
STEPS 6 & 7 Repeat the same process with fabric C. Remember not to trim the fabric in the seams.
STEPS 8 - 13 Repeat STEPS 2 - 7 for the block at the bottom. The bottom block is not included in the 4x4 size (STEP 8 will be the last step for the 4x4 design).
Tape in between the two border blocks.
STEP 14 Embroider the quilting on both border blocks.
Remove your work from the hoop.
Trim the batting out of the seams if you skipped STEP 1. Trim the seams to about ½ an inch.
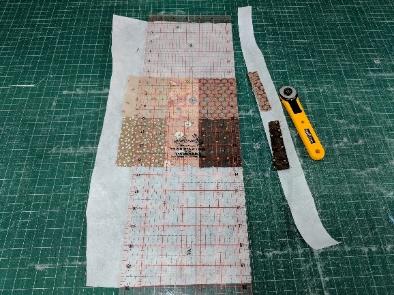
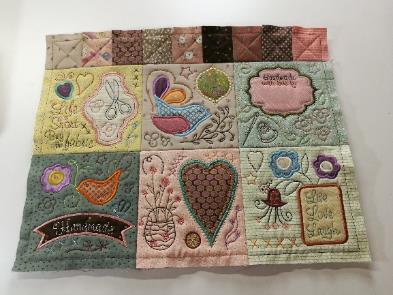
JOIN THE BLOCKS
On your workspace, have your blocks in the layout that you want. 6 blocks and 3 border blocks for the front of the bag and 6 blocks and 3 border blocks for the back of the bag.
Start by sewing the blocks for the front of the bag together.
Join the blocks in rows.
Place the first two panels right sides together (we started joining the border row first). Pin and sew a half inch seam, sewing just inside the border lines already on the panels.
Open the seams and iron them flat.
Then continue joining the other blocks in that row together.
Repeat the same process for the second & third row of the front of the bag.
Next join the horizontal rows to each other by placing right sides together.
Pin and stitch the seam on your sewing machine. Stitch just inside the border already stitched on the blocks so the stitching will not be seen on the right side later.
Open the seams and iron them flat.
Repeat for the remaining row.
Repeat the above steps for the back of the bag.
CUT THE LINING
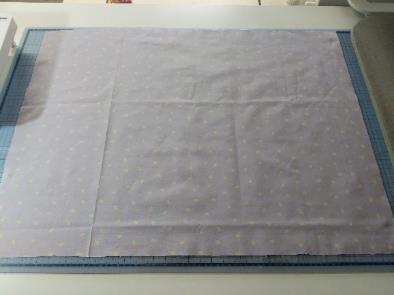
Place Fabric F (front lining) on your table.
Place your sewn front of the bag on top of Fabric F right side together.
Pin together lightly and trim the lining so it matches the shape of your bag.
Unpin & put aside for later.
Repeat the above process for the back lining (using Fabric G) using the back of the tote bag.
These two pieces of fabric will form the lining of the bag. MAKE THE STRAPS
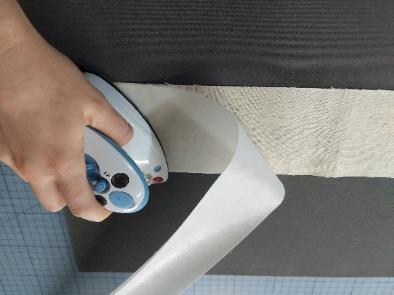
Take out both pieces of Fabric H for the straps. (Iron fusible interfacing on to them – optional)
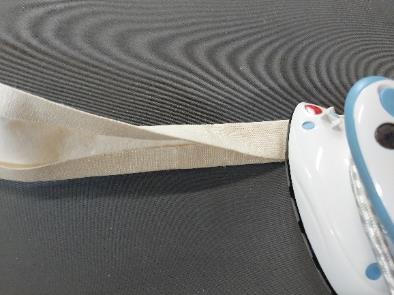
Fold the edges in about 1cm (half an inch) wrong sides together and iron.
Fold in half lengthways and iron.
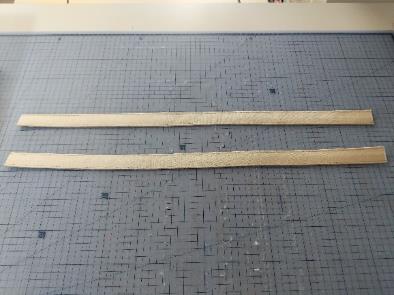
Topstitch the edges together and repeat for the other side if you would like it to look even. Use the same colour bobbin thread.
Make sure both the straps are even and trim them to the desired length.
Place the first strap (folded in half – wrong side up) on top of the front of the bag with the cut edges along the top of the bag and the length of the strap towards the middle of the bag.
Pin and stay stitch in place.
Repeat for the strap on the back of the bag. (Try and place the strap in the same location as the front of the bag).
Handmade from the Heart Tote Bag 4x4 5x5 6x6 instructions FABRIC REQUIREMENTS |
Последнее изменение этой страницы: 2019-03-22; Просмотров: 308; Нарушение авторского права страницы