|
Архитектура Аудит Военная наука Иностранные языки Медицина Металлургия Метрология Образование Политология Производство Психология Стандартизация Технологии |
|
|
Архитектура Аудит Военная наука Иностранные языки Медицина Металлургия Метрология Образование Политология Производство Психология Стандартизация Технологии |
Sorting on Numeric ValuesСтр 1 из 3Следующая ⇒
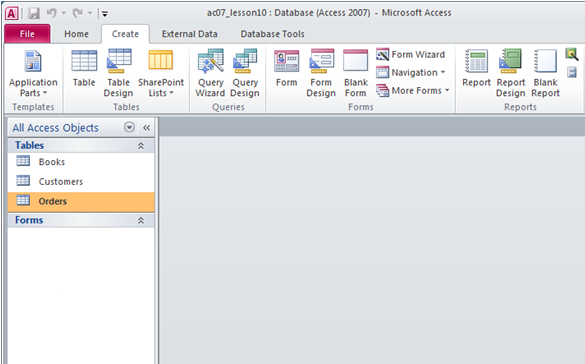
Create a Blank Database
A blank database is a database with nothing in it. You must create all the tables, forms, reports, queries, and so on. If you cannot find a template that suits your needs, create a blank database. After you create the database, Access opens to a datasheet and makes available the tools you need to create objects. Creating tables is the first step in building a database. You will learn more about creating tables in the next lesson. To create a blank database:
1. Start Access. 2. Click Blank Database. 3. Type the name you want to give your database in the File Name field. Access will automatically append .accdb to the name. 4. Click the Browse button. The File New Database window appears. 5. Locate the folder in which you want to store your database. Note that the name of the file appears in the File Name field. 6. Click OK. 7. Click the Create button. Access creates the database and opens a datasheet with the Table Tools available to you.
Note the Table Tools in the upper-right portion of the Ribbon.
To add fields to a table: 1. Right-click the ID column label. A menu appears. 2. Click Rename Column. 3. Type the field name Customer ID. 4. Press Enter. 5. Right-click the Add New Field column label. A menu appears. 6. Choose number format, which you will use. Text! 7. Rename Field 1 to First Name. 8. Press Enter. Access creates the field. 9. Type the next field name. Access creates the field. Continue until you have created all of the fields in your table. 10. Create this table (you can copy data of table)
Name and Save a Table After you create a table, you must name and save it. To name and save a table:
1. Click the Save button on the Quick Access toolbar. The Save As dialog box appears. 2. Type the name Customers. 3. Click OK. Access names your table.
To use Design view to create a new table:
1. Activate the Create tab. 2. Click Table Design in the Tables group. Access changes to Design view and the Table Tools become available.
1. Type the first field name in the Field Name field. 2. Press the Tab key. 3. Click the down-arrow that appears when you click in the Data Type field and then select a data type. 4. Click Primary Key if the column you created is a primary key. A small key appears next to the field name. 5. Press the Tab key. 6. Type a description. The description is optional. 7. Press the Tab key. Access moves to the Field Name field. 8. Repeat steps 3 through 10 until you have created all of your fields.
You can use Design view to create or modify a table. After you finish the task, you must save the table by clicking the Save button on the Quick Access toolbar. 1. Click the Save button on the Quick Access toolbar. Access saves the table unless you are saving for the first time. If you are saving for the first time, the Save As dialog box appears. 2. Type the name Books 3. Click OK. Access saves the table. You can now access the table by using the Navigation pane. 3. Activate the Table Design tab. 4. Click on View. Choose Datasheet view 5. Copy all information from this table
Sorting on Text Values
When Access 2007 sorts on a text value, it offers the two options described in the table below: Sort Option Also Called Description A to Z Ascending Values closest to A are displayed first Z to A Descending Values closest to Z are displayed first
To Sort Based on a Text Value
To sort based on a text value: 1. Click the drop down arrow at the top of the field you wish to sort.
2. When the menu appears, select either the Sort A to Z or the Z to A option. · With A to Z, the records will be sorted based on the chosen field's value with the value closest to A at the top of the table, as seen below.
Records Sorted A to Z on Category
· With Z to A, the records will be sorted the using the chosen field's value with the value closest to Z at the top of the table.
Sorting on Numeric Values
Access 2007 also offers the two options when sorting based on a numeric value. These options are described in the table below: Sort Option Also Called Description Smallest to Largest Ascending Values closest to 1 are displayed first Largest to Smallest Descending Values furthest from 1 are displayed first
To Sort Based on a Numeric Value
To sort based on a number value: 1. Click the drop down arrow at the top of the field you wish to sort.
Sorting Largest to Smallest
2. When the menu appears, select either the Lowest to Highest or the Largest to Smallest option. · With Smallest to Largest, records will be sorted based on the chosen field's value with the value closest to 1 at the top of the table. · With Highest to Lowest, records will be sorted the using the chosen field's value with the value furthest from 1 at the top of the table, as seen below.
Records Sorted Largest to Smallest on Price
To Clear a Sort To clear your sort: · Click the Clear Sort command in the Sort & Filter group on the Ribbon.
Clear All Sorts Command
4. Activate the Create tab. 5. Click Table Design in the Tables group. Access changes to Design view and the Table Tools become available.
9. Type the first field name in the Field Name field. 10. Press the Tab key. 11. Click the down-arrow that appears when you click in the Data Type field and then select a data type. 12. Press the Tab key. 13. Don’t type a description. 14. Click Primary Key if the column you created is a primary key. A small key appears next to the field name. 15. Press the Tab key. Access moves to the Field Name field. Type Customer ID 16. Press the Tab key. 17. Click the down-arrow that appears when you click in the Data Type field and then select Lookup Wizard. This data type helps you to add some data from other table.

18. Choose I want the lookup field to get the values from another table or query. Click Next.

19. Select the table Customers, because you take the field Customer ID from this table and click Next

20. Select field Customer ID.
23. Chose Customer ID and click Next. 24. If you do all right, you can see this dialog box, click next. 25. Select Enable Data Integrity for connection of tables and click Finish.

26. Create Field Book ID using this method data type must be Lookup wizard 27. Data type of Order date is Date/Time
You can use Design view to create or modify a table. After you finish the task, you must save the table by clicking the Save button on the Quick Access toolbar. 6. Click the Save button on the Quick Access toolbar. Access saves the table unless you are saving for the first time. If you are saving for the first time, the Save As dialog box appears. 7. Type the name Order 8. Click OK. Access saves the table. You can now access the table by using the Navigation pane. 6. Activate the Table Designtab. 9. Click on View. Choose Datasheet view 10. Fill in this table
Close all tables and forms. (Right-click on the tab of any Object. A menu appears. Click Close All.)
11. Activate the Database Tools tab. 12. Click the Relationships button in the Show/Hide group. The Relationships window appears. 13. So looks like a relationship between tables
14. Close this Relationships window. Creating Forms Access forms are much like paper forms: you can use them to enter, edit, or display data. They are based on tables. When using a form, you can choose the format, the arrangement, and which fields you want to display. This lesson teaches you how to create forms. Using the Form Button Access can automatically create several types of forms. For example, when you click the Form button on the Create tab, Access places all fields in the selected table on a form. If the table has a one-to-many relationship with one other table or query, Access creates a stacked form (the records are displayed in a column) for the primary table and a datasheet for the related table. If there are several tables with a one-to-many relationship, Access does not create the datasheet. To create a form:


You can use the Navigation bars to move through the records on a form.
To save a form:
You can also save by right-clicking a form’s tab and then selecting Save from the menu that appears. Access saves the form unless you are saving for the first time. If you are saving for the first time, the Save As dialog box appears. Type the name you want to give the form and then click OK. Access saves the form. You can now access the form by using the Navigation pane. Create a Split Form A split form is a form in which the same data is displayed in two views simultaneously. One part of the form displays in Form view (stacked fields), while the other part displays in Datasheet view. The two views are synchronized, so as you select a field in one view, it is automatically selected in the other view. You can add, change, or delete the data in either view. Using a split form gives you the benefits of two types of forms in a single form. For example, you can use the datasheet portion to locate records and the form portion to edit records. To create a split form:

To change the view:
To change a form title: When you create a form, by default, Access uses the form name as the title. You can change the title.
To add the date and time: You can easily add the date and time to your form.
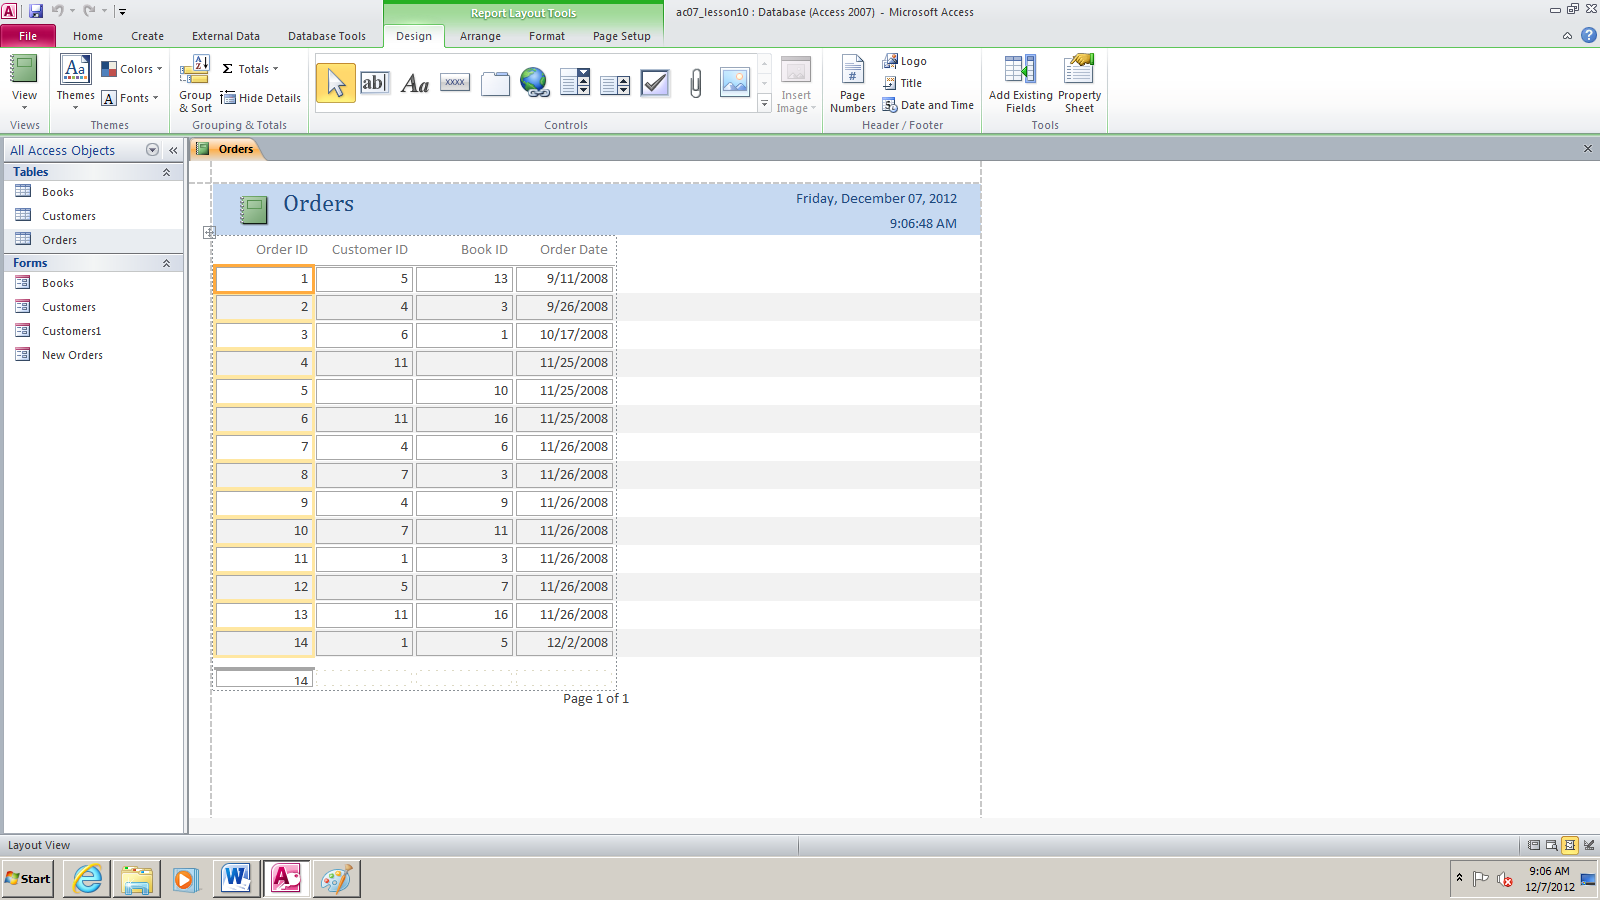
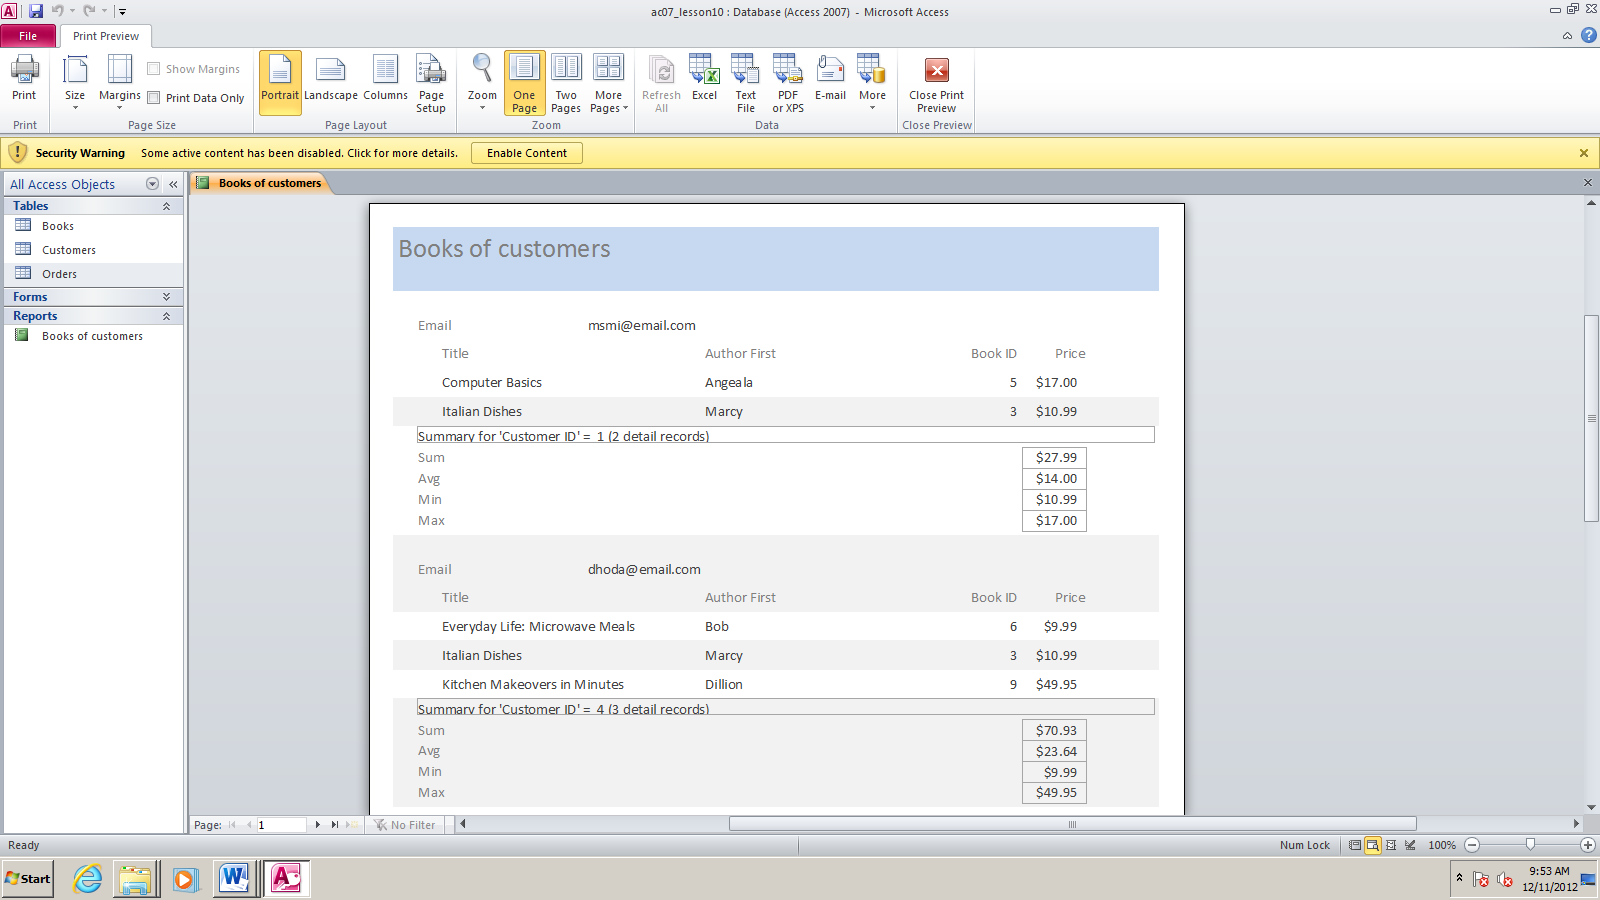
Creating Reports Reports organize and summarize data for viewing online or for printing. A detail report displays all of the selected records. You can include summary data such as totals, counts, and percentages in a detail report. A summary report does not list the selected records but instead summarizes the data and presents totals, counts, percentages, or other summary data only. Access has several report generation tools that you can use to create both detail and summary reports quickly. This lesson teaches you how to create reports. Use the Report Button The Report button creates a simple report that lists the records in the selected table or query in a columnar format. To use the Report button:
As with other objects, you can also save a report by right-clicking the reports tab and selecting Save. Saved reports appear in the Navigation pane.
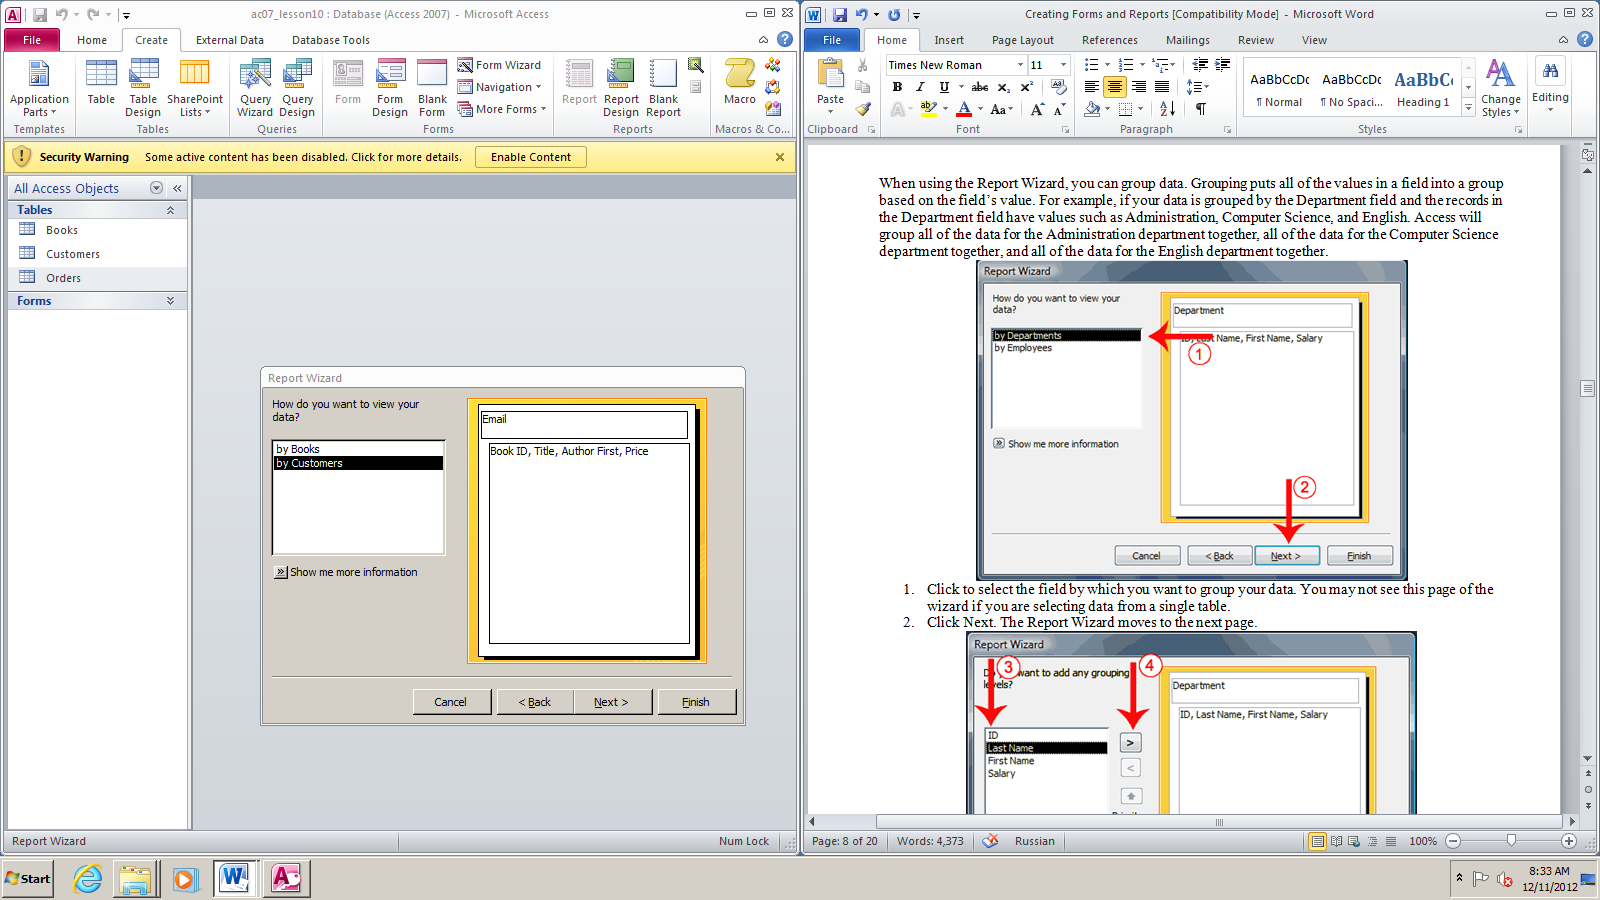
Use the Report Wizard You can also use the Report Wizard to create a report. The Report Wizard provides you with more flexibility than you get by using the Report button. You can choose the tables and fields, group the data, sort the data, summarize the data, choose a layout and orientation, apply a style, and title your report. Follow the steps shown here to create a report by using the Report Wizard: Open the Report Wizard
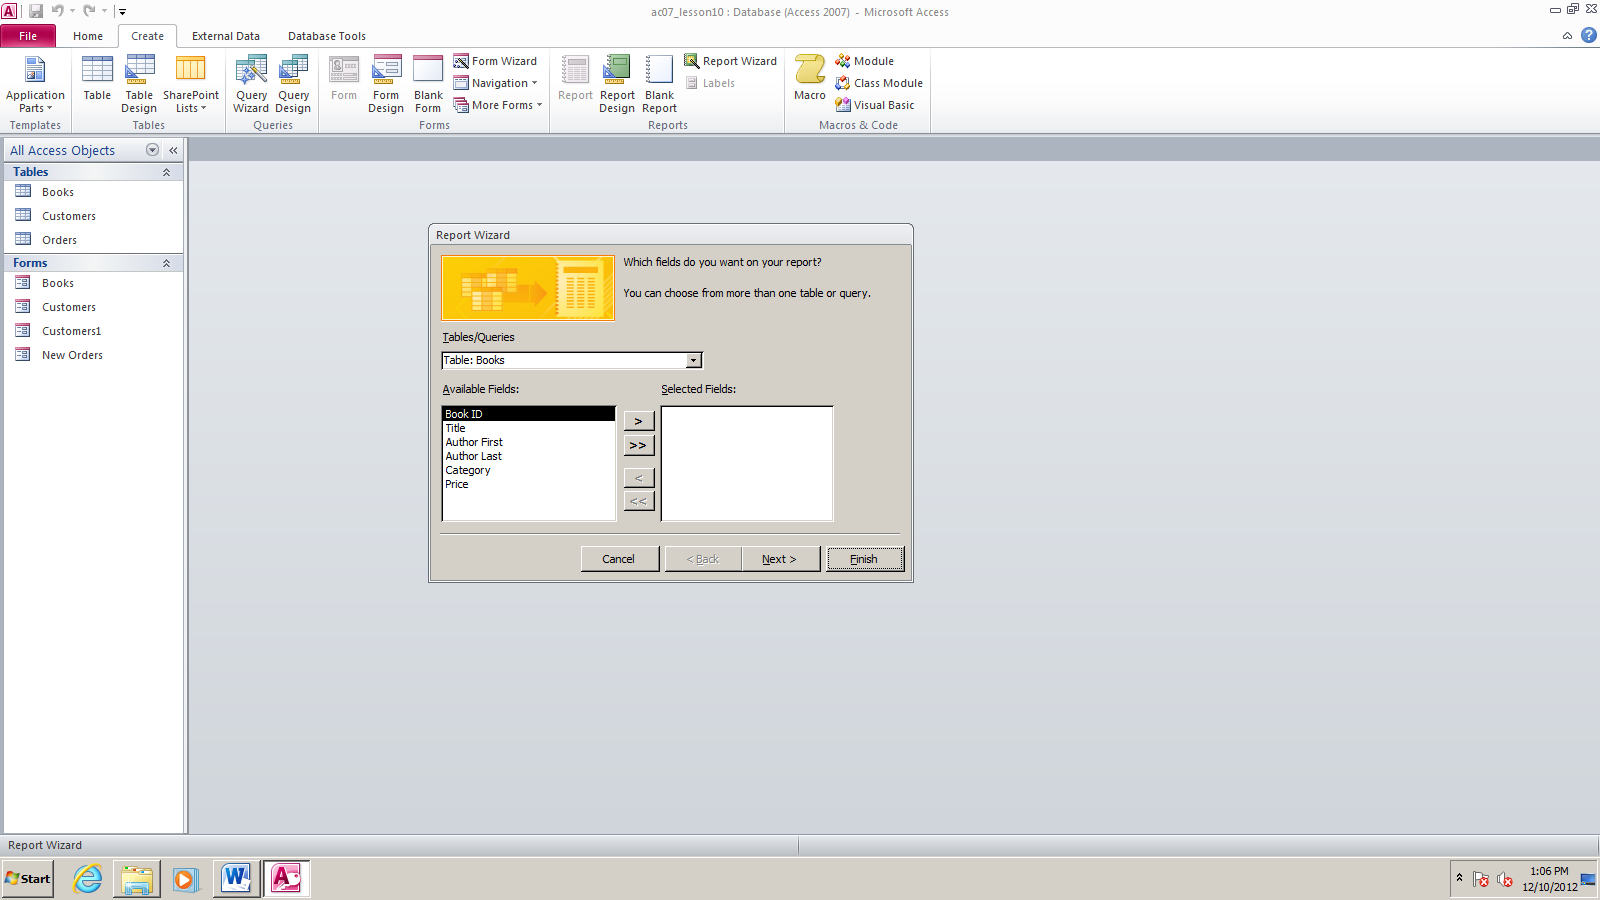
30. Click the down-arrow next to the Table/Queries field and then click the table from which you want to select fields.
When using the Report Wizard, you can group data. Grouping puts all of the values in a field into a group based on the field’s value. For example, if your data is grouped by the Department field and the records in the Department field have values such as Administration, Computer Science, and English. Access will group all of the data for the Administration department together, all of the data for the Computer Science department together, and all of the data for the English department together.

Sort and summarize By using the Report Wizard, you can create up to four levels of sort. Access sorts the first level, and then sorts the second level within that sort, and so on. If you have grouped your data, you can summarize it by displaying the sum, average, and minimum or maximum value for each numeric field. You can choose to have your report display just the summary data or each detail line and the summary data. There is also an option that allows you to display the percent the sum of each group is of the grand total. All of the fields in your report may not fit on a single page. You can have Access automatically adjust the size of the font so that every field fits.


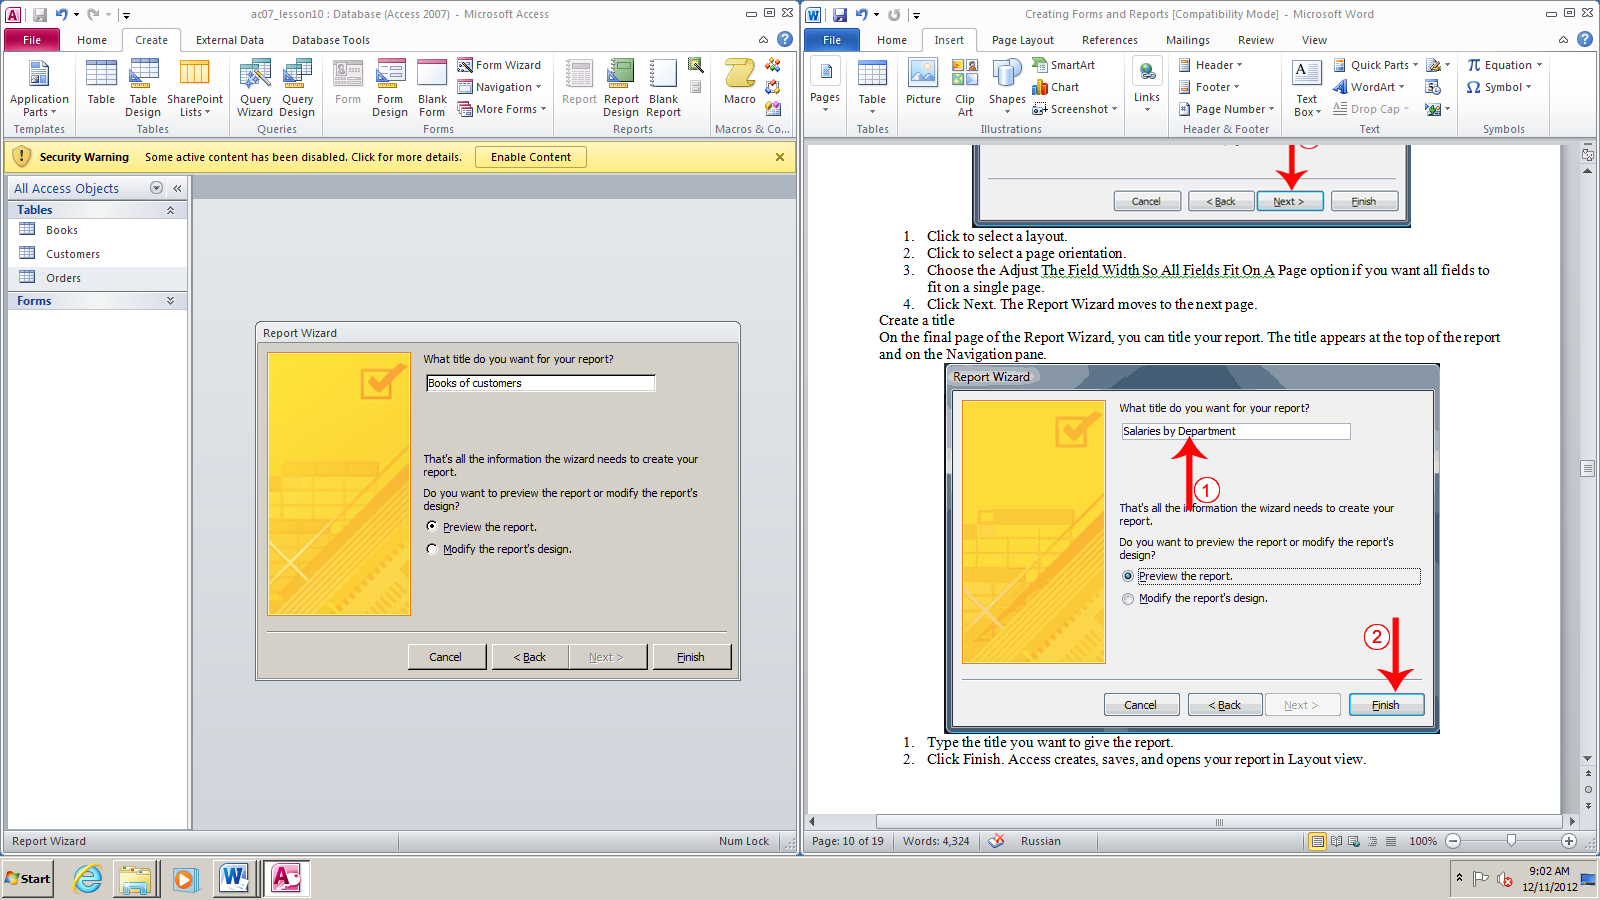
Layout and orientation You can choose the layout and orientation of your report. The layout determines where each field appears on the page. Access provides three options to choose from: Stepped, Block, and Outline. When you choose an option, the left side of the window displays a graphic of the layout. Orientation determines whether Access creates the report in portrait or landscape. Most paper, such as paper sized 8 1/2 by 11, is longer on one edge than it is on the other. If you print in Portrait, the shortest edge of the paper becomes the top of the page. Portrait is the default option. If you print Landscape, the longest edge of the paper becomes the top of the page.
Create a title On the final page of the Report Wizard, you can title your report. The title appears at the top of the report and on the Navigation pane.
Modify a Report After you create a report, you can modify it. You can add groups or sorts, add fields, change labels, and perform many other tasks. You can view a report in Report view, Layout view, Design view, and Print Preview. You can modify a report in Layout view or Design view. In Layout view, you can see your data, and the report you see closely resembles how your report will look when you print it. You can make most, but not all, changes to your report in Layout view. Design view displays the structure of your report. In this view you cannot see the underlying data, but you can perform some tasks in Design view that you cannot perform in Layout view. This tutorial focuses on Layout view. To change to Layout view:
Add a Group or Sort When you create a report by clicking the Report button, you are not given options that enable you to group or sort. You can use the Group & Sort button on the Format tab to create a group or sort. When you create a report by using the Report Wizard, you can use the Group & Sort button to add or modify a group or sort. To Group or Sort: Add a group
Add a sort
Groups and sorts display in the Group, Sort, and Total pane in levels. Access performs the highest-level group or sort first, the second level next, and so on.
After you have added a group or sort, you can set several options by clicking the More button and then clicking the down-arrow next to each option and making your choices.
There are three buttons on the right side of the Group, Sort, and Total pane. If you want to delete a group or sort, click the group or sort you want to delete and then click the Delete button. Groups and sorts execute in the order they are listed in the Group, Sort, and Total pane. If you want to change the order of execution, click the group or sort you want to move up or down and then click the Move Up or Move Down button to move a group or sort up or down a level. To add a field :
To delete a field :
To move a column :
To change a title :
To change a field label :
To change the paper size :
To change paper orientation :
To change margins :
To add page numbers :
To add current date or time :
Apply an AutoFormat You can use the AutoFormat option on the Format tab to apply formats such as background colors, fonts, and font sizes quickly. To apply an AutoFormat:
Create Mailing Labels In Access, the easiest way to create a mailing label is to use the Label Wizard. The Label Wizard extracts name and address data from your database and formats it so you can print it on commercially available labels. Each time you view or print labels, the data are extracted from the database, so as you update your database, Access updates your labels. To create labels: Open the Labels Wizard
Choose a product number Most commercially available labels have a product number. You should be able to find the number on the box. You use the product number to tell Access the dimensions of your labels and the number of columns and rows that are on a page.
Create a layout You create the layout of your labels by selecting fields and placing them in the Prototype Label box. You type any text or spaces that you want to appear on your label.
Sort When creating labels, you can sort on any field and you can have multiple levels of sort. For example, you can sort by last name and then by first name.
Title the report
Create a Blank Database
A blank database is a database with nothing in it. You must create all the tables, forms, reports, queries, and so on. If you cannot find a template that suits your needs, create a blank database. After you create the database, Access opens to a datasheet and makes available the tools you need to create objects. Creating tables is the first step in building a database. You will learn more about creating tables in the next lesson. To create a blank database:
1. Start Access. 2. Click Blank Database. 3. Type the name you want to give your database in the File Name field. Access will automatically append .accdb to the name. 4. Click the Browse button. The File New Database window appears. 5. Locate the folder in which you want to store your database. Note that the name of the file appears in the File Name field. 6. Click OK. 7. Click the Create button. Access creates the database and opens a datasheet with the Table Tools available to you.
Note the Table Tools in the upper-right portion of the Ribbon.
To add fields to a table: 1. Right-click the ID column label. A menu appears. 2. Click Rename Column. 3. Type the field name Customer ID. 4. Press Enter. 5. Right-click the Add New Field column label. A menu appears. 6. Choose number format, which you will use. Text! 7. Rename Field 1 to First Name. 8. Press Enter. Access creates the field. 9. Type the next field name. Access creates the field. Continue until you have created all of the fields in your table. 10. Create this table (you can copy data of table)
Name and Save a Table After you create a table, you must name and save it. To name and save a table:
1. Click the Save button on the Quick Access toolbar. The Save As dialog box appears. 2. Type the name Customers. 3. Click OK. Access names your table.
To use Design view to create a new table:
1. Activate the Create tab. 2. Click Table Design in the Tables group. Access changes to Design view and the Table Tools become available.
1. Type the first field name in the Field Name field. 2. Press the Tab key. 3. Click the down-arrow that appears when you click in the Data Type field and then select a data type. 4. Click Primary Key if the column you created is a primary key. A small key appears next to the field name. 5. Press the Tab key. 6. Type a description. The description is optional. 7. Press the Tab key. Access moves to the Field Name field. 8. Repeat steps 3 through 10 until you have created all of your fields.
You can use Design view to create or modify a table. After you finish the task, you must save the table by clicking the Save button on the Quick Access toolbar. 1. Click the Save button on the Quick Access toolbar. Access saves the table unless you are saving for the first time. If you are saving for the first time, the Save As dialog box appears. 2. Type the name Books 3. Click OK. Access saves the table. You can now access the table by using the Navigation pane. 3. Activate the Table Design tab. 4. Click on View. Choose Datasheet view 5. Copy all information from this table
Sorting on Text Values
When Access 2007 sorts on a text value, it offers the two options described in the table below: Sort Option Also Called Description A to Z Ascending Values closest to A are displayed first Z to A Descending Values closest to Z are displayed first
To Sort Based on a Text Value
To sort based on a text value: 1. Click the drop down arrow at the top of the field you wish to sort.
2. When the menu appears, select either the Sort A to Z or the Z to A option. · With A to Z, the records will be sorted based on the chosen field's value with the value closest to A at the top of the table, as seen below.
Records Sorted A to Z on Category
· With Z to A, the records will be sorted the using the chosen field's value with the value closest to Z at the top of the table.
Sorting on Numeric Values
Access 2007 also offers the two options when sorting based on a numeric value. These options are described in the table below: Sort Option Also Called Description Smallest to Largest Ascending Values closest to 1 are displayed first Largest to Smallest Descending Values furthest from 1 are displayed first
To Sort Based on a Numeric Value
To sort based on a number value: 1. Click the drop down arrow at the top of the field you wish to sort.
Sorting Largest to Smallest
2. When the menu appears, select either the Lowest to Highest or the Largest to Smallest option. · With Smallest to Largest, records will be sorted based on the chosen field's value with the value closest to 1 at the top of the table. · With Highest to Lowest, records will be sorted the using the chosen field's value with the value furthest from 1 at the top of the table, as seen below.
Records Sorted Largest to Smallest on Price
To Clear a Sort To clear your sort: · Click the Clear Sort command in the Sort & Filter group on the Ribbon.
Clear All Sorts Command
4. Activate the Create tab. 5. Click Table Design in the Tables group. Access changes to Design view and the Table Tools become available.
9. Type the first field name in the Field Name field. 10. Press the Tab key. 11. Click the down-arrow that appears when you click in the Data Type field and then select a data type. 12. Press the Tab key. 13. Don’t type a description. 14. Click Primary Key if the column you created is a primary key. A small key appears next to the field name. 15. Press the Tab key. Access moves to the Field Name field. Type Customer ID 16. Press the Tab key. 17. Click the down-arrow that appears when you click in the Data Type field and then select Lookup Wizard. This data type helps you to add some data from other table.
18. Choose I want the lookup field to get the values from another table or query. Click Next.
19. Select the table Customers, because you take the field Customer ID from this table and click Next
20. Select field Customer ID.
23. Chose Customer ID and click Next. 24. If you do all right, you can see this dialog box, click next. 25. Select Enable Data Integrity for connection of tables and click Finish.
26. Create Field Book ID using this method data type must be Lookup wizard 27. Data type of Order date is Date/Time
You can use Design view to create or modify a table. After you finish the task, you must save the table by clicking the Save button on the Quick Access toolbar. 6. Click the Save button on the Quick Access toolbar. Access saves the table unless you are saving for the first time. If you are saving for the first time, the Save As dialog box appears. 7. Type the name Order 8. Click OK. Access saves the table. You can now access the table by using the Navigation pane. 6. Activate the Table Designtab. 9. Click on View. Choose Datasheet view 10. Fill in this table
Close all tables and forms. (Right-click on the tab of any Object. A menu appears. Click Close All.)
11. Activate the Database Tools tab. 12. Click the Relationships button in the Show/Hide group. The Relationships window appears. 13. So looks like a relationship between tables
14. Close this Relationships window. Creating Forms Access forms are much like paper forms: you can use them to enter, edit, or display data. They are based on tables. When using a form, you can choose the format, the arrangement, and which fields you want to display. This lesson teaches you how to create forms. Using the Form Button Access can automatically create several types of forms. For example, when you click the Form button on the Create tab, Access places all fields in the selected table on a form. If the table has a one-to-many relationship with one other table or query, Access creates a stacked form (the records are displayed in a column) for the primary table and a datasheet for the related table. If there are several tables with a one-to-many relationship, Access does not create the datasheet. To create a form:
You can use the Navigation bars to move through the records on a form.
To save a form:
You can also save by right-clicking a form’s tab and then selecting Save from the menu that appears. Access saves the form unless you are saving for the first time. If you are saving for the first time, the Save As dialog box appears. Type the name you want to give the form and then click OK. Access saves the form. You can now access the form by using the Navigation pane. Create a Split Form A split form is a form in which the same data is displayed in two views simultaneously. One part of the form displays in Form view (stacked fields), while the other part displays in Datasheet view. The two views are synchronized, so as you select a field in one view, it is automatically selected in the other view. You can add, change, or delete the data in either view. Using a split form gives you the benefits of two types of forms in a single form. For example, you can use the datasheet portion to locate records and the form portion to edit records. To create a split form:
|
|||||||||||||||||||||||||||||||||||||||||||||||||||||||||||||||||||||||||||||||||||||||||||||||||||||||||||||||||||||||||||||||||||||||||||||||||||||||||||||||||||||||||||||||||||||||||||||||||||||||||||||||||||||||||||||||||||||||||||||||||||||||||||||||||||||||||||||||||||||||||||||||||||||||||||||||||||||||||||||||||||||||||||||||||||||||||||||||||||||||||||||||||||||||||||||||||||||||||||||||||||||||||||||||||||||||||||||||||||||||||||||||||||||||||||||||||||||||||||||||||||||||||||||||||||||||||||||||||||||||||||||||||||||||||||||||||||||||||||||
Последнее изменение этой страницы: 2019-03-31; Просмотров: 293; Нарушение авторского права страницы


 Tip: If you want every record in a field to be unique, check the Unique box on the Datasheet tab in the Data Type & Formatting group. If you do not want the user to leave a field blank, check the Is Required box.


 Tip: After you create a form, you can save it. You can open a saved form at any time.


 in the Controls group. The Date and Time dialog box appears.