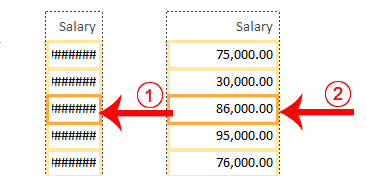
Change the Size of a Field or Label
If the data in a field or label seems crowded, if some of the data in the field or label does not appear, or if the data appears as pound signs (####), the field or label is too small.
To change the size of a field or label:
- Click the field or label. A border appears around it.
- Click a side of the border and drag outward to increase the width. Click a side of the border and drag inward to decrease the width.
 Tip: Incidentally, if you want to change the height of records, click the top or bottom of a field border and drag upward or downward.
Add a Group or Sort
When you create a report by clicking the Report button, you are not given options that enable you to group or sort. You can use the Group & Sort button on the Format tab to create a group or sort. When you create a report by using the Report Wizard, you can use the Group & Sort button to add or modify a group or sort.
To Group or Sort:
Open the Group, Sort, and Total pane
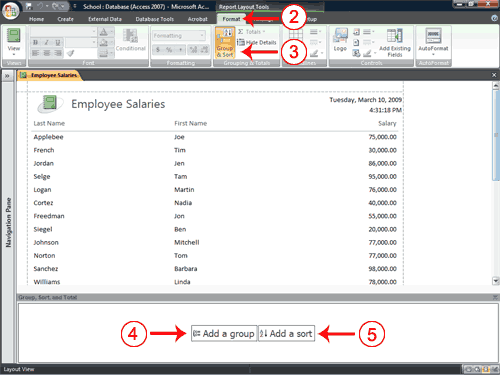
- Open your report in Layout view.
- Activate the Format tab.
- Click Group & Sort in the Grouping and Totals group. The Group, Sort, and Total pane appears.
Add a group
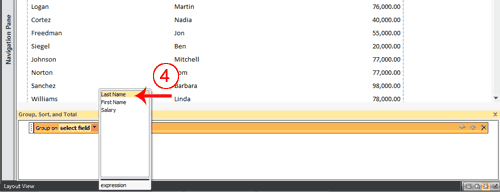
- Click Add A Group and then select the field by which you want to group. Access groups and sorts the field.
Add a sort
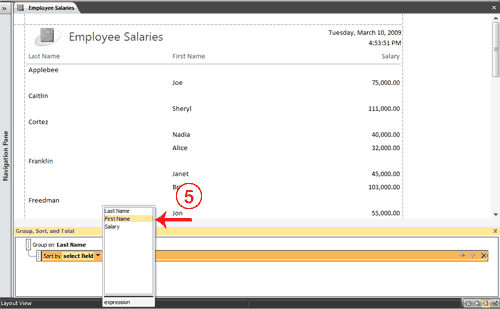
- Click Add A Sort and then select the field on which you want to sort. Access sorts the field.
Groups and sorts display in the Group, Sort, and Total pane in levels. Access performs the highest-level group or sort first, the second level next, and so on.


After you have added a group or sort, you can set several options by clicking the More button and then clicking the down-arrow next to each option and making your choices.
| Group, Sort, and Total Pane Options
|
| Option
| Description
|
| Sort order With A on top From smallest to largest From oldest to newest
| Use these options to choose from ascending or descending order.
|
| Group interval
| Set how you want to group. For example, if you want to group by the first letter of the last name so that all As are together, all Bs are together. etc., you can select By First Character.
|
| Totals
| Select the field you want to total on and the type of total you want. Your total can be a sum, average, count, etc. You can also choose whether you want to show a grand total, totals as a percentage of a grand total, display totals in the header, or display totals in the footer.
|
| Title
| Allows you to add or change the field label.
|
| With or without a header section
| Group headers precede each group. This option allows you to determine whether you want a header section.
|
| With or without a footer section
| Group footers are printed at the bottom of each group. This option allows you to determine whether you want a footer section.
|
| Keep group together
| Use these options to determine where a page break will occur when you print: Do not keep group together on one page. This option allows page breaks within a group. Keep whole group together on one page. This option prevents page breaks within a group. Keep header and first record together on one page. This option prevents a header from printing at the bottom of a page with no records.
|
There are three buttons on the right side of the Group, Sort, and Total pane. If you want to delete a group or sort, click the group or sort you want to delete and then click the Delete button. Groups and sorts execute in the order they are listed in the Group, Sort, and Total pane. If you want to change the order of execution, click the group or sort you want to move up or down and then click the Move Up or Move Down button to move a group or sort up or down a level.
To add a field :
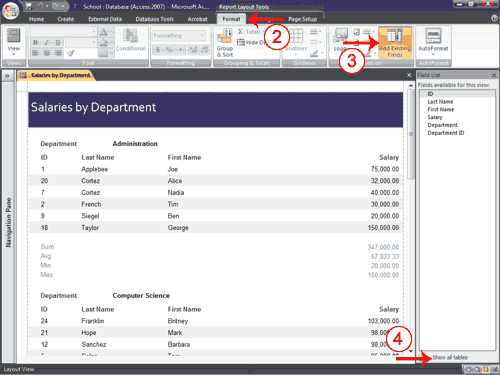
- Open your report in Layout view.
- Activate the Format tab.
- Click the Add Existing Fields button in the Controls group. The Field List pane appears.
- Click Show All Tables if the field you want to add does not appear.
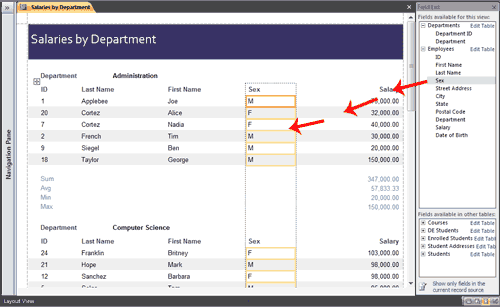
- Click the field you want to add and drag it onto your report. A thick line appears on the report. Access places the field before the line. If you want the field to appear in the detail area, be sure to drag it to the detail area.
To delete a field :
- Open your report in Layout view.
- Click the field you want to delete.
- Press the Delete key. Access deletes the field.
To move a column :
- Open your report in Layout view.
- Click the column label.
- Drag the column to the new location. Access moves the column to the new location.
To change a title :
- Open your report in Layout view.
- Double-click in the Title field.
- Click and drag to select the current title.
- Type a new title.
- Click anywhere outside the Title field. Access changes the title.
To change a field label :
- Open your report in Layout view.
- Double-click the field label.
- Click and drag to select the label name.
- Type the new label name.
- Click anywhere outside the label. Access changes the field label.
To change the paper size :
- Open your report in Layout view.
- Activate the Page Setup tab.
- Click the Size button in the Page Layout group. A menu appears.
- Click the size of the paper you are going to print on.
To change paper orientation :
- Open your report in Layout view.
- Activate the Page Setup tab.
- Click Portrait or Landscape to choose the orientation you want to use. Access changes the page orientation.
To change margins :
- Open your report in Layout view.
- Activate the Page Setup tab.
- Click the Margins button in the Page Layout group. A menu appears.
- Click the margin size you want. Access changes the page margin.
To add page numbers :
- Open your report in Layout view.
- Activate the Format tab.
- Click the Insert Page Number button in the Controls group. The Page Numbers dialog box appears.
- Click a radio button to choose a format.
- Click a radio button to choose a position.
- Click the down-arrow in the Alignment field and then choose an alignment.
- Deselect Show Number On First Page if you do not want the page number to appear on the first page.
- Click OK. Access places the page number in your report.
To add current date or time :
- Open your report in Layout view.
- Activate the Format tab.
- Click the Date and Time button
 in the Controls group. The Date and Time dialog box appears.
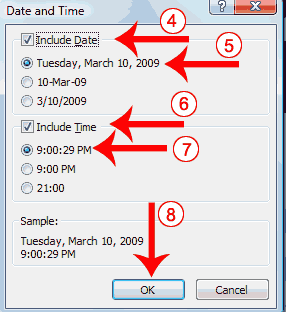
- Deselect the Include Date box if you do not wish to include the date.
- Click to select a format if you are including the date.
- Deselect the Include Time box if you do not wish to include the time.
- Click to select a format if you are including the time.
- Click OK. Access places the date and/or time in your report.
Apply an AutoFormat
You can use the AutoFormat option on the Format tab to apply formats such as background colors, fonts, and font sizes quickly.
To apply an AutoFormat:
- Activate the Format tab.
- Click AutoFormat. The AutoFormat menu appears.
- Click the format you want to apply.
Tip: After you modify your report, you must save it if you want to keep the changes. To save, click the Save button on the Quick Access toolbar or right-click the report’s tab and then click Save.
Create Mailing Labels
In Access, the easiest way to create a mailing label is to use the Label Wizard. The Label Wizard extracts name and address data from your database and formats it so you can print it on commercially available labels.
Each time you view or print labels, the data are extracted from the database, so as you update your database, Access updates your labels.
To create labels:
Open the Labels Wizard
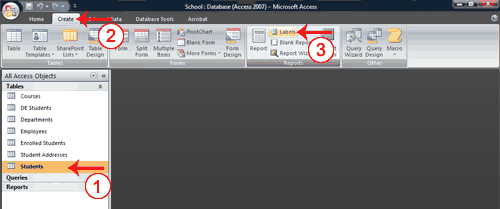
- Click the table or query you want to use to create a label.
- Activate the Create tab.
- Click Labels in the Reports group. The Labels Wizard appears.
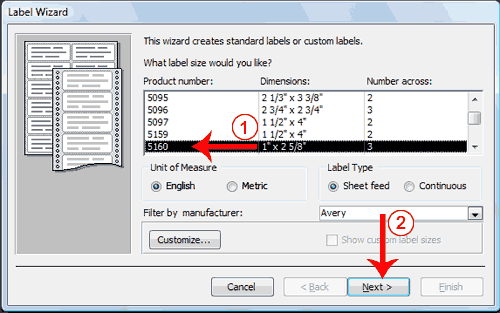
Choose a product number
Most commercially available labels have a product number. You should be able to find the number on the box. You use the product number to tell Access the dimensions of your labels and the number of columns and rows that are on a page.