|
Архитектура Аудит Военная наука Иностранные языки Медицина Металлургия Метрология Образование Политология Производство Психология Стандартизация Технологии |
|
|
Архитектура Аудит Военная наука Иностранные языки Медицина Металлургия Метрология Образование Политология Производство Психология Стандартизация Технологии |
GENERAL PRINCIPLES OF DIAGNOSIS AND TREATMENT
Clinical Examination of Traumatic Patients Special considerations Diagnosis of injuries is made using conventional clinical methods. To verify the diagnosis special investigations are used. History. Delineating the cause of the trauma facilitates diagnosis and prevention of the trauma. The mechanism of the trauma can be deduced from the patient's history, which coupled with the initial impression may help outline the workup (e.g. falling with one's arm outstretched results in a radial fracture in a typical site or a fracture of the humeral head; falling from a height and landing on the buttocks leads to a compression fracture of the lumbar spine, etc.). Inspection. Inspection of the patient and the injured area even without special equipment can be of diagnostic value. It is a must to compare the injured side of the limb with the intact one. In examining the affected organ the three main positions are to be considered: passive, active or forced. Passive position of the whole body suggests a serious injury and is characteristic of an unconscious patient (e.g. in head or spinal injuries with possible palsy). A passively placed limb is typical of fractures (e.g. in femoral neck fractures, the fractured leg is found rotated outside; when a major nerve is injured there can be passive positioning of the limb without active movements etc.). Forced position of the limb occurs in displacements and in the acute phase of fractures or in inappropriately healed fractures and development of ankylosis. On inspection, the skin pallor and hyperaemia are to be noted, as well as skin hydration (dry hot skin/cold sticky sweat), the presence of abrasions, bruises, their localisation, size or colour etc. It is important to ascertain any changes in the positioning of limbs in relation to their axes. Normally, the axis of the lower limb corresponds to a direct line joining the superior anterior iliac spine, the medial aspect of the patella and the first toe. The injured limb can be rotated internally or externally, forming an angle at the knee joint that opens inor outwards. Thus, the two types of deformity are identified: valgus deformity, i.e. the angle opens outwards, and varus deformity, i.e. the angle opens inwards. The normal axis of the upper limb corresponds to a direct line joining the centre of the humeral head, the radial and ulnar heads. A rotation of the forearm from the upper limb axis leads to formation of an angle with the apex at the elbow joint; correspondingly, when this angle is opened outwards or inwards, a valgus or varus deformity is observed. The axes of the upper and lower limbs change in fractures, displacements, ankylosis or inappropriate fracture healing. The axial changes can also be found in patients with congenital deformities or acquired conditions such as rickets. Inspection helps to elicit changes in the affected organ - levelling of the folds (contours) of a joint in haemarthrosis; swelling in soft tissue haematomas; deformation of the limb in fractures etc. Palpation. On palpation the injured sites, pain, swelling or induration may be noted. In fracture of jaws palpation is performed via the oral cavity, while in that of the coccyx bone it is carried on through the rectum. The presence of fluid in a joint can be identified by palpation (e.g. the ballottement of patella sign that occurs in haemarthrosis, synovitis). Palpation can help to determine «gap» tissue defects that may be the case in a muscle or ligament tear. Rupture of the biceps muscle is characterised by a gap in the muscle bulk with its defiguration during contraction, while clavicle fracture produces deformation during palpation; in the Achilles' tendon tear contraction of the calf muscle brings about a gap in that area etc. Auscultation. This technique plays a vital role in the examination of chest and abdominal organs and helps to elicit changes resulting from the injury (e.g. an absence of peristalsis in posttraumatic peritonitis; a decrease in or absence of breath movements in pulmonary injuries complicated by pneumo- and/ or haemothorax; a characteristic murmur in post-traumatic aneurysm). Determination of joint motion starts with assessment of the extent of active joint motion that can be performed by the patient themselves. The surgeon is to evaluate the extent of passive motion, which helps establish the absence of active or passive motion or any limitations due to tenderness on motion. An angular is used to measure the degree of motion; its sides being connected to hinges. The movement of the siteers along the conveyer helps to measure (in degrees) the extent of joint motion. The one at the injured site is compared to that at the intact side and also to average values for a normal person of the same age and sex. The original position of the shoulder joint is regarded as the free fall of the limb along the trunk, while that of the elbow, wrist, and finger joints is the state of full extension in the joints at 180°. For the hip and knee joints the normal angle of position is 180° when the body is in the vertical position, the ankle joint - 90° to the axis of the leg. To measure the motion in the shoulder and hip joints, one side of the angular is placed along the body axis with the other being put along the moving limb following the flexion and extension of the limb. In measuring the motion in other joints one side of the angular is placed along the proximal aspect of the limb above the joint (along the thigh, upper arm, leg and forearm), while the other along the distal end below the joint. The hinge of the angular is positioned at the level of the joint involved. The displacement of the angular's side connected to the distal end of the limb is used to determine the degree of motion in the joint. Special types of angulars (protractors) are used to determine other types of motion in the joints (e.g.rotation). Changes in the degree of joint motion can vary from ankylosis, or stiffness, to contracture, or limited motion. Ankylosis can be due to the bones forming the joint fused together or as a result of the formation of fibrous fusion of joint spaces (fibrous ankylosis). Joint stiffness can be due to sclerosis and calcification of the soft tissues around the joint (extra-articular ankylosis). Contracture can result from one of the following: degeneration of the muscles of the limb, impaired innervation, displacement resulting from distortion of anatomical relation between the joint surfaces of the bone and the spastic contractions of the muscles. Joint contracture caused by progressive changes in the neighbouring soft tissues and joint capsule can lead to extra-articular ankylosis. Measurement of the extremity length is of vital importance in the examination of patients with trauma. The length of an extremity can be estimated visually by comparing the two symmetrical limbs on different segments and the levels of position of symmetrical bone projections. To do this, have the patient lie supine on a firm surface placing the two lower extremities in a symmetrical position, the bone projections on the legs being thus compared - the anterior superior iliac spines, major trochanters, patellas, malleoli in relation to each other. Mismatch of these suggests a shortening of the limb and its extent of either the thigh or leg can then be measured based on the differences in the levels of the major trochanters, patellas, malleoli. The length of the upper limbs can be compared by the position in relation to their symmetrical bone projections, the patient " standing to attention". A more exact measurement is obtained by using a tape measure. The length of the lower limb is assessed from the anterior superior iliac spines, to the lateral malleolus; the thigh's length - from the major trochanter to the knee joint space, the length of the leg from the knee joint space to the lateral ankle bone malleolus; the upper limb from the acromial end of the clavicle to the end of the third phalanx; the upper arm (humerus) from the acromial end of the clavicle to the olecranon; the forearm - from the olecranon to styloid process of the radius. The length of the limb changes in fractures and displacements. The circumference of a limb is measured at the symmetrical levels of the two limbs. The difference in the circumference of the injured limb suggests the presence of oedema, haematoma, and bleeding as well as the displacement of bone fragments. The X-ray methods play a major role in diagnosis of trauma. X-ray films are to be obtained in at least two projections - sagittal and lateral. In fractures and displacements X-ray pictures help to determine the type of displacement of fracture fragments and joint ends in displacements. Serial X-rays facilitate evaluation of the adequacy of the bracing of the fracture fragments together and relocation of the displaced joint as well as the assessment of the therapeutic results. In traumatology, radio-opaque methods (e.g. arthrography, or investigation ofjoints, angiography, or investigation of vessels) are also used. Tomography yields X-ray images of bones and other organs at different levels, which provide a more detailed impression of the type of injury and help exclude the presence of foreign bodies etc. Functional methods of investigations (e.g. rheovasography, oscillometry) provide the data as to the regional circulation. Electromyography enables the physician to evaluate muscular contractility. Dressings Dressings is a surgical area that deals with bandaging. The indications for bandaging usually involve protection of wound or damaged fissues from external exposures. The main types of bandages are given below (tab. 7). Table 7. Types of Bandage and Their Indications
Bandages are divided into soft and immobilisation (immovable) ones. Immobilisation bandages (fastened and correction bandages) and those with traction are generally used for the treatment of patients with injuries and diseases of the locomotive system. These include the plaster of Paris bandage, splint and apparatus. Soft bandages comprise the dressing material that is placed directly on the wound and a means of fixation. They are divided into simple soft (protective and therapeutic), pressure (haemostatic) and occlusive bandages. Fixation of the dressing material is done with gauze, knitted tube bandages, netknitted medical bandage «retilast», cotton scarf, glue, collodion, adhesion plaster. A bandage has two ends: the rolled side, or the head, and the free end, or the beginning. The rules and regulations of bandaging are as follows: 1. The patient should be placed in a comfortable position, with maximum relaxation of the muscles. There should be a free access to the part of the body to be bandaged. The part to be bandaged is to be placed in the position it is supposed to occupy after the bandage has been applied and must stay immobile during the process of bandaging. 2. The person applying the bandage should stand facing the patient in order to be able to see by the patient's facial expression whether the procedure is causing him/her pain. 3. Bandaging is started from the periphery towards the trunk stretching the bandage with equal force. The direction of the rounds should be from left to right in relation to the one bandaging (with the exception of bandaging the left eye, Desault's bandage on the right hand etc.). The right hand is used to unwrap the head of the bandage and the left one is used to hold and straighten out the bandage. The bandage is unrolled while being put around the part of body that is bandaged, each round covering the previous one by either a half or two thirds of its width. The end of the bandage is fastened with a safety pin or adhesion plaster to the bandage either along the free end or around the bandaged area fastening it to the intact side. A well-applied bandage should fasten the dressing material, adequately cover the injured part, and be comfortable for the patient, light and nice looking. The main types of bandage dressing. Circular, or round, bandage is the initial step in any soft bandage dressing and is used alone for the closure of small wounds on the forehead, neck, wrist or ankle joint etc. In this kind of bandaging, each round completely covers the previous one. The first round is placed a bit slanting and tighter than the following ones, leaving the tip of the bandage uncovered to fold over the second round and to fasten it by the third one. A drawback of this type of bandage is that it can rotate and in so doing displace the dressing material. Spiral bandage is used to cover big wounds on the trunk and extremities (fig. 41, c). It is started with a circular bandage above or below the injured site and the rounds directed spirally covering the previous round by 2/3. Simple spiral bandage is applied to cylindrical parts of the body (chest wall, upper arm, and the thigh). Spiral bandage with a bend is applied to cone-shaped parts of the body (shin and forearm). The bend is done as follows: each next round is done in a more slanting manner than the previous spiral rounds; the thumb of the left hand is used to keep the lower edge, the head of the bandage is unfolded a little and pulled so that the upper edge becomes the lower and vice versa; then the next round is applied and so on. In this way the bending has to be done along the same line and outwards from the injury site. This bandage dressing is simple and quick, but it can easily slip down when the patient is walking or running. To keep it firm in place, the last round can be fastened to the skin with glue (fig. 42). Serpiginous bandage is the preliminary stage of a spiral or any other type of bandage. It is used to fasten large piles of dressing (normally on the limbs) (see fig. 41, fig. 43). It is started with a circular bandage around the wrist or ankle joint, then goes spirally, each round not touching the preceding one. In this way free spaces, the size of about the width of the bandage, are left in between the bandage rounds.
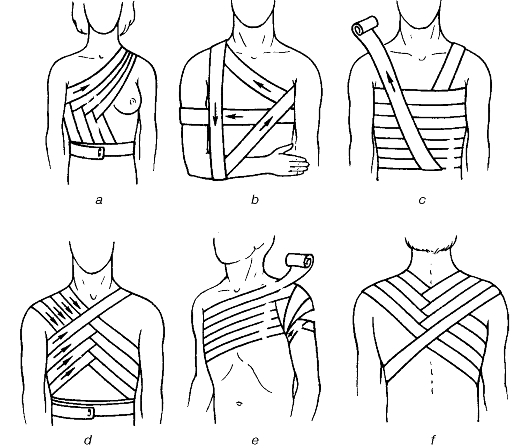
Fig. 41. Bandaging the thorax and the shoulder: a - mammary bandage; b - Desault's bandage; c - spiral bandage; d - and f - figure-of-eight bandage; e - spica bandage. Cross, or «a figure of eight», bandage is very convenient in bandaging parts of the body with uneven surfaces (the back of the neck, occipital area, the upper chest and the perineum). It is started with the circular bandaging which is followed by cross over rounds, intermittent with circular rounds that are placed distal or proximal to the first circular rounds. At the back of the neck, and occipital a cross or figure eight bandage is applied in the following way: the bandage is fastened around the head in a circular manner, then above and posterior to the left ear it is lowered to the right side of the neck up to the right ear, passing in front of the neck and rising along its posterior aspect up to the right ear. Passing in front of the head the bandage is placed above the left ear slanting down, repeating the preceding rounds. The bandage is fastened around the head. In bandaging the chest the bandage is passed around the shoulder in a figure of eight with the crossing rounds located in relation to the injury site either in front or at the back of the chest. Spica bandage is a type of a figure of eight one and differs in that at the crossing site the preceding round is not fully covered, but covers on only one side lying above or below. In this way the crossing site appears like a an ear of grain. A well-placed bandage looks nice and does not fall when the limb is moved. Such bandage is applied to the hip and shoulder joints, above the shoulder and other difficult areas where their uneven nature makes it difficult to keep dressing materials on the wound by means of other methods (see fig. 41). «Tortoise» bandage is applied on the elbow and knee joints. This kind of bandage has two variants - diverging and converging bandages. Diverging bandage on the knee joint is started with circular rounds placed directly around the joint; then similarly above and below the preceding rounds. The rounds are crossed over in the popliteal fossa, and in front of the joint they diverge on both sides of the first bands, covering in that way most areas of the joint. The bandage is fastened around the thigh. Converging bandage is started with a circular one above and below the joint, crossing in the popliteal fossa. The subsequent rounds are placed closer and closer to each other and to the most prominent area of the joint until all the area has been covered completely. Returning bandage is applied on the head, foot or hand and on the stump after amputations. It is started with circular rounds on the limb. It is then bent on the anterior aspect of the stump with a vertical round across the proximal part of the stump to the posterior aspect. A circular round is additionally added to fasten each returning band. Vertical rounds are successively moving to the lateral and medial aspects of the stump. Additional fixation of these rounds is achieved with spiral rounds.
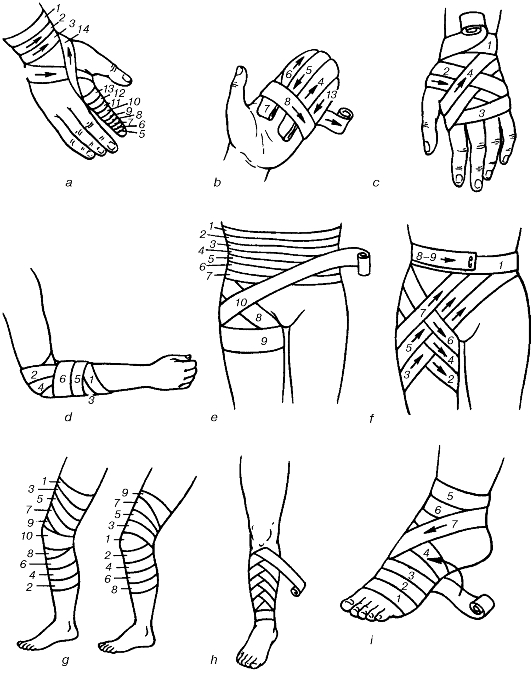
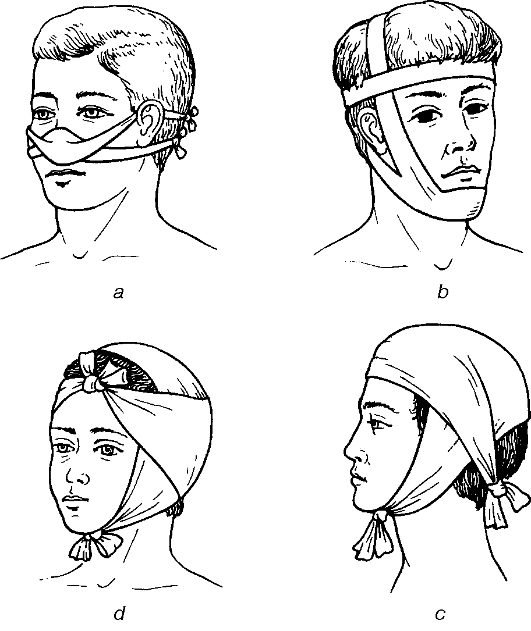
Fig. 42. Bandaging the upper and lower limbs: a - digital spiral bandage; b - hand bandage; c - hand cross bandage; d - converging elbow bandage; e - abdominal and hip bandage; f - inguinal bandage; g - «tortoise»-type knee bandage, converging (left), diverging (right); h - bent spiral bandage; i - foot and ankle bandage. Figures match the rounds. Triangular bandage (fig. 44, 45). This is a triangle-shaped piece of cloth or scarf folded into an angle. The longer side is termed the base, the opposite angle being the apex and the other two sides - the base angles. If one-meter square of material is cut along its diagonal into two, two big triangular scarves are made, while division of these into two parts yields four small triangular scarves. Triangles are more convenient for giving the first aid. It is commonly used to support the arm in fractures of the forearm or in impacted humeral rod fractures. Types of bandages applied depending on parts of the body Head and neck bandages (see fig. 43). Circular bandages on the head are applied for minor injuries on the forehead, temporal and occipital regions. Returning bandages on the head are used for widespread injuries involving the hairy parts. Their characteristic feature is that all the returning rounds are first applied and then fastened with ordinary circular rounds. Galen's bandage is one of the simplest and most convenient forms of head bandage. It is started with the placement of a single piece of string of about one metre long: the middle of the string is placed over the temporal region, whilst the ends are left hanging anterior to the auricles. The patient is made to hold and slightly pull on the string, the first circular round is made around the head and then on reaching the string the bandage is wrapped around it and sent in a slanting manner across the occipital area. On the other side the bandage is again wrapped around the string and sent across the fronto-parietal region in a slanting manner partly covering the previously placed round. The subsequent ones are applied similarly, constantly heading upward towards the parietal region until the head is fully covered. The final round of the bandage is placed either circular around the head or fastened to the vertical string. The ends are fastened below the chin. Hippocrates' cap is applied using a double-head bandage or two separate bandages. One of the bandages always goes circularly around across the forehead and occiput, fastening rounds of the second bandage covering the head from midline to the right and left. The ends are knotted at the occiput. Bandage on the right eye. Circular horizontal rounds are applied around the forehead, thus fastening the bandage, and then it should go downwards to the occiput, below the right ear and across the lateral aspect of the neck and across the cheek bone upwards covering the sick eye. Oblique rounds are fastened with circular ones. The upward oblique rounds are later alternated with circular rounds. Bandage on the left eye is applied in an atypical manner. The beginning of the bandage is held in the right hand and the head in the left hand. The next stages of bandaging follow the pattern described above but in the opposite direction. Bandage on both eyes is started typically with the one on the right eye. A circular round of bandage is then done atypically from the right temporal region down over the left eye, followed by circular fastening rounds and subsequent alternating rounds covering the right and left eyes. To cover the back of the neck and occipital regions a figure of eight bandage is used. A true circular bandage is rarely applied to the neck. This kind of bandage is commonly used in combination with either the figure of 8 tied on the forehead or with a cross bandage over the upper posterior chest wall. Four-tailed bandage is a strip of material or a piece of gauze both ends of which have been slit open lengthwise. It is used to cover wounds on the chin, nose and occipital region. Bandaging of the chest and shoulder girdle. Apart from the above-described circular, spiral, figure 8 and the spica bandages, special types of bandages are also applied to these areas (see fig. 41). Bandaging of the breasts. When bandaging the right breast, the direction of the rounds is from left to right. The fastening round is passed around the chest beneath the breasts and on approaching the right breast the bandage grabs the lateral and lower parts of it. Then the round is sent to the sick armpit and across the back to the intact shoulder. Then it descends obliquely, lifting the medial part of the inflicted breast torwards the initial circular round on the chest. Further, these steps are repeated. When the left breast is bandaged, the direction is the opposite.
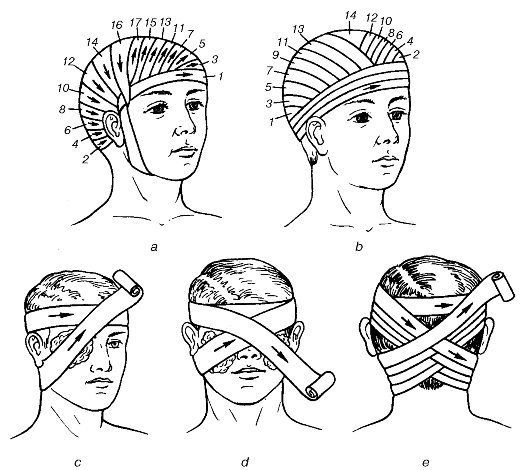
Fig. 43. Bandaging the head: a - head gear; b - Hippocratic cap; c - one eye bandage; d - both eyes bandage; e - occipital bandage. Figures match the rounds.
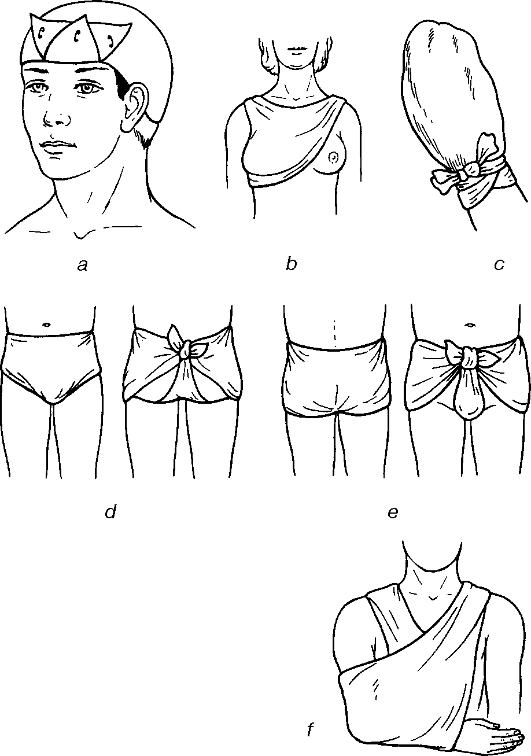
Fig. 44. Head (a), mammary (b), hand (c), perineal (c, d) and upper limb triangular bandages.
Fig. 45. Nasal (a), chin (b), occipital (c) and parietal (d) four-tailed bandages. Velpeau's bandage is applied for fractures of the clavicle and after repositioning of a dislocated shoulder. In this process the arm on the injured side is placed on the intact shoulder and bandaged to the trunk. Bandaging is started from the injured side. The first round starts from the mid portion of the back, goes horizontally grabbing the chest and arm, under the armpit of the intact side, then the second round is passed across the back obliquely upwards to the injured upper shoulder and bending around it drops vertically down (third round), grabbing the elbow from below and is sent to the armpit of the intact side. All the three rounds are repeated making sure that the horizontal rounds are placed beneath the preceding ones, and vertical rounds placed medial to the previous one ones. Bandaging of the abdomen and hip. To prevent slipping down, which is commonly the case, the spiral bandage is fastened with a spica bandage over the upper third of the thigh. Hip bandage is a variant of the spica bandage. A fastening circular round is initially applied across the abdomen above the umbilicus. From the lateral aspect of the abdominal wall, a downward course is then taken along the internal aspect of the thigh, bent around it from behind and rises on the lateral surface of the thigh to the anterior on the abdomen. The next round repeats the previous one course but lies beneath. The bandage is fastened with a circular round across the abdomen. Depending on the area of crossing, these bandages are applied to the inguinal region, upper third of the thigh, perineum, the gluteus region or on both sides. Bandaging the upper and lower limbs. All the various types of bandages can be applied to these parts of the body (see fig. 42). Spiral bandage of the finger. Using circular courses the bandage is fastened on the wrist and then sent obliquely along the dorsum of the fingers to the fingertips. Spiral bandaging is applied on the finger up to the base and along the dorsal aspect of the fingers it is returned to the wrist where it is fastened by circular rounds. When it is necessary to bandage all the fingers in the form of gloves, the courses are repeated as described for each finger. To fasten a bandage, knitted tubes and elastic netting bandages can be used (e.g. retylast, or elastic netting material in the form of a stocking of different sizes available in rolls). To fasten the dressing on a wound, a one-layer elastic tube is put on. Over the finger - sizes 1 and 2 on the limbs - sizes 3 and 4; over the head sizes 5 and 6; on the trunk - sizes 6 and 7 are applied. Individual dressing packs are used for extensive injuries. The pack consists of two cotton-wool cushions of about 15x15 cm and a 9-cm wide bandage. One of the cushions is fastened stationary on the bandage, while the other one can be moved alongwise. The dressing materials are packed into a paper bag and into an airtight plastic bag which can be used for occlusion bandage in a penetrating chest injury. When using a dressing packet, the plastic bag is torn or cut open to remove the paper envelope, which is drawn out by its safety pin and torn open to remove the bandage with cotton-wool swabs. The head of the bandage is held with the right hand and the bandage is unfolded without touching on the cushion surfaces. The mobile swab is moved to the required distance and placed on the wound or one on each side of the wound (the entry and exit sites) and fastened by circular bandaging. The end of the bandage is fastened with a safety pin. Wound dressing Dressing is applied to provide favourable healing conditions for a pathological process. It is used in cases when there is a defect in the skin covering (wounds, ulcers, burns, frostbites, necrosis, external fistulae etc.). Change of dressing is performed for both therapeutic and diagnostic purposes, i.e. to determine the type, extent and course of the disease process, to determine complications, to probe fistula tracts, to perform fistulography etc. It is done in dressing rooms, or on dressing tables using surgical instruments. The rules and regulations of asepsis must be abided by without infringement to avoid contamination of aseptic wounds, secondary infections of purulent (septic) wounds and burns. The dressing room nurse prepares for the manipulation as she does for the operation. She cleans her hands by means of one of the methods of scrubbing and wears sterile gloves, covers the dressing table with a sterile material (sheet) and arranges the required sterile instruments taking into consideration the workload to be performed. In case there are only a few dressings to be done, the nurse after laying the table can either help the doctor do some of the dressing or performs some of the minor dressing under the doctor's supervision. In a heavy scheduled set-up there should two nurses in the dressing room: one to give out the instruments and dressing materials and the other to assist the doctor in the procedure. The physician has also to scrub the hands and wear sterile gloves. In certain instances dressing is done by using instruments alone. The main steps to change wound dressing are as follows: analgesia - anaesthesia, removal of the previous dressing, initial inspection of the wound, wound toileting and treatment of surrounding skin with solutions of iodine, iodonate, betadine, removal of wound discharge (blood clots, necrotic tissue, foreign body etc.), repeated wound inspection, therapeutic or diagnostic manipulations, other procedures (instrumental investigations, wound washout, taking materials for wound culture etc.), repeated wound toileting if during the manipulation some pus is identified, removal of antiseptic solutions that need to be evacuated, cleaning the surrounding skin with iodine and lastly, application of the sterile dressing materials. Change of wound dressing should cause minimal pain to a patient, which is of importance when certain therapeutic or diagnostic manipulations associated with pain are required (wound toileting, removal of necrotic tissue, instrumental examination of the wound, placement of a drainage tube or tamponade into the wound etc). When changing the dressing anaesthetic and narcotic substances are used: injections of analgin, promedol, morphine, fentanyl solutions and occasionally short-acting inhalation (pentran, nitrous oxide, halotan + ether) or non-inhalation (hexenal, ketamin) anaesthesia (see " General Anaesthesia" ) are used. In traumatic injuries (e.g. wounds, burns) the first dressing is normally applied by the patient, relatives or witnesses or by the medical personnel at the place of an accident. Such dressing is mostly aimed at arresting the bleeding and prevention of wound contamination. When the bandage is soaked with pus or wound discharge or if the wound is contaminated by intestinal contents, urine and exudates, the change of dressing is indicated to prevent anaerobic infection. In case the secondary bleeding is suspected (the bandage is heavily soaked with blood) emergency change of dressing is also indicated to perform wound revision and control bleeding. When removing a wound dressing one should aim at minimal tissue trauma. Otherwise, the procedure is not only painful but may also destroy the granulation tissue and cause bleeding. Scissors should be used to cut the dressing alongwise. Before removing the dressing dried to the wound it must be first soaked with antiseptic solutions (hydrogen peroxides, furacilin, solafur, potassium permanganate), or isotonic solutions of sodium chloride, or novocain. If the wound is on the limb, the whole limb can be put in a bucket or bowl containing the antiseptic solution to soak up the dressing. In some minutes, after the dressing has been well soaked, it is removed using some forceps and along the wound length. After removing the dressing the wound is inspected, the type of wound, its character, the presence of bleeding, wound discharge, inflammation as well as the state of the regeneration process are all assessed. The surrounding skin is then cleaned with one of the antiseptic solutions that are used to clean operative fields. If it is the first dressing of a freshly contaminated wound in a surgical setting up the indications for primary wound debridement are considered. The first change of dressing after an aseptic operation is performed the following day after surgery. If the wound is dry with no signs of inflammation the dressing may be kept till the removal of stitches. Indications for the change of dressing are the onset of bleeding, signs of local or generalised infections (rise in body temperature, tachycardia, leucocytosis, wound discharge and pus) Having removed the dressing from the wound with either primary or secondary sutures, the wound is inspected for signs of local infections (hyperaemia, oedema, redness of skin etc.); the condition of the sutures is also assessed (eruption, cutting through etc.). In normal suture conditions without any signs of inflammation 5% alcohol solution of iodine, or 1% alcohol solution of brilliant green, or 3-5% potassium permanganate is used to clean along the suture line, after this a sterile gauze dressing is applied and fastened with either glue, a tube or ordinary bandage. Removal of sutures. If necessary, before sutures are removed the surrounding skin is cleaned from residual glue with a mixture of camphor spirit and ether, or 0, 5% liquid ammonium or turpentine. To clean the wound along the suture line, alcohol or solutions of iodine or potassium permanganate are used. Forceps are used to pick the thread by the knot and moved slightly away from the skin until the stitch shows out from the stitch canal. The thread is held in that position and cut at the site that came out of the canal using scissors, then the thread is drawn out. When done in this way the possibility of infecting the stitch tract at the time of stitch removal is minimised. After removal of the sutures, 5% alcohol solution of iodine, or 1% alcohol solution of brilliant green, or 3-5% potassium permanganate is used to clean along the suture line and the wound. A sterile dressing is then applied. Skin care during wound dressing is of great importance, especially in such cases as constant contamination by intestinal contents, pancreatic juice, bile, urine, in the presence of fistulae from different organs, as well as pus in extensive purulent infections, purulent fistulae, e.g. in osteomyelitis, chronic paraproctitis etc. When wound discharge constantly contaminates the skin it leads to its maceration, inflammation and ulceration. Macerated skin serves as an entry site for secondary infections. To reduce the rate of contamination of the surrounding skin several forms of dressing materials are used - pelotas, intestinal prosthesis, obturating dressing etc. To reduce the irritating action of digestive enzymes, mainly that of trypsin, chemotrypsin, and pepsin which may cause skin maceration, agents that inactivate these enzymes are used when dressing the patient. For this purpose, decimolar solutions of hydrochloric acid, minced meat, meat stock, etc. are used. These are used to soak the dressing or irrigate the wound (through a microirrigator). 5-10% tannin, 3-5% potassium permanganate or 1% alcohol solution of methylene blue can be applied on the macerated skin. To reduce the skin irritation caused by the discharge from a fistula the surrounding skin can be smeared with Lassar cream, or zinc ointment during dressing. It can also be powdered with modified plaster of Paris, chalk, talcum powder. Cerygel or BF-6 (a sort of glue) can be applied to form a protective film on the skin. In severe skin conditions when the dressing does not provide appropriate skin protection, «open» wound treatment (i.e. without dressing materials) is recommended. When dressing a septic wound, attention is paid to the type of wound discharge. In the presence of wound discharge (blood, pus, serous fluid, intestinal contents, bile, urine etc.), cleaning is done by using gauze swabs, tamponade, or napkins. The wound is washed with an antiseptic solution (3% hydrogen peroxide is preferable) using a syringe. Alternatively, the solution is just poured over the wound and dried with gauze swabs by way of blotting. Using forceps or by washing out bone sequestra, any as well as detached necrotic tissues are removed from the wound. In case the necrotic tissues are fastened necrectomy is done (see Chapter XIII). To ensure the free flow of pus, wound discharge and exudates from wounds and cavities as well as the arrest of bleeding methods of drainage and tamponade (packing) are used. It is commonly performed during surgery. The necessity to drain or pack a wound while changing the dressing occurs when there is retention of pus or discharge in the wound and when there are signs of secondary haemorrhage. The functional status of the drainage and tamponade (position, patency and quality of the tampon) is checked when changing the dressing and if there is still the need to drain the wound, they are changed. When they are no longer needed the drainage and tamponade are removed. The draining ability of gauze pack is limited to only a few hours. For the purpose of long-term drainage rubber or chlorvinyl tubes or other tubes with extra opening are used. After wound toileting and cleaning the surrounding skin the drain is put and fastened with plaster strips in a position that will facilitate the outflow of contents. The change of dressing is completed by bandaging on the wound or ulcer. |
Последнее изменение этой страницы: 2019-06-08; Просмотров: 100; Нарушение авторского права страницы