|
Архитектура Аудит Военная наука Иностранные языки Медицина Металлургия Метрология Образование Политология Производство Психология Стандартизация Технологии |
|
|
Архитектура Аудит Военная наука Иностранные языки Медицина Металлургия Метрология Образование Политология Производство Психология Стандартизация Технологии |
Classification of fractures
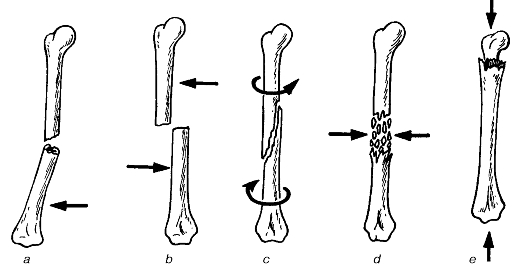
I. Based on the origin of fractures: • congenital (intrauterine); • acquired. Congenital fractures, mostly multiple, are due to changes in the foetal bones or maternal abdominal trauma during pregnancy. Acquired fractures are subdivided further into traumatic and pathological ones. The latter are caused by bone tumours, osteomyelitis, tuberculosis, echinococcosis and syphilis. Obstetric fractures that occur during delivery (passage through the birth canal) are also identified. II. Based on the extent of organ or tissue damage: • complicated; • non-complicated. Complicated (open) fractures are those with local damage to the skin and subcutaneous fat, which allows microorganisms to enter the wound and cause inflammation. Fractures accompanied by the damage to the major vessels, neural trunks, and viscera (e.g. the lungs, pelvic organs, the brain and spinal cord, joints) are all examples of complicated ones. It is noteworthy that closed fractures lack skin defects. III. Based on the location of fractures, i.e. the position of the fracture line: • diaphyseal; • epiphyseal; • metaphyseal. IV. Based on the relation of the fracture line to the longitudinal axis of the bone: • transverse; • oblique; • spiral. Fig. 54 shows bone fractures depending on their mechanisms.
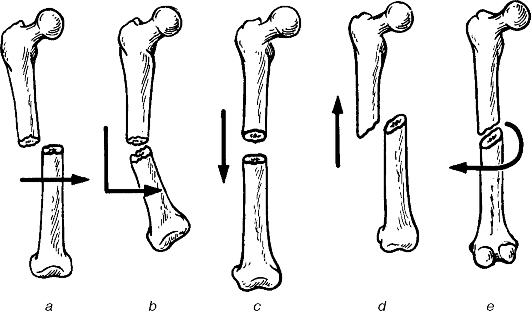
Fig. 54. Bone fractures depending on their mechanisms: a - due to flexion; b - due to a direct blow; c - due to twisting; d - due to comminuting; e - due to longitudinal compression. The arrows show the direction of the causative factor. Physical examination 1. Complaints (pain and limb dysfunction are commonly the major complaints). 2. History. Meticulous history taking helps elicidate the mechanism of trauma, the location and type of fracture. For example one's head hitting when diving can result in a fracture of the cervical spine; direct hitting against the bumper can lead to a pelvic fracture or fracture of the lower limbs; being run over by a car may cause fractures of the pelvis, thigh and leg bones; falling from height on the buttocks or heels can lead to a compression fracture of the spine or fractures of the ischium bones; twisting the foot medially or laterally results in ankle fractures. Both limbs have to be examined comparatively. All manipulations have to be performed carefully and gently. Probable signs of fractures are as follows: pain and tenderness, swelling, deformity and dysfunction, while absolute ones involve pathological mobility of the limb at unusual sites and crepitation of bone fragments. Pain is an indispensable symptom localized, as a rule, at the fracture site; it progresses on an attempt to move the limb. Firm but careful palpation with one finger away from the expected fracture site helps find out tenderness. Tenderness localised at one site is an important sign. It can also be established by making light knocks along the axis of the limb e.g. upon slight hitting on the heel, tenderness is elicited at the site of fracture on the thigh. Swelling may be due to bleeding, haematoma, blood or lymph circulatory defect. The circumference of the affected limb may reach 11/2as much as that of the intact side. Deformation of the limb is elucidated on examination and depends on the angular displacements of the bone fragments. The limb can either be distorted or shortened. The distal end of the limb can be turned to either side (rotational displacement). The longitudinal axis of the upper limb corresponds to the line joining the three sites of: heads of the humerus, radius and ulna with the fingers in supination. The axis of the lower limb also joins the three sites: anterior superior iliac spine, mid patella and the middle portion of the anterior surface of the ankle joint. Inspection. Measurement and palpation of the limb help determine the location or displacement of the bone fragments. The rotation of the distal end of a limb without a change in its length is indicative of a rotational displacement of fragments; lengthening or shortening of the limb may be found in displacement along its length; change in the axis of the limb, i.e. an angular twist at the fracture site at an angle is indicative of an axial (angular) displacement and finally an increase in the limb's size the limb suggests a transverse displacement (fig. 55). The exact type of the fracture and location of bone fragments of a fracture are established with X-ray pictures that are taken in two views. Dysfunction is established by the extent of active movement in the limb. As a rule, the patient is not able to move the limb or part of it immediately after the trauma because of severe pain. The lying patient is asked to move the foot, fingers or bend the extremity in the joint (elbow, knee or shoulder). Even the attempt to move can occasionally cause severe pain. Pathological movements are a reliable sign of a fracture. They must be assessed very carefully and gently so as not to cause further damage to the adjacent tissues and organs by the bone fragments. The peripheral part of an extremity is gently moved, whilst the mobility in the fracture site is observed. Swinging motions in the thigh, upper arm, forearm, shin indicate a fracture.
Fig. 55. Bone fragment displacements due to fractures: a - lateral; b - axial (angular); c - with prolongation of the bone; d - with shortening of the bone; e - rotational. Crepitation of bone fragments is established by the hands. The limb is fastened above and below the suspected fracture site and moved in both directions. The appearance of friction sounds of bone fragments moving over each other is an absolute sign of a fracture. Because these two methods can cause further the damage to tissues, they are used only in extreme situations. Clinical examination of the patient with fracture involves the measurement of limb length, determination of peripheral vascular pulsation, skin sensitivity, active movements in the fingers and toes to identify any vascular or neural damage. Conservative treatment of fractures. Conservative methods are commonly used to treat fractures. In both conservative and surgical treatment of fractures the three main principles have to be followed. 1. Reposition of bone fragments; 2. Immobilisation of repositioned bone fragments: 3. Use of agents and physical methods that promote formation of new bone callus and bone consolidation. The successful repositioning of bone fragments is achieved with adequate analgesia, which removes the reflective muscle contraction. Muscle contraction is the cause of the secondary displacement of fragments. Anaesthesia in fracture cases is achieved by injecting solutions of novocain, lidocaine, or trimecain into the haematoma at the fracture site. To do this, the skin at the fracture site is cleaned with iodine solution. It is then infiltrated with novocain using a 10 ml syringe. After this a long needle is moved to the fracture site (fig. 56), 3-5 ml are injected, periodically checking for the presence of blood. The appearance of blood in the syringe is an indicative of the needle located in the haematoma at the fracture site. The injection of 20 ml of of any of the abovementioned 1-2% anaesthetic solutions provides for adequate anaesthesia at the fracture site for 11/2-2 hours. If the needle fails to get into the fracture site haematoma, it is removed, the site of fracture is determined once again and the procedure is repeated. If the anaesthetic solution is given not into the haematoma, anaesthesia is not achieved.
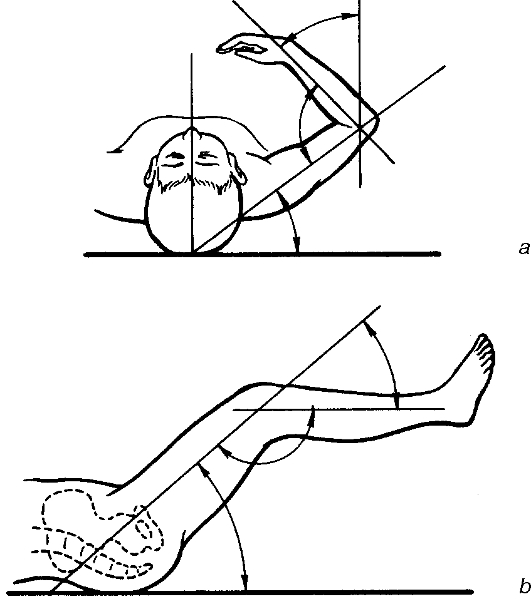
Fig. 56. Anaesthesia in femoral fracture. In case it is impossible to give the anaesthesia to the fracture site, block anaesthesia above the site of fracture, or the conduction anaesthesia can be used. When local anaesthesia is inefficient the patient is given general anaesthesia. Repositioning of displaced bone splinters involves their accurate resetting of the bone fragments along the fracture line to provide for further consolidation. The outcome of treatment will be restoration of limb function, which mainly depends on the accuracy of repositioning. To manage rotational displacement, the peripheral fragment has to be placed in its correct position in relation to the longitudinal axis of the limb, which is achieved by rotating the peripheral part of the limb in the opposite direction, i.e. by placing the limb along its exact axis. It is only in fracture of the middle and lower thirds of the forearm that the arm is placed in the midsite between supination and pronation. Resetting an angular displacement of fragments is rather easy. One of the assistants holds on to the central fragment, fastening the hands on the central part of the limb. The surgeon pulls the distal part (below the fracture level) to restore the longitudinal axis of the limb (fig. 57). Replacing the fragments longitudinally occasionally requires enough strength, to be able to overcome the reflex muscle contraction that is most commonly seen in femoral fractures. The manipulation is done by traction along the limb's length and countertraction by its central part. In femoral and humeral fractures, the limb should be put in the median physiologic position: for the lower limb, flexed in the hip and knee joints at 140°; for the upper limb, drawn a little laterally at 60° and forward at 30°; in bending the hand at the elbow at 90° the forearm should be positioned between supination and pronation. To verify the restoration of its length, the limb is to be measured.
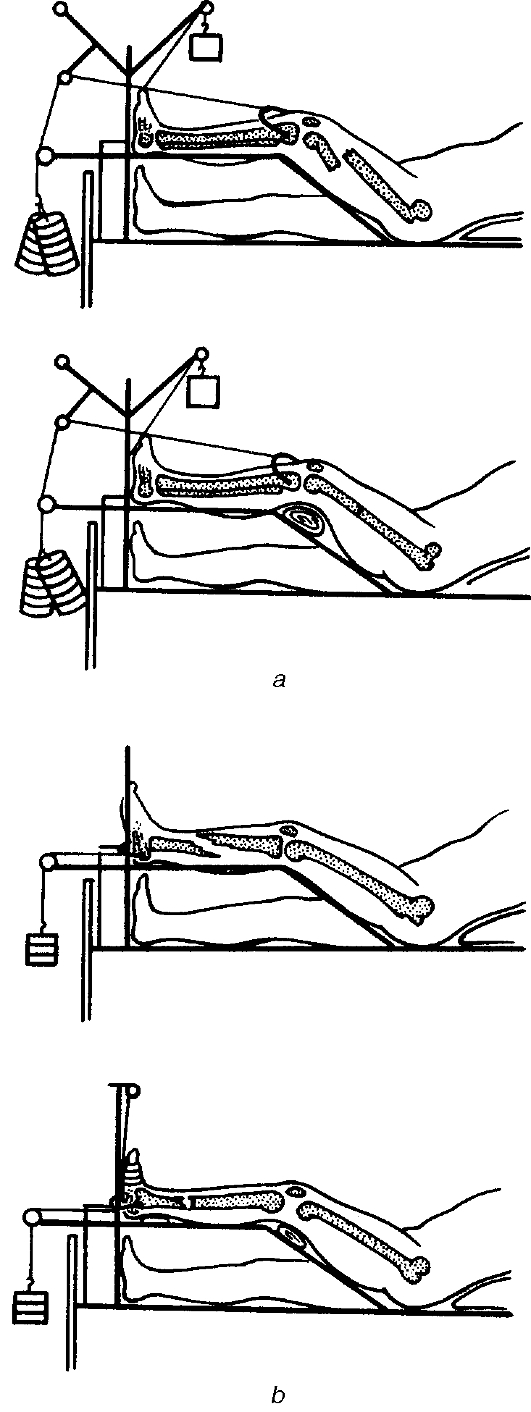
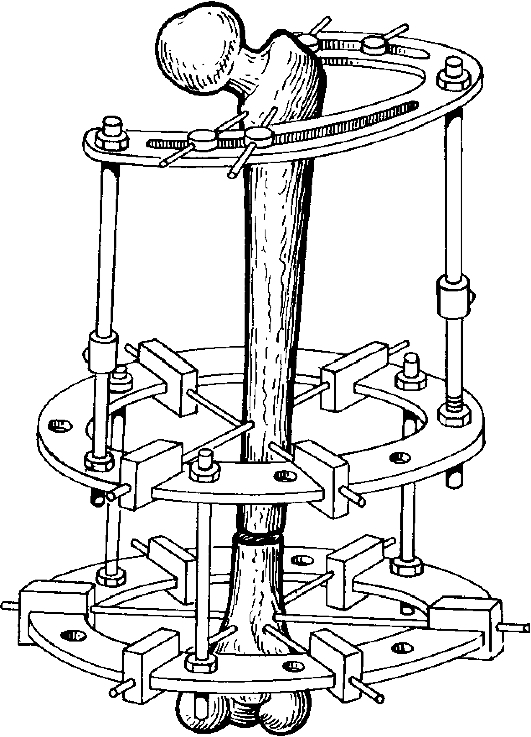
Fig. 57. Manual reposition in radial fracture. To correct the displacement of fragments along the limbs is more difficult. The same manipulations of traction and contratraction are used in the median physiologic position of the limb. Interposition of tissues is commonly observed in transverse diaphyseal femoral and humerus fractures with displacement of splinters along the limbs. Repositioning is hampered by bone chips and projections along the fracture line. These types of fractures are a relative indication for surgical intervention, i.e. open reposition of bone splinters. The reposition of bone fragments is occasionally done with a loop, cuff, and weight (fig. 58) or by a special apparatus (fig. 59), but it is commonly done by manual reposition or constant traction. The latter provides gradual repositioning of bone fragments, which is often the case in spinal fractures (fig. 60).
b Fig. 58. «Soft» traction: a - using Glisson's sling for cervical spine fractures; b - using a gaiter.
Fig. 59. Reposition in forearm fracture using Sokolovsky's apparatus.
Fig. 60. Reposition in compression spinal fracture: a - types of flexion fractures of vertebral bodies depending on the direction of the causative factor (shown by the arrows); 1 - wedge-shaped fracture due to vertical compression; 2 - comminuted fracture due to sudden flexion; 3 - dislocation fracture due to flexion using horizontal anteposition; b - reclination. The patient is placed supine on a special table with a steep slope and kept in this position for several days. The reposition of spinal fragments is thus achieved. Immobilisation with plaster of Paris (POP). In the conservative treatment of fractures, the POP is widely used; it is the best material for external fixation of fracture fragments and limb immobilisation. The POP is widely used both as a separate method of treating fractures and also to provide additional immobilisation in metal osteosynthesis and to prolong immobilisation following the removal of traction. The POP (calcium sulphate) consists of tiny powder, which on mixing with water forms some porridge-like mass that hardens within several minutes. To do the dressing, bandages of the POP made with white gauze are used. Standard gauze bandage is 2, 5-3 m long and is impregnated with the POP powder. Such POP gauze bandages are available in already prepared forms, packed into polyethylene bags, but they can also be prepared ex tempore. Before use, the POP has to be tested for its viability since it can loose its quality during storage. The viable POP is of a smooth consistency and void of lumps and grains. After squeezing it in the hand it should not form a lump with the finger marks but should easily scatter. The formation of lumps is an indication of an increase in humidity. The smell of rotten egg on mixing the POP with water suggests that it may not be used. An important property of the POP is the ability to harden quickly, which is tested by mixing equal amounts of the POP and water, the mass that is obtained, is moulded into a plate that should harden within 6-7 min and when broken, it should not crumble. To remove the lumps and grains the POP powder can be sieved. If the powder is very humid or hardens slowly, it can be heated in an oven at 120 °C to render it viable. When the POP bandage is to be prepared manually, a gauze bandage is unrolled onto a table covered with a plastic cloth; the POP powder is spread onto it and rubbed into the gauze using the palms so that it covers the gauze like a thin film. The gauze impregnated with the powder, it is carefully folded into a loose roll, and packed flat into a box to keep the POP on the bandage and stored in a dry place. When applying the POP, specific regulations are to be followed: • the limb must be placed in a functional position; • the bone fragments must be repositioned properly, the limb which being held firm during application of the POP until it hardens; • the POP bandage must be applied to cover the two neighbouring joints; • finger or toe tips must be left uncovered; • cotton wool pads (non-hygroscopic type, which is more elastic and does not get soaked with sweat) must be placed under bone projections; • the POP must be well moulded and put evenly but it should not compress any underlying part of the body; • after application a POP bandage must be marked: the date of fracture, the date of application and the supposed date of its removal are noted down on the POP bandage. The POP bandage on the thigh and hip joint and the POP «bed» are applied on special orthopaedic tables whose construction ensures immobilization of repositioned fragments both using countertraction and manual traction (fig. 61, 62). In the absence of such a table, this type of the POP bandage can be applied on a dressing table using special supporting stands.
Fig. 61. Plaster bandage in humeral fracture.
Fig. 62. Plaster bandage in radial (Colle's) fracture. The following types of POP bandages are identified: plaster bar, circular, plaster bar circular. Best of all is the combined plaster bar circular type which does not require cotton wool padding on the whole length but only on bone projections to prevent pressure sores. In purulent fistulas or a wound on the limb, a window is left in the POP bandage for observation and change of dressing and pus removing. Such type is known as fenestrated plaster bandage. Occasionally, the POP bandage consists of two parts joined together by one, two or more bridges (the bridged type). A bowl containing water at the temperature of about 20 °C is used to wet the POP bandage. To prevent the POP powder from falling off the bandage has to be handled and put carefully into the water. While in the water the POP bandage should not be folded or squeezed roughly. It takes about 1, 5 - 2 minutes for the POP bandage to get fully soaked with water. It is taken out of water by the ends using both hands and slightly twisted to remove the excess of water, it is then straightened for use. To apply a plaster bar or plaster bar circular bandage, the plaster bar of the required length is made, having initially measured the length of the injured leg with a piece of a gauze bandage. The measure is placed on a casting table and the soaked bandages of the same length are unrolled, straightening each layer with the hands, and laid one over another. Not allowing the POP to harden the plaster is placed on the patient's injured limb, moulded and fastened with a soft roller gauze bandage. When applying the circular plaster bar bandage, the plaster bar is fastened with spiral turns of plaster bandage. Bandaging should be neither tight nor loose, no folds or bents are allowed; each new turn is smoothed out with the palm. Plaster bars can be made into different thickness: thin (3-4 layered) - for the upper limbs and thick (6 -8 layered) - for the lower limb. To apply and fix a circular plaster bar bandage on the upper limb 2-3 layers of plaster bandage are needed, on the shin - 5-6, on the thigh - 6-8 layers. The plaster bar has to be constantly held by the assistant. Occasionally two assistants are needed: one holding the limb, to prevent displacement of the fragments, the other holds the plaster bar and helps in the application. The assistant holding the plaster bar should do it with the hands and not only the fingers to keep it smooth and thus prevent pressure sores. While the plaster bandage is hardening, it is thoroughly moulded at the fracture site and on the bone projections. The bandage applied of POP, the limb is placed on an oil-cloth pillow. Transportation of the patient is not allowed until 25-30 minutes after the procedure, which is enough for the plaster to harden and thus avoid bandage deformation and another displacement of bone fragments. The application of a circular plaster bar bandage to the fractured shin (the tibia and fibula) may serve as an example. A back plaster bar is prepared from the end of the toes to the mid-third of the thigh using a 5-6 layered POP bandage. One of the assistants holds the straightened leg, the foot being held at right angles. The plaster bar is put on the back of the leg to cover it from the upper end is at the mid-tlurd of the fligh to the lower end of the bar going about 2-3 cm further beyond the tips of the toes. Holding the bar in that position it is fixed with 4-5 circular turns of the POP bandage. The bandage is thoroughly moulded around the ankles, Achilles tendon and at the knee. The patient is placed in the bed with a wooden board put under the mattress to prevent deformation of the plaster bandage. It takes 1-3 days for the plaster bandage to get dry at room temperature (depending on its thickness). To make it quicker, dry air (fan) or an ordinary electric lamps can be applied. After the application of a POP bandage the patient's condition must be monitored, including the condition of the limb. The allerting picture commonly involves complaints of pain in the leg and local pressing sensation, tachycardia, fever, and a change in the condition of open fingers as well as other areas free from the bandage. These are serious symptoms and signs and may require immediate measures to be taken. Oedema, cyanosis, cooling, sensory disorders and the disturbance of active movement of the fingers or toes of the limb indicate that the plaster bandage is too tight, which brigs about venous stasis. In such a case, the POP bandage has to be either cut through partially or in full length and the edges turned back to both sides. In case of a fast increase of oedema, the bandage has to be cut along its length rapidly. If the fingers or toes return to normal colour, the POP bandage is fastened by several turns of the plaster bandage. Localised pain is indicative of pressure sores. In such a case, the bandage has to be cut at that place and the edges turned back to the sides. The severe sensation of pressure in the limb, local pain, rigors, fever, tachycardia, regional lymphadenitis, oedema of the areas above the bandage and signs of severe intoxication are all manifestations of anaerobic infection. The POP bandage must be removed immediately, the wound inspected and emergency measures taken to treat the gas gangrene (see «Wounds»). Localised pulsating pain, fever, tender and enlarged regional lymph nodes and leucocytosis are signs of local purulent infection. After the fracture has united, the POP bandage is removed. A special type of scissors or a plaster saw is used to cut the POP bandage in its length, its edges are opened wide and the limb is taken out carefully so as not to damage the soft bone callus that has formed at the fracture site. The limb is washed with water and soap and abrasions treated with iodine solution. The method of constant traction. This method ensures both reposition and maintenance of the repositioned fragments. Its variants are skin (fig. 63) and skeletal traction. The latter is most effective. Using the method of constant traction, the following has to be taken into consideration:
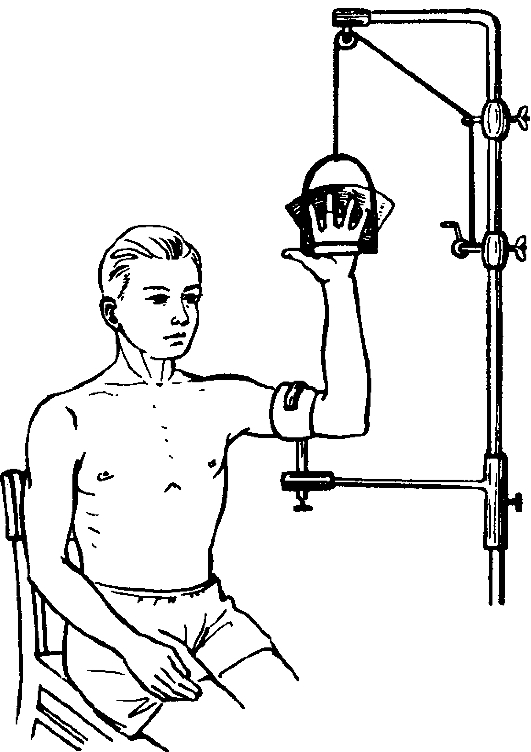
Fig. 63. Skin (plaster) traction using CITO splint in humeral fracture. • traction has to be done with the limb in the median physiologic position, i.e. there should be the equilibrium between antagonistic muscles. This is achieved by placing the semi-flexed limbs on a Bahler's or Bogdanov's splint (fig. 64); • resetting has to be done along the axis of the central bone fragment, i.e. the peripheral fragment has to be placed along the axis of the central one; • the weight for traction has to be added gradually, which provides a painless traction on the muscles and reposition of the fragments; • it is necessary to establish a countertraction, which is achieved for example by raising the foot end of the bed treating lower limb fractures. In such a position, the weight of the patient establishes countertraction. To perform skeletal traction (fig. 65), the following set of sterile instruments is required: Kirschner's wires or extension wires for skeletal traction, a special hand or electric drill for passing a wire. The wires are passed in the operating theatre. After anaesthetising the fracture site the patient's limb is placed on a therapeutic Border's splint. The operative field is cleansed according to the generally accepted principles and the site locally anaesthetised: the skin is infiltrated with 0, 5% novocain, then the subcutaneous, periosteum: first at the entry site and later at the site of exit of the wire in that same order. In femoral rod fracture the wire is passed through the area just above the projections of the condyles, which corresponds to the upper edge of the patella or behind the tuberoses of the tibia bone - at 1, 5-2 cm backwards from the most prominent part of the tuberoses. The wire is passed from external towards the medial. In fractures of shin bones, the wire is passed through the calcaneum - 3-4 cm posterior and below the ankle. In fracture of the humerus, the wire is passed through the olecranon through a site located at 2-3 cm distally from its apex of the process and 1-1, 5 cm deeper from its surface.
Fig. 64. Physiologic position of the upper (a) and lower (b) limbs.
Fig. 65. Skeletal traction in femoral (a) and shin (b) fractures. The wire is pushed through the skin and its sharp end strictly perpendicular to the longitudinal axis of the bone is passed using a drill. As soon as the wire comes out of the bone and is felt in the subcutaneous layer at the opposite side, the power is off, the skin is pierced by the wire (to prevent the skin from winding around and causing additional more damage) and the power started again, and the wire is advanced further until equal lengths of appear on each side. Iodine solution is used to clean the wire exit sites and gauze balls are fixed to the wire and to the skin to prevent displacement of the wire. A stirrup is attached to the wire with screws and a wrench to press and tighten the wire and thus to prevent its cutting through the bone during traction. Not removing the leg from the splint, the patient is then transported to the ward and placed on the bed with a wooden board under the mattress. A string is attached to the stirrup and passed over the pulleys of the system of traction along the splint axis, which is placed along the axis of the central bone fragment and the weight is then attached. A piece of bandage is fixed or clayed to the sole, passed over the pulley and a small weight is attached to it. This helps to keep the foot at right angles and in that way prevents the formation of a «foot drop». Skeletal traction provides for constant monitoring of the limb, and allows for movements in the joints keeping the fracture site immobilized. This improves blood circulation in the limb and facilitates consolidation of bone fragments. This method of treatment is known as functional. The traction weight depends on the extent of displacement of the bone fragments, muscle development and the patient's body weight. The approximate weight to use for lower limb fractures is 15% of the body weight in femoral fractures and 10% of the body weight for shin fractures; or it is equal to the first figure of the body weight in fractures of the shin and the first figure of the body weight plus half its value in femoral fracture. The countertraction in constant traction is provided by the patient's weight due to raising the foot end of the patient's bed. To ensure adequate countertraction the bed is raised to different levels depending on the weight being used for the traction: for the weight of 6-10 kg it is 30 cm, the weight of 11 - 15 kg - 70 cm. Reposition of fragments lasts for 1-3 days, then during the period of reparation bone callus forms, which takes about 4-6 weeks depending on the location and the type of fracture. To achieve an increasing traction during reposition more weight is added gradually, within 24 hours, starting from 4-5 kg and adding 1-2 kg every 2 hours. After reposition has been achieved, the weight is reduced to 4-5 kg, to prevent over-extension of the muscles and displacement of the fragments. The favourable conditions for fracture consolidation imply a balanced diet rich in proteins, vitamins, minerals, and primarily phosphorus and calcium. Measures to improve blood circulation at the fracture site include physiotherapy (e.g. exercise, massage, mechanical stimulation). Skeletal traction is maintained for a long time, occasionally for up to 2 months. At the end of traction the weight is first removed, the stirrup and wire are then removed. To do this both the wire and the surrounding skin are treated thoroughly with iodine, a sterile wire cutter is used to cut the wire right at the entry site to the canal, it is then pulled out of the canal from the opposite side. The skin wounds remaining are cleaned and covered by sterile gauze. An indication for an urgent removal of the wire to stop skeletal traction is inflammation accompanied by pain at the site of entry of the wire or the surrounding skin. In such a case the wire is cut off at the opposite side, and drawn out from the side where the infection is more pronounced. Constant traction can also be achieved with a loop, a strap and a cuff. The principles of treatment are similar to those for skeletal traction. For reposition of fractures of the cervical and upper thoracic spine traction is achieved with Glisson's loop (see fig. 29). The loop is fastened to the head end of the bed, which is raised as high as 50-60 cm. After reposition, the bed is lowered by 25-30 cm. Open reposition of fractures (surgical treatment of fractures). There are absolute and relative indications for surgical treatment of fractures. The absolute indications are as follows. 1. Open fractures. 2. Bone fragments damaging vital organs (the brain, spinal cord, organs of the chest and abdominal cavities, major vessels and nerves of the limb). 3. Interposition of soft tissues (e.g. muscles, tendons, fasciae - are trapped in between the bone fragments); this makes reposition and consolidation of bones impossible. 4. Pseudoarthrosis. 5. Purulent complications of bone fractures. 6. Imperfectly united fracture with severe organ dysfunction. The relative indications include the following ones. 1. Failure to reset bone fragments despite several attempts. 2. Delayed bone consolidation. 3. Transverse fractures of long bone rods when it is not possible to reduce the fragments and maintain the achieved reposition. 4. Imperfectly united fracture with moderate organ dysfunction. Bone fragments can be joined and kept using different methods by metal constructions (pins, nails, plates, rods, screws, bolts, wires etc). Metal rods are passed into a bone (intramedullar osteosynthesis) (fig. 66) or metal plates are placed on the fragments and fastened with screws (extramedullar osteosynthesis) (fig. 67, 68). Bone fragments can also be fastened with bolts, metal wires. All these types of bone fragment fixation are performed directly at the fracture site during focal osteosynthesis. The fracture focus is exposed surgically, open reposition is performed, one of the fixation variants is then performed. Disadvantages of this method are as follows: • additional trauma to the tissues at the fracture site; • traumatic character of the intervention; • destruction of the bone marrow along the limbs (intramedullar osteosynthesis); • the need for another operation to remove the metal after fracture consolidation. The use of compression apparatus helps to avoid the abovementioned problems. The major advantage of the technique is that the fixing wires are not passed through the fracture site (extramedullar osteosynthesis). The apparatus of Ilizarov, Gudushauri, Volkov-Oganesian provide for reposition of bone fragments without operation at the fracture site. They have been constructed not only to keep bones in the united position, but also to establish compression, tight pressing the fragments to each other with special bolts and rods (fig. 69). The method of extramedullar compression osteosynthesis is used for treating not only fresh fractures but also pseudoarthrosis, slowly uniting fractures, osteomyelitis of bone ends. This method helps prevent pyogenic infections, since there are no any foreign bodies (e.g. metal rods) in the fracture site and the adjacent tissues. The complications are slow consolidation and development of a false joint. During this period, the bone marrow canal is closed up. Consolidation is considered slow if it does not occur within twice the average time required for the union of such a fracture, which depends on the location and type of fracture. The main characteristic of false joint is the closure of the bone warrow canal. It takes about nine to ten months after the fracture for a false joint to form.
Fig. 66. Intramedullary osteosynthesis in femoral fracture: a - displacement of the femoral bone fragment; b - insertion of the metal rod in the proximal fragment; c - the metal rod inserted in the proximal and distal fragments of the thighbone. The causes of slow consolidation can be of local (most commonly) and general character. The local factors are as follows. 1. Improper reposition of the fragments. 2. Inadequate immobilisation (mobile fragments, overextension during constant traction). 3. Partial or complete interposition of soft tissues, the latter invariably resulting in a false joint. 4. Bone defects formed as a result of bone fragment removal or bone resection. 5. Osteomyelitis of the bone fragments at the fracture site. 6. Dystrophy due to injuries to the vessels or nerves of the limb or because of severe soft tissue damage at the fracture site. General factors include debilitating conditions, inadequate nutrition, infections, and metabolic diseases (e.g. diabetes mellitus), old age. The signs of slow consolidation are as follows: pathologic mobility at the fracture site, skin hyperaemia, tissue swelling, muscle atrophy, tenderness on axial pressure. To differentiate slow consolidation from a false joint an X-ray has to be taken, which may show sclerotic ends of the bone fragments or their disjunction. A false joint is identified by the obliteration of the bone marrow canal. Conservative treatment of slow consolidation requires thorough immobilisation throughout the whole period of consolidation of a fresh fracture. Immobilisation is usually achieved with POP bandage or the apparatus for compression osteosynthesis. In case the reposition of fragments is unsatisfactory, scar tissues between the fragments is to be removed and the bone fragments are to be reset. To enhance regeneration of bone tissue, massage, electrophoresis of chloridium, exercise, anabolic hormones are administered as well as a balanced diet. Treatment of false joints is only by surgery. During the operation, the scar tissue around the bone fragments is excised, their edges are exposed, and the fragments repositioned thoroughly. Bone fragments are fastened using compression apparatus or bone auto-transplant or an operation of the of «Russian lock♠ type. Good results are achieved by the combination of bone plastic operations and compression osteosynthesis. Dislocations Dislocation is a complete displacement of the joint ends of bones in relation to each other; it will be noted that partial dislocation may also occur.
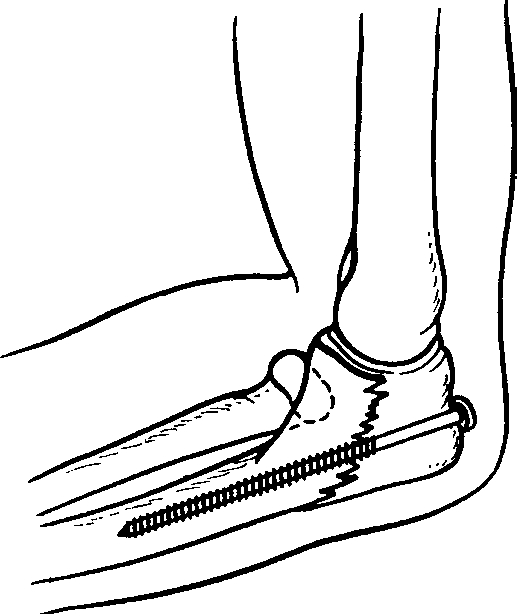
Fig. 67. Extramedullary osteosynthesis (e.g. fixation of the olecranon using a screw).
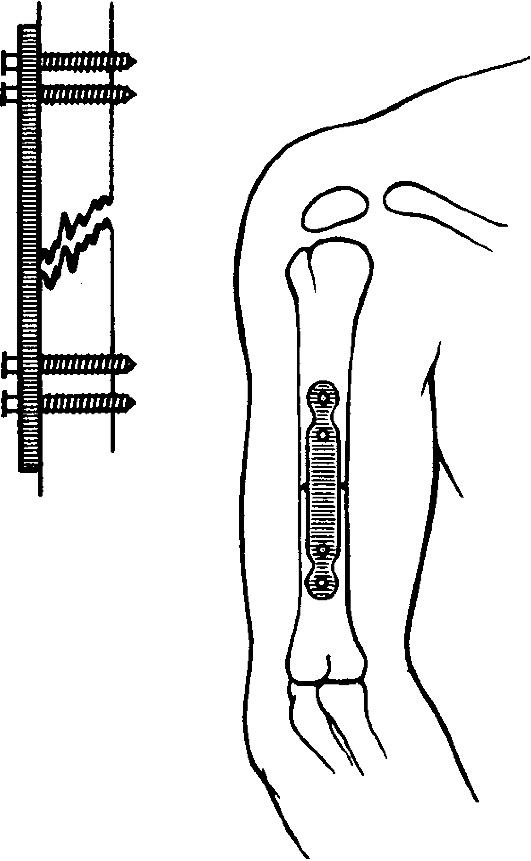
Fig. 68. Extramedullary osteosynthesis (e.g. fixation of the humeral fragments using a plate and screws).
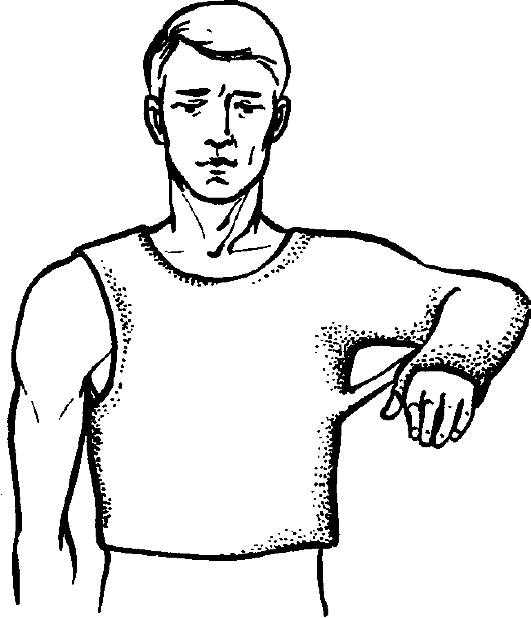
Fig. 69. Extraosseous osteosynthesis using Ilizarov's apparatus. Classification of dislocations. Dislocations are divided into congenital and acquired. Acquired dislocations are, on the other hand, subdivided into traumatic and pathologic; complicated and non-complicated; open and closed. Habitual (repeated dislocations in one particular joint) are also identified. Management of dislocations. Patients usually complain of severe pain in the affected joint and are unable to make any active or passive movements as an attempt causes extreme pain. History taking yields the mechanism of injury: a fall on the limb (e.g. on an outstretched " barm); overextension in the joint, a direct blow on the joint etc. On inspection, there is deformation at the joint region and atypical, forced positioning of the joint (fig. 70-72). Active movement is impossible, there is shortening (rarely lengthening) of the limb and a change in the limb axis.
Fig. 70. Humeral dislocation.
Fig. 71. Forearm dislocation. On palpation, there is tenderness at the joint, occasionally the joint end can even be palpated in an abnormal position only. In dislocation of the humerus, instead of its head, for instance, a hollow is palpated and the joint is felt to be «empty». Passive motion is very limited and painful. When attempting to change the atypical position of the joint, springy resistance in it is felt, the extremity returns to its original position if not held (the springy resistance sign). In dislocation of the acromial end of the clavicle, pressing on the protruding end returns the joint to its normal position; but as soon as the pressure is released it goes back to the forced position (the «key sign»). Examination of the patient with dislocation should include feeling peripheral arterial pulses, sensitivity and the extent of active movement in the fingers or toes, for there can be damage to the vascular nerve bundles. X-ray is used to confirm the diagnosis of dislocation and helps to determine the exact position of the joint surfaces as well as possible fractures of the bone joint ends. Dislocations are divided into fresh (up to 3 days from the trauma), not fresh (from 3 days to 3 weeks from the trauma) and long-standing, or chronic (since the trauma occurred 2-3 weeks ago). The older the process, the more pronounced the changes that occur on the joint surfaces and the adjacent tissues. Initially, oedema of the adjacent tissues increasingly develops followed by rapid development of muscle retraction and haematoma formation. Later on, the gradual scar of the joint capsule and adjacent tissue occurs filling in the joint cavity. Chronic dislocations can be reduced only through surgery (open method). The dislocations are therefore to be reduced as soon as possible. The treatment of traumatic dislocations involves the three stages. • Reduction. • Immobilisation of the limb. • Restoration of functions. Of utmost importance are adequate anaesthesia and complete relaxation of the muscles during the reduction. Reducing a dislocated joint without analgesics is prohibited, since the resultant pain can lead to more muscular resistance and more damage to the joint capsule causing severe capsular rupture and subsequent development of scar tissue and, later on, of habitual dislocations. Analgesia can be achieved by injecting 1 ml of 1% promedol or morphine subcutaneously and 20 ml of 1-2% novocain intra-artcularly (e.g. in shoulder, forearm or foot dislocations). Hip dislocations are reduced under general anaesthesia. The use of muscle relaxants in difficult cases of hip dislocations makes the reduction much easier, the type of manipulation playing no particular role.
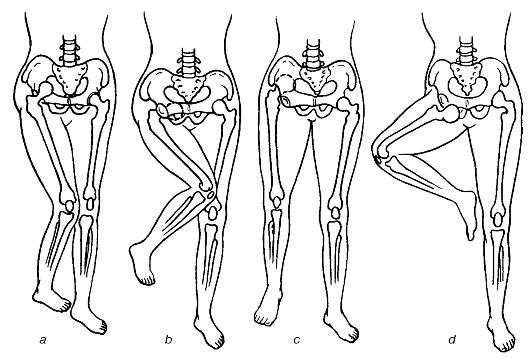
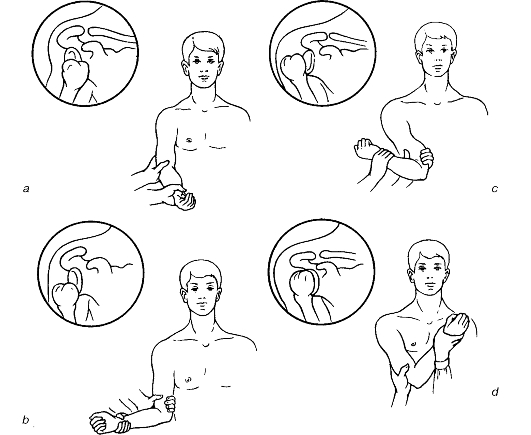
Fig. 72. Femoral dislocation: a - iliac; b - ischiaic; c - suprapubic; d - obturator. Shoulder dislocation is one of the commonest types (50-60% of all dislocations). The shoulder joint is deformed (see fig. 70), the humeral head is absent in its normal position and can be palpated either in the armpit or beneath the coracoid process. The humeral head should preferably be palpated when the arm is flexed at the right angle in the elbow joint. To reduce shoulder dislocation a number of methods [e.g. that of Kocher (fig. 73), Djanelidze (fig. 74), Motais (fig. 75) or Hippocrates] can be used.
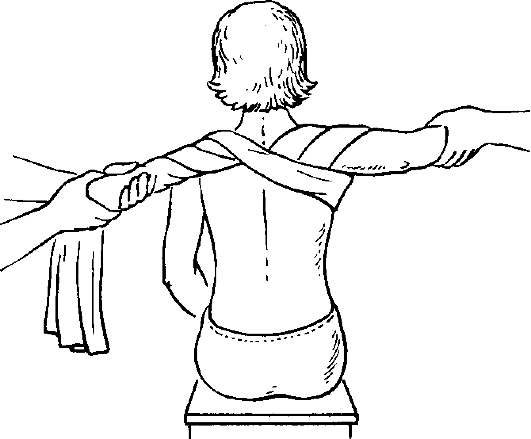
Fig. 73. Reducing humeral dislocation (Kocher's method): a - axial humeral traction followed by adduction of the arm; b - external humeral rotation; c - humeral displacement to the anterior thoracic surface; d - internal humeral rotation.
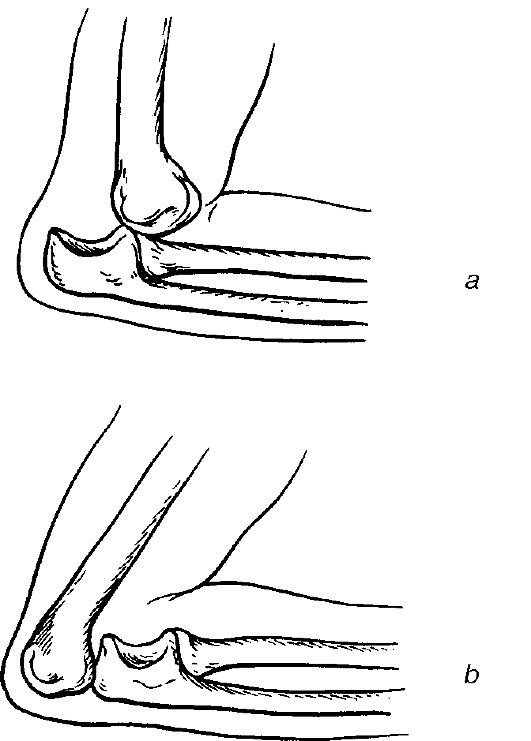
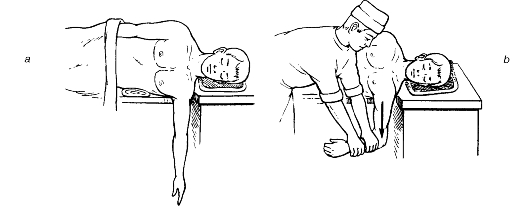
Fig. 74. Reducing humeral dislocation (Dzhanelidze's method): a - the patient's position before reducing; b - reducing the dislocation. When reducing the dislocation by Motais (fig. 75), the trunk is fastened with some bed sheet passed under the axilla and the injured limb traction is pulled. The click sound and restoration of the joint's function both indicate successful reduction. The reduction by Hippocrates is performed by putting the patient in the supine position and the doctor sets the heel against the patient's armpit, and pulls the affected arm holding it onto the hand and forearm. After the reduction the limb is fastened either with a plaster bar or Desault's bandage or with a triangular bandage for 2-3 weeks. It is necessary to perform a control X-ray investigation after the reduction. Dislocation of the elbow joint. A characteristic sign is the projection of the olecranon (posterior dislocation; see fig. 71) or the block of the humerus (anterior dislocation). Posterior dislocation is reduced under general anaesthesia. To reduce a posterior dislocation, the assistant pulls on the forearm flexed at right angles, and the doctor presses on the olecranon using the fingers. In anterior dislocation, a big towel is applied and pulled along the axis of the humerus, trying to pull the olecranon over the humeral block. A click sound indicates a successful reduction. After the reduction and an X-ray control, a back plaster bar is applied for 5-7 days until the pain is over.
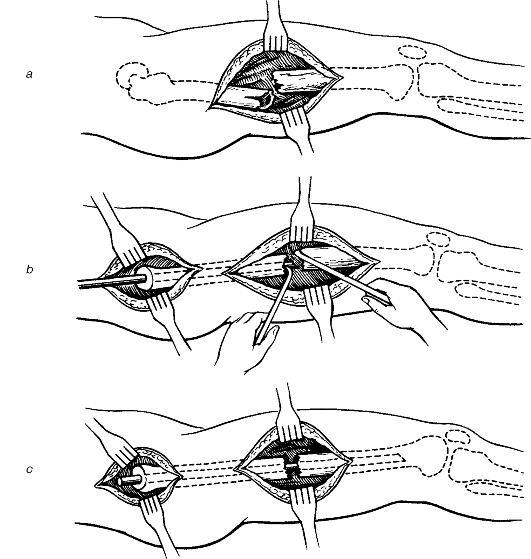
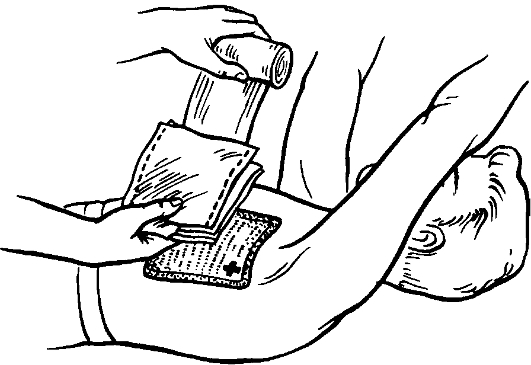
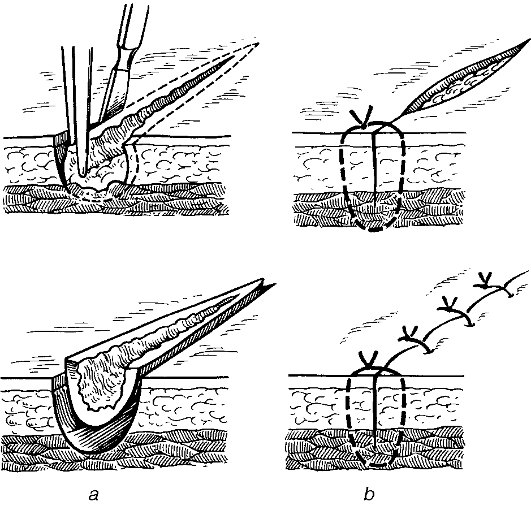
Fig. 75. Reducing humeral dislocation (Motta's method). Hip dislocation (see fig. 72). This is characterised by the general clinical symptoms of joint dislocation with the typical positioning of the limb. Reduction is achieved by using the Kocher's method under general anaesthesia. The assistant fastens the patient's pelvis with both hands, pressing it against the table. The doctor holds the shin flexed in the knee joint at right angles, and strongly pulls the thigh upwards rotating it laterally at the same time. The appearance of active and passive movements in the hip joint is an indication of a successful reduction. X-ray control is done and a complete bed rest is prescribed for a period of 3-4 weeks, after which the patient is allowed to walk with crutches for another 4 weeks. Dislocation of the shin is accompanied by damage to the ligaments of the joint and characterised by a typical positioning of the shin. Reduction of this type of dislocation is done under general anaesthesia by pulling on the limb along its length. After reduction, the POP bandage is applied to cover the limb from the ankle to the mid-third of the thigh. If it is not possible to reduce this type of dislocation in such a way, it means there is interposition of soft tissues or bone fragments in the joint, which is an indication for emergency surgery, i.e. open reduction of the dislocation. Wounds Wound is an injury caused by physical means, with disruption of the normal continuity of the skin and underlying tissues. Classification of wounds I. Depending on the cause: — surgical, or aseptic, i.e. resulting from aseptic surgery; — accidental, or casual (these are always infected! ); — battle (wartime) wounds. II. According to the character: — incised; — stab; — chopped; — contused; — crushed; — lacerated; — bite; — gunshot; — poisoned; — combined. III. Depending on the presence of microorganisms in the wound: — aseptic, or surgical; — infected, or accidental; — purulent, i.e. resulting from contamination with pyogenic flora. IV. In relation to the bodily cavities: — penetrating, i.e. penetrate into the chest, abdominal cavity, the skull or joint cavities etc.; — non-penetrating, i.e. when the injury is confined to the cavity wall without penetrating into it. V. Depending on the presence of complications: — non-complicated, i.e. involving only mechanical tissue injury; — complicated, i.e. in addition to mechanical damage, accompanied by other factors: poison, radioactivity, infection, burns and frostbite. Examination and management of wounded patients Examination of the patient with a wound has to be done thoroughly. The place, the circumstances under which the injury was inflicted, the patient's condition at the moment he/she got injured should always be taken into account. The patient's general condition is assessed: consciousness, skin colour (pallor), rate and volume of pulse, depth and rate of breathing. The information about first aid is obtained: by whom and what kind of aid was provided (self help, lay man's help or by a medical personnel), as well as how the injured was transported to the hospital. The history should contain information on the injuring agent and possible blood loss. The main clinical signs and symptoms of wounds are pain, bleeding and gaping. Pain is due to injury to the nerve endings and depends on the location of a wound; most painful are wounds of the organs with large amounts of nerve endings (e.g. finger tips, the periosteum or peritoneum). The type of an agent of injury also plays a role - contused, lacerated and crushed wounds are more painful. The patient's condition also plays a role as pain threshold is decreased in shock, drunkenness and in massive blood loss. Bleeding always accompanies wounds but the extent and rate differ, depending on the calibre and type of the injured vessel (artery, vein, minute vessels), location (bleeding is more marked if the wound is located on the face, scalp or), bleeding from an incised wound is more pronounced than from lacerated and contused ones. Defective blood clotting system (e.g. haemophilia) can produce profuse haemorrhage. Gaping of wound edges results from contraction of elastic skin fibres, deep lying muscles and tissue defect because of the trauma. On inspection, the size and type of wound, the difference in the affected part of the body as compared to the intact one, the presence of deformation, mobility in the joints, the presence of active and passive movements, the state of superficial and deep sensitivity, the presence and type of pulse on the peripheral arteries of the limbs are all taken note of. In chest wounds, lung percussion and auscultation have to be done. In abdominal wounds, percussion, auscultation and palpation are to be performed. These examinations done prior to examination of the wound itself help in the assessment of possible injuries to the nerves, arteries or organs of the abdominal and chest cavities. The next step is the examination of the wound itself. The use of probes and other instruments is not recommended at this stage. The wound is inspected to determine its size and character and the extent of tissue damage, contamination and possible complications. Incised (slashed) wounds tend to have smooth edges and, as a rule, be confined to soft tissues. When the incision is transverse to the elastic fibres of the skin compared to longitudinal incisions the wound gapes, bleeds more. Stab wounds caused by knives, awl, bayonets as well as other sharp piercing objects have smaller entry sites and are commonly accompanied by minimum damage to the adjacent tissues. It is imperative to thoroughly examine the patient with a stab wound since there is always the danger of damage to the internal organs, e.g. the stab can be penetrating into the chest or abdominal cavity (see below). If it is on the limb there can be damage to the major vessels, with haematoma formation or bleeding into the deeper layers, that increases the limb size and causes tissue induration. Chopped wounds have even edges and are characterised by soft tissue damage and haemorrhage around the wound. Bleeding is usually profuse and there can be bone involvement. Contused wounds have an irregular shape. The adjacent tissue is crushed, there are marked haemorrhages with haematomas. The crushed adjacent tissues are normally not viable and are necrotised later on. Lacerated wound can result from contact with a fast moving object (e.g. a saw, shell-splinter). Tissue damage (the skin, muscle, tendon) in such injuries is marked. The wound has an irregular shape, edges are jagged and there are massive haemorrhages into the skin, subcutaneous tissues and muscles. The wound cavity can also be filled with blood clots, bleeding mildly. Bite wounds occur from animal or human bites. They are similar to the lacerated and contused ones. Gunshot wounds result from the injuries by projectiles, firearms and grenades (e.g. missiles, bullets, pellets, bomb, mines etc.). These types of wounds are typically with extensive tissue damage because of the high speed of the wound infecting and the resultant injury by bone fragments. The three areas from a gunshot wound of damage are identified: the wound canal, the areas of primary traumatic necrosis and the area of concussion. The wound canal contains shell-splinters, tissue and clothing fragments and other foreign bodies, and blood clots. The area of primary traumatic necrosis consists of necrotised tissues adjacent to the wound canal. The area of molecular concussion is characterised by haemorrhages, impaired capillary blood flow (i.e. stasis of blood cells and capillary ruptures) Modern gunshot wounds that are inflicted by high tech missiles with unstable flight directions are characterised by large wound canals. Gunshot wounds are accompanied by extensive traumatic tissue necrosis, the tissues surrounding the wound canal form wide nonviable areas with multiple haemorrhages. Wounds caused by the exit sites of such wounds are wider than their inlet sites. Wounds caused by shell-splinters are commonly blind and the damage at ther entry site is always greater. Large areas of dead tissue, pronounced bacterial contamination, progressing tissue necrosis at the area of molecular concussion as well as the concurrent damage to the vessels and nerves, bones, joints; blood loss and shock are characteristic features of gunshot wounds. Such wounds are not infrequently complicated with infection (purulent, putrid, anaerobic). In chest injuries apart from the type of injury (stab, gunshot, incised), the patient has to be examined for signs of penetration. The presence of penetration into the chest cavity is identified by the noisy outflow of foamy blood from the wound, «breathing» in the air into the pleural cavity accompanied by whistling breath sounds, the air bubbles coming out of from the wound and subcutaneous emphysema. The entry of air into the pleural cavity leads to an open pneumothorax. In open pneumothorax, air enters through the wound on inspiration and escapes on expiration with whistling sounds. Tension (valvular) pneumothorax can also develop when the air breathed into the pleural cavity but is not able to escape on expiration because the valves formed by tissues of the chest wall close up. The condition of the patient with tension pneumothorax is always critical and deteriorates progressively because of the increased compression of the lung and displacement of the mediastinal organs to the intact side. In patients with this condition severe dyspnoea, acrocyanosis, fast and weak pulse are observed. Intercostal spaces on the affected side widen up, half of the chest swells up, the percussion note on this side is tympanitic, and breath sounds are absent. Signs of penetrating abdominal wounds are intraperitoneal haemorrhage and posttraumatic peritonitis. Patients complain of abdominal pains, thirst and malaise. Skin pallor, tachycardia, fast and weak pulse may be noted. The abdomen is tender and tense, Blumberg's sign is positive; percussion note is highly tympanic and the liver dullness is diminished, because the air having entered the abdominal cavity. If the penetrating injury is accompanied by intraperitoneal bleeding, dull percussion notes characterise the areas where blood has accumulated. Diagnosis of penetrating abdominal injury is confirmed in cases when loops of intestine, omentum, intestinal contents, urine or bile are found in the wound. First aid and management of wounds. First aid prior to hospitalization should include bleeding arrest, application of bandages and, when necessary, transport immobilisation. In case of profuse arterial and venous bleeding tourniquet has to be applied (see Chapter IV). The surrounding skin is cleaned with solutions of iodine, iodonate betadine, and free lying foreign bodies are removed from the wound. It is not allowed to use instruments (probes) and the fingers to examine the wound as it may cause additional damage to the vessels and nerves as well as transfer infections from the surface deep into the wound. The wound is covered with sterile tissue or cotton wool - gauze pads (see «Dressings») and then bandaged. To stop venous and capillary bleeding the pressure bandage is applied. In case of open fractures, damage to major vessels and nerves, extensive soft tissue damage (lacerated and contused wounds) the standard transportation immobilisation or improvised splints are applied. The patient is then transported to a surgical unit. In giving first aid to a patient with penetrating chest wound that is complicated with an open pneumothorax it is advisable to try to as early as possible block the contact of the pleural cavity with the surround by applying an occlusive bandage. An individual dressing pack is ideal for this purpose. The wound edges are cleaned with an antiseptic solution. The individual pack's cover is cut open and its internal surface applied on the wound, the cotton wool pads are placed on top and bandaged firmly to the chest (fig. 76). In the absence of a plastic pack, any available material that does not allow air to pass through can be used - polyethylene bag, oilcloth and in extreme cases cotton wool heavily covered with sterile Vaseline or some other harmless cream to the wound. Strips of adhesive plaster can also be used to make the wound airtight. The wound edges are brought together with some plaster strips and then the imbricated bandage is applied, each new strip covering half of the previous one. In penetrating abdominal injuries, the first aid is to apply aseptic dressing on the wound. If there is external bleeding, pressure haemostatic bandaging is done. In eventration of the internal organs (e.g. the loop of intestine, omentum) they are not to be reduced back into the abdomen but rather sterile gauze tissue is placed on them and a circular bandage around the abdomen is applied. Primary surgical wound debridement. At the basis of treating infected wounds is primary debridement. The aim is to remove nonviable tissues together with the microorganisms and in that way prevent the further development of wound infections (fig. 77; fig. 78, colour inset). Primary wound debridement is divided into: early, which is done within the first day of injury; delayed - within the second day after injury and late - more than 48 hours after injury. The earlier the primary debridement is done, the better are chances of preventing the wound from being infected. Surgical debridement is not done for non-penetrating stab wounds without damage to major vessels, for piercing wounds with small entry and exit sites without signs of injury to the vital organs, vessels, and for incised wounds that do not go beyond the subcutaneous fat.
Fig. 76. Occlusive dressing in open pneumothorax.
Fig. 77. Primary surgical debridement of a wound: a - edge, wall and base excision; b - primary suturing. Primary surgical wound debridement should be done in one stage and should remove all nonviable tissue. The first to be operated on are the injured with haemostatic tourniquet and those with extensive shell-splinter injuries with soil contamination and thus being at high risk of anaerobic infections. Primary surgical wound debridement involves excision of wound edges, bases and walls up to the intact tissues with restoration of anatomical structure. The manipulation is started with incision of the wound: 0, 5 - 1 cm of the skin and subcutaneous tissue around the wound is excised. In an extremity injury, after that the incision is performed along the limb axis, along the vascular - nerve bundle making it long enough to inspect the wound including its pockets and to excise all the nonviable tissues. Then the fascia and aponeurosis are incised in a Z-shaped or a semilunar incision. This ensures adequate inspection of the wound and prevents muscle compression due to oedema, which is of special importance in gunshot wounds. After the wound has been incised, pieces of clothing, clots of blood, free lying foreign bodies are removed before the excision of crushed and contaminated tissues is started. Muscles are excised up to intact tissue. Nonviable muscles are dark-red and dull, do not bleed on cutting and do not contract on touch with the forceps. Intact major vessels, nerves and tendons have to be preserved; contaminated tissue is carefully removed from their surface. Free lying small bone fragments that are found in the wound should be removed, and bone edges having no periosteum should be cut off with a bone cutter. In injuries to the vessels, nerves, tendons, they have to be repaired. Meticulous homeostasis has to be done during wound debridement. After the wound has been thoroughly cleaned of all the dead tissues and foreign bodies it is sutured (primary suturing). Late surgical wound debridement is performed following the same principles as for the early one, but if there are signs of pyogenic infection, it is done by removing foreign bodies, cleaning the wound of dirt, removal of necrotic tissue, opening up of pus collected into pockets, haematomas, abscesses to provide for a free flow of tissue secretions. Wide excision of the wound as a rule is not done for fear of generalising the infection. The application of primary sutures is the last step in the primary surgical wound debridement. Primary suturing restores the continuity of tissues. It is aimed at preventing secondary infections of the wound and provides the conditions for wound healing by primary intention. Primary suturing is done within the first day after the injury. Aseptic operations are also most commonly completed with the application of primary sutures. Primary sutures may be applied after incision and drainage of subcutaneous abscesses, phlegmon, and the excision of necrotic tissue which provides for better drainage and long term wound washouts with solutions of antiseptics and proteolytic enzymes (see Chapter XI). Primary - delayed sutures are applied during 5-7 days after the primary surgical wound debridement, before the formation of granulation tissue if the wound did not get infected. Inflammation in the primarily sutured wound is usually mild and healing by primary intention results. The widespread use of primary suturing even when the wounds are debrided at late periods (12-24 hours) has become possible because of the effective antibacterial therapy and the systematic observation of the patient. At first signs of infection, some or all of the sutures have to be removed. Experience from the Second World War and subsequent other local wars has shown that application of primary sutures to gunshot wounds is not justified not only because of their extent but also because of the impossibility to monitor such wounds under war conditions and during the period of medical evacuation. The concluding and delayed stage of the primary wound debridement is the application of the secondary suture. It is placed on granulating wound provided there are no signs of purulence. Secondary suture can be applied within several days to several months. It is used to enhance wound healing. Early secondary suturing is done on a granulating wound between days 8-15. The wound edges are usually mobile and there is no need to excise them. Late secondary suturing is done in later periods (in about 2 weeks) when scar has already set in at the wound edges and walls. Bringing the wound edges together is impossible unless the edges are mobilised and the scar tissues excised. In large tissue defects skin grafting has to be done. Indications for the use of secondary sutures are as follows: body temperature and the blood picture having returned to normal, patient's satisfactory general condition, as well as the following wound characteristics: - no oedema and surrounding skin hyperaemia, clean wound devoid of pus and necrotic tissue, healthy, bright and sappy granulation. Different types of sutures can be used but independent of the type the following general principles have to be abided by: there should not be empty spaces and pockets left within the wound, adaptation of wound edges and walls must be maximum. Removable sutures should be used and no ligatures (either absorbable or catgut) should be left in the sutured wound cavity, since the presence of these foreign bodies, can lead to wound suppuration. In early secondary suturing the granulation tissue should be left intact, which makes the operation technique easier and preserves granulation's barrier function, thus preventing the spread of infection to the adjacent tissues. Healing of the wound treated with secondary suturing without infection is referred to as healing by the type of primary intention as opposed to the true primary intention, since even though in the former the wound heals with a linear scar, it was preceded by the maturing and scar of granulation tissue. Surgical infection Wound suppuration. Clinical signs of local wound infection are usually evident within 2-3 days following the injury. The risk of purulent infections is high by extensive tissue damage, incomplete excision of nonviable tissues during wound debridement, and the presence of pathogenic microorganisms in the wound. Fulminant suppuration, severe intoxication, intense pain in the sutured wound, fever with moderate tissue necrosis in the wound are characteristic of staphylococcal infection. Sluggish suppuration with extensive tissue necrosis is typical of infections caused by E. coli, Proteus and Pseudomonas spp; in such cases infection in these cases will spread extensively. Streptococcal infection is characterised by formation of marked inflammatory infiltrates with distinct hyperaemia of the skin. Pyogenic infection in the wound that occurs within the first 3-5 days is referred to as primary infection, while that developing later assecondary infection, which is caused by new necrotic foci in the wound or by secondary infection with nosocomial strains of microorganisms. Following contamination, pain in the wound intensifies, its edges become oedematous, tissue colour changes, clots of blood and fibrin appear as dirty grey, wound secretion accelerates, serous and/or haemorrhagic exudates evolve to serous and/or purulent or then to purulent. The neighbouring tissues are hyperaemic on inspection and firm on palpation. The regional lymph nodes are commonly enlarged, firm and tender. Lymphadenitis is common. As the infection begins to subside, oedema of the adjacent tissues reduces as does skin hyperaemia; necrotic tissue falling off and wound granulation start, which indicates the transfer to the reparative phase (the stage of wound healing, or dehydration). In unfavourable course, the patient's condition may deteriorate - intoxication (fever as high as 39-40 °C, rigors, tachycardia) sets in, neighbouring tissues become oedematous and the skin becomes hyperaemic, tissue necrosis worsens and the purulent secretions from the wound increases. In severe cases the patient progressively becomes weaker, loses appetite and complains of headache. The blood film may show leucocytosis with a left shift and rise in ESR. The colour, odour and consistency of the exudate depend on the type of infection. Ichorous offensive smell and dirty grey colour of pus are characteristic of ichorous bacteria, bluish-green colour of exudates is found in cases of Pseudomonas spp. Recurrent rigors in a patient without pain in the wound are an early sign of suppurative wound tissue decay, of which specific odour of rotten tissue is typical. The odour depends on the type of the causative agent: the odour of rotten meat is characteristic of Cl. sporogene, that of ammonia is encountered in infecting by B. coli communis or Proteus vulgaris; the odour of mould rotten stuff is produced by fungal or spirochaetal infection. In ichorous infections the wound appears dry, granulation is absent and tissue necrosis progresses, muscles become grey and dull. Wound discharge is dirty grey, or dark brown or greenish in colour with specific smell. The skin and subcutaneous tissues are usually covered with dirty-green patches as they get soaked with the products of haemolysis. The regional lymph nodes are commonly enlarged and tender. The signs anaerobic infections other than Clostridium spp include offensive smell of the exudate, excessively necrotised wound tissues, dirty-grey purulent contents with droplets of fat. Furthermore, severe intoxication is evident: subicteric or icteric sclerae and skin, anaemia, tachycardia etc. Unlike anaerobic clostridial (gas) gangrene, this type of infection produces less prominent local signs, and there is no specific muscle change, i.e. no «boiled meat» appearance or bronze discolouration of the skin, accumulation of gas in the tissues is very rare (crepitation is not revealed). Treatment involves antibacterial, detoxicating, anti-inflammatory and supportive measures and depends on the phase of the condition. • Phase 1 includes evacuation of pus, necrotic tissue, dehydration and antibacterial therapy. Round change of wound dressing is of great importance. To evacuate pus, products of necrolysis and exudates drainage as well as hypertonic solutions are used (see «Mechanical and physical antiseptics»). Proteolytic enzymes are used to stimulate necrolysis (see " Biological antiseptics" ). Moreover, the wounds are washed with solutions of antiseptics (see «Chemical antiseptics). To remove necrotic tissues, laser beams and ultrasound cavitation are applied. In extensive necrosis, necrectomy is indicated, either as a one-stage procedure or a serial one. Such wounds require daily change of dressing, in severe infection the procedure may need to be performed twice a day. • Phase 2 (reparative regeneration) precludes the use of physical antiseptics or proteolytic enzymes since such substances hamper regeneration of tissues. The rate of dressing should be reduced. Ointments that enhance tissue regeneration are prescribed for topical wound dressing (e.g. methyluracyl). Stripes of adhesive plaster can be used to approximate the wound edges. When the infection has subsided completely, the wound can be managed by early or late secondary suturing and in extensive tissue defect, autodermoplasty may be an option. |
Последнее изменение этой страницы: 2019-06-08; Просмотров: 168; Нарушение авторского права страницы