|
Архитектура Аудит Военная наука Иностранные языки Медицина Металлургия Метрология Образование Политология Производство Психология Стандартизация Технологии |
|
|
Архитектура Аудит Военная наука Иностранные языки Медицина Металлургия Метрология Образование Политология Производство Психология Стандартизация Технологии |
Step 5. How to give a rescue breath
- Ensure the casualty’s airway is open. - Pinch their nose firmly closed. - Take a deep breath and seal your lips around their mouth. - Blow into the mouth until the chest rises. - Remove your mouth and allow the chest to fall. - Repeat once more. Carry on giving 30 chest compressions followed by two rescue breaths for as long as you can, or until help arrives. If the casualty starts breathing normally again, stop CPR and put them in the recovery position. Exercises Answer the questions. 1. What is CPR? When do we do it? 2. What does CPR involve? 3. What should a rescuer do if he finds someone unresponsive? 4. How should a rescuer give chest compressions? 5. How should a rescuer give a rescue breath? 6. What should a rescuer do after the casualty starts breathing?
Give Russian equivalents. Chest compressions, to keep smb’s heart and circulation going, recovery position, to be unresponsive, to assess the casualty, emergency medical help, airways, to tilt smb’s head back and lift the chin, chest movement, to start CPR, chest pressure and rescue breaths, a heel of a hand, a breastbone, to interlock fingers, to lean over the casualty, to release the pressure, to pinch smb’s nose closed, to take a deep breath, to repeat once more.
Find English equivalents. Искусственное дыхание и непрямой массаж сердца, не реагировать (без сознания) и не дышать, положение лёжа на боку с расположением полости рта ниже уровня воздухоносных путей и выдвинутой вперёд нижней челюстью, непрямой массаж сердца, поддерживать голову, движение грудной клетки, нажимать на грудину вертикально, зажимать нос плотно, плотно сжать губы, вызывать скорую помощь, вздохнуть глубоко, продолжать искусственное дыхание.
Match the words in the two columns.
Explain how to act if someone is unresponsive and not breathing. Use words and word combinations from ex. 2 and given below. Firstly / The first step is / To begin with … Secondly / Thirdly / The next step is … After that /Then … Following that … Finally / Lastly / The last step is …
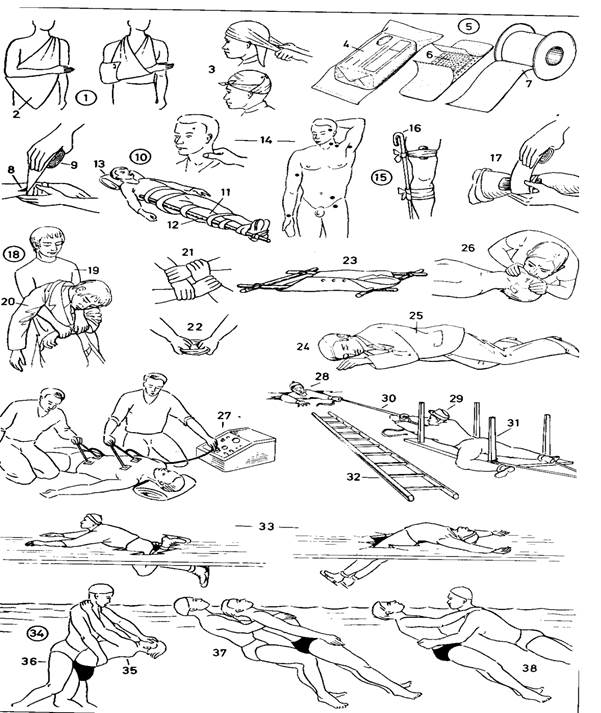
Study the pictures following the terminology below. Can you guess what these words and word combination mean? Check yourself, using a dictionary. First Aid 1-13. –Measures for managing fractures and wounds 1. arm bandage 2. arm sling 3. head bandage 4. first aid kit 5. first aid dressing 6. sterile gauze dressing 7. sticking plaster 8. wound 9. bandage 10. emergency splint for a broken limb 11. fractured (broken) leg 12. splint 13. headrest 14-17. - Measures for stanching (tying up of) the blood flow 14. pressure points of the arteries 15. emergency tourniquet on the thigh 16. walking stick used as a screw 17. compression bandage 18-23 - Rescue and transport of an injured person 18. Rautek grip (for rescue of a victim of a car accident) 19. helper 20. injured person (casualty) 21. chair grip 22. carrying grip 23. emergency stretcher of sticks and a jack 24-27. the positioning of an unconscious person and artificial respiration (resuscitation) 24. coma position 25. unconscious person 26. mouth-to-mouth (mouth-to-nose) resuscitation 27. resuscitator (respirator, artificial breathing device) 28-33 methods of rescue in ice accidents 28. person who has fallen through the ice 29. rescuer 30. rope 31. table (or smth. else) 32. ladder 33. self-rescue 34-38 - rescue of a drowning person 34. method of release (release grip) to free a rescuer from the clutch of a drowning person 35. drowning person 36. lifesafer 37. chest grip, a towing grip 38. tired swimmer grip (hip grip)
Study the information given below. Check yourself, using a dictionary.
FIRST AID KIT A well-stocked first-aid kit, kept within easy reach, is a necessity in every home. Having supplies gathered ahead of time will help you handle an emergency at a moment's notice. You should keep one first-aid kit in your home and one in each car. Also be sure to bring a first-aid kit on family vacations. Store your kits in easy-to-retrieve locations that are out of the reach of the children. Check your first-aid kits regularly, at least every three months, to replace supplies that have expired. You can purchase a ready first aid kit at the chemist’s or make one of your own. If you decide to make one, choose containers for your kits that are roomy, durable, easy to carry, and simple to open. Plastic tackle boxes or containers for storing art supplies are ideal, as they're lightweight, have handles, and offer a lot of space. What You'll Need Include the following in each of your first-aid kits: - Activated charcoal (use only if instructed by your poison control center) - Adhesive tape - Aloe vera gel - Antibiotic ointment - Anti-diarrhea medication - Antiseptic solution or towelettes - Aspirin and nonaspirin pain relievers (never give aspirin to children) - Bandages, including a roll of elastic wrap (Ace, Coban, others) and bandage strips (Band-Aid, Curad, others) in assorted sizes - Calamine lotion - Cotton balls - Disposable latex or synthetic gloves, at least two pair - First-aid manual - Gauze pads - Over-the-counter hydrocortisone cream - Petroleum jelly or other lubricant - Plastic bags for the disposal of contaminated materials - Scissors and tweezers - Soap or instant hand sanitizer - Sterile eyewash, such as a saline solution - Thermometer - Triangular bandage After you've stocked your first-aid kits: - Read the entire first-aid manual so you'll understand how to use the contents of your kits. - Store first-aid kits in places that are out of children's reach but easily accessible for adults. - Check the kits regularly. Replace missing items or medicines that may have expired. - Check the flashlight batteries to make sure they work. - If you're flying, be sure to pack the first-aid kit in your checked luggage. Many of the items won't be permitted in your carry-on bags. |
Последнее изменение этой страницы: 2019-10-24; Просмотров: 330; Нарушение авторского права страницы