
|
Архитектура Аудит Военная наука Иностранные языки Медицина Металлургия Метрология Образование Политология Производство Психология Стандартизация Технологии |
|
|
Архитектура Аудит Военная наука Иностранные языки Медицина Металлургия Метрология Образование Политология Производство Психология Стандартизация Технологии |
CONTROL CABLE LUB R I CATI ONСтр 1 из 19Следующая ⇒
Periodically , disconnect the throttle cables at their upper ends. Thoroughly lubricate the cables and their pivot points with a commercially available cable lubricant or a light weight oil.
(1)
.PO,INTS (1) CLUTCH AND BRAKE LEVER PIVOTS
- (2) or lCABLE LUBRICANT I THROTTLE CABLES I
odCABLE LUBRICANT I (4) CHOKE CABLE
(8) orl CABLE LUBRICANT I SPEEDOMETER CABLE AND TACHOMETER CABLE
(5) SWING ARM PIVOT I I I I I
I I I I I
(7) DRIVEN FLANGE SPLINES (LITHUIM BASED MULTIPURPOSE GREASE)
(10) SPEEDOMETER DR IVE GEAR I I I I I I I - liijjiiffl (12) BRAKE (14) FOOT PEG PEDAL PIVOT - PIVOT
(LITHIUM BASED MULTIPURPOSE GREASE) (11) FRONT FORK (A.T.F.) (13) GEARSH IFT PEDAL PIVOT
(15) SIDE AND CENTER STAND PIVOT (17) FINAL DRIVE GEAR (HYPOID GEAR OIL API,GL-5 SAE #80 - #90)
MAINTENANCE SCHEDULE Perform the pre·Ride Inspect on in the Owner's Manual at each scheduled maintenance period. I: INSPECT ANO CLEAN, ADJUST. LUBRICATE, OR REMPLACE IF NECESSAR Y . C:CLEAN, R : REPLACE, A: ADJUST L: LUBRICATE
§ - · .::: · !;! f?'tl ;::·tJ (6)Refer
* Should be serviced by an authorized Honda dealer. unless the owner has proper tools and service data and is mechanical qualif ied. •• In the interest of safety, we recommend these items be serviced only by an authorized Honda dealer. Note: 1. Service more f requently when riding in dusty areas. 2. Service more f requently when riding in rain or at full throttle. 3. For higher odometer reading, repeat at the frequency interval established here.
MAINTE NANC E H ONDA VTSOOC
Check the f uel lines for deterioration, damage, or leakage.
Replace if necess.arv.
Remove the fuel cup, 0-ri ng and filter screen and drain the gasoline i n to a suitable contai ner.
Wash the cup and filter screen in clean non flamm· able or high flesh poi nt solvent.
Reinstall the screen, aligning the index marks on the fuel valve body and fil ter screen. I nstall a new O ri ng into the f uel valve body. Reinstall the fuel cup, making sure the new O·ring is in place. Hand tighten the fuel cup and torque to specifica· ti on.
TOR QUE: 3-6 N·m (0.3-0.6 kg-m, 2-4 ft-lbl
Oo not over tighten the fuel cup.
MAINTENANCE HOND A. VT500C
THROTILE OPER ATIO N Check for smooth th rottle grip lull opening and automatic f ull closing in all steering posi tions.
Make sure there is no deterioration, damage, or kinking in the th rottle cables. Replace any damaged parts. Lubricate the throttle cables ( page 2-10). if throttle operation is not smooth.
Measure thronle grip free play at the th rottle grip f lange.
FREE PLAY: Z-6 mm l /8- 1/4 in)
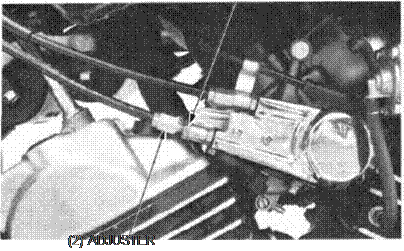
Throttle grip free play can be adjusted at either end of the throttle cable. Minor adjustments are made with the u pper adjuster.
Major adjustmen ts are made with the lower adjuster on the carburetor.
Adjust free play by loosening the lock nu t and turning the adjuster. Then ti!titen the lock nu t and recheck th rottle operation. FREE PLAY:
(1)
CARBURETO R CH OKE The VTSOOC choke system uses a fuel enrichening circuit controlled by a bystarter valve. The by5tarter valve opens the enrichening circuit via a cable when the choke lever on the handlebar is pushed up.
Check for smooth upper choke lever operation. Lubricate the choke cable if the operation is not smooth.
Remove the th rottle lin k cover. Remove the choke cable boots and loosen the choke valve nuts on the carburetors. Remove the bystarter valves ( the choke valves) from the carburetors.
Push the choke lever on the handlebar all the way down to fully closed and make sure the distance between the tip of the th reads and the step oo the valve is 10-11 mm (0.39-0.43 in).
Thread the choke valve in by hand and then tighten the choke valve nut 1/4 tum with a 14 mm wrench. I nstall the throttle lin k cover.
Rei nstall the removed parts in the reverse order of disassembly.
(1) H O NDA
AI R CLEANER Remove the frame right side cover. Remove the air cleaner cover screws and cover. Pull the air cleaner element holder out of the air cleaner case.
Wash the element in non·flammable or high flash point solvent, squeeze ou t and l et it dry.
Soak the element in gear oil (SAE #B0-#90) and squeeze out the excess.
I nstall the removed parts in the reverse order of diassembly.
(2) SCR EWS
(1) H ONDA VTSOOC (3) ELEM ENT HOLDER (I NS I DE)
Remove the plug from the drain tube to empty any deposits.
SECTION
MAINTENANCE
SPAR K PLUGS R ECOMMENDED SPARK PLUGS
Disconnect the spark plug caps and clean any dirt from a round the spark plug bases. Remove and discard the spark plugs. Measu re the new SPark plug gaps using a wi re-type feeler gauge. SPARK PL UG GAP: 0.8-0.9 mm (0.031-0.035 in) Adjust by bending the side electrode carefully. With the plug washer attached, thread each spark plug in by hand to prevent crossthreading. Tighten the spark pl ugs another 1/2 turn with a spark plug wrench to compress the pl ug washer. Connect the spark plug caps.
V ALVE CLEAR ANCE
Inspect and adjust valve clearance wh i le the engine is cold (Below 35°C/95°F).
Remove the frame side covers and the seat. Turn the fuel valve OF F, disconnect the fuel line and remove the tank (page 4-14). Remove the timing cap from the right crankcase cover.
For front valve clearance adjustment, rotate the crankshaf t clockwise to align the "FT" mark with the index mark.
For rear valve clearance adjustmen t, rotate crank· shaft clockwise to align the "RT" mark with the index mark .
'"""""\'""' I
(2) "FT'' M AR K H ONDA
O.B-0.9 mm (0.031-0.035 i n )
Make sure the piston is at TDC on the compression stroke;rocker arms should be loose. Check the clearance of both valves by inserting a feeler gauge between the adjusting screw and valve stem. VALVE CLEAR ANCES : INTAKE : 0.10 mm (0.004 in) EXHAUST: 0.10 mm (0.004 in)
Adjust by loosen ng the lock nut and turning the adjusting screw until there is a slight drag on the feeler gauge. Hold the adjusting screw and tighten the lock nut.
TORQUE: 20-25 N·m
(1) VA LVE ADJUSTING WRENCH 079Q,8-KE90000
(2)
Recheck the valve clearance.
Install the removed parts in the reverse order of disassembly.
IGNITION SYSTEM NOTE
(2) "F" MARK ( l) TIMING CAP
Remove the timing inspection hole cap on the right crankcase cover.
Connect the timing light and check the timing.
MAINTE NANCE
|
|||||||||||||||||||||||||||||||||||||||||||||||||||||||||||||||||||||||||||||||||||||||||||||||||||||||||||||||||||||||||||||||||||||||||||||||||||||||||||||||||||||||||||||||||||||||||||||||||||||||||||||||||||||||||||||||||||||||||||||||||||||||||||||||||||||||||||||||||||||||||||||||||||||||||||||||||||||||||||||||||||||||||||||||||||||||||||||||||||||||||||||||||||||||||||||||||||||||||
Последнее изменение этой страницы: 2019-06-10; Просмотров: 205; Нарушение авторского права страницы

 OIL PUMP
 LUBRICATION
 I -
I -


 FUEL LINE S
 FUEL STRAINER
 Turn tho f uel valve OFF.

 After installing and refilling the tank, tu m the fuel valve ON, start the engine and check that there are no leaks.
 2-6 mm (1/8-1/4 in)
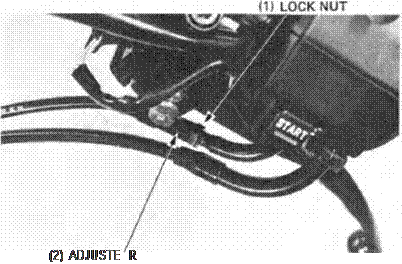
 LOCK NUT
 MA INTENANCE
 Adjust to withi n specifications by looseni ng the lock nut and turning the round joi nt at the handlebar choke lever housi ng. Tighten the lock nut and recheck the distance.
 CHOKE VALVE NUT
 VTSOOC
 MA I N TENANCE
 ( 1 ) AI R CLEANER COVER
 E LEME NT HOLDER (OUTSIDE)
 CRANKCACE BREATHER
 NOTE
NOTE R emove the valve adjusting hole covers and caps.
 t
t (2) CENTER ELECTRODE
 VTSOOC

 12.0-2.5 kg·m,14-18 ft-lb)
 TAPPET ADJUSTING WRENCH 10 x 12 mm 07708-0030200
 Warm up the engine
 The timing is correct If the "F" mark aligns with the index mark on the right crankcase cover at 1,100 ± 100 rpm for each cylinder.