|
Архитектура Аудит Военная наука Иностранные языки Медицина Металлургия Метрология Образование Политология Производство Психология Стандартизация Технологии |
|
|
Архитектура Аудит Военная наука Иностранные языки Медицина Металлургия Метрология Образование Политология Производство Психология Стандартизация Технологии |
RA DIATOR / COOLI NG FA N
REMOVAL
Remove the drain bolt and drain the coolant (page 6-3).
Remove the radiator cover. H ONDA
IllFILLER NECK MOUNTING
(4) IGN ITION COIL BRACK ET (51 CLAMP 161 THE RMOSTAT MOU NTI NG BOLTS HOUSING
(1) THE RMOSWITCH WI RE (2) FAN MOTOR
Loosen tho upper radiator hose clamp.
(3) UPPER CLAMP
Loosen the lower radiator hose clamp. Disconnect the radiator hoses from the radiator. (11 LOWE R CLAMP
(21 MOUNT BOLT
Then remove the radiator.
DISASSEMBLY
Disconnect the thermoswitch wire. Remove the fan shroud with the cooling fan by removing the three bolts.
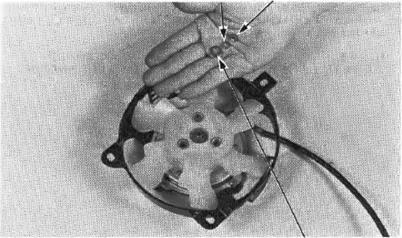
Remove the fan attaching nut and pull the fan off the fan motor.
Remove the four fan motor attaching screws and re· move the fan motor from the shroud. (11MOUNTING BOLT
(2) FAN SHROUD
(1) FAN
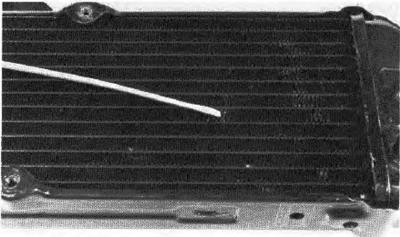
COOLIN G SYSTEM c:iJ\ H O NDA VTSOOC RAD IATOR INSPECTION
Inspect the radiator soldered joints and seams for leaks.
Blow dirt out from between core fins with com pressed air. If insects, etc.. are cloggi ng the radiator, wash them of f with low pressu re water.
Carefully straighten any bent f ins or collapsed core tuber.
INSTALLATION
I nstall the fan motor on the fan shroud. Tigh ten the screws. NOTE
Install the cooling fan onto the fan motor.
I nstall the special washer onto the fan by aligning the groove with the fan motor shaft cut-out.
I nstall the spring washer and ti gllten the nut securely.
(1) SPRING WASHER 2) NUT
(3) SPECIAL WASHER
I nstall the fan shroud onto the radiator and ti!titen the mounting bolts.
INSTALLATION
I nstall the radiator in the reverse order of removal.
Fasten the fan motor wi re, thermoswitch wi re and pulse generator wire with the clip on the radiator right side sequrely.
Fill the cooling system (page 6-3).
Fit the grooves of the radiator cover to the tabs of the radiator top, then tighten the cover mounting screw.
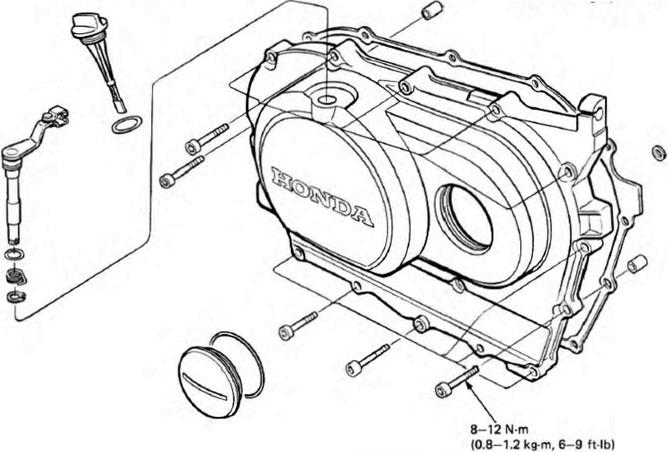
WAT E R P U MP MECHANICAL SEAL INSPECTION
Remove the crankcase left rear cover.
Inspect the tell tale hole for signs of mechanical seal coolant leakage.
R eplace the water pump as an assembly if ttie mechanical seal Is leaking. (1) MOUNTING BOLTS
(1) RADIATOR COVER (2) FIT
COOLING SYSTEM H ONDA VTSOOC
REMOVA L
Remove the engine from the frame (page 5-2).
Loosen the lower radiator hose clamp and disco<> nect the radiator hose from the water pump.
Remove the water pump cover bolts and cover. Pull the water pump of f the crankcase. (1) CLAMP (2) BOLTS (3) CLAMP
Check the water pump for mechanical seal l eakage and bearing deterioration. Replace the water pump as an assembly if necessary.
INSTALLATION
Apply a coat of clean engine oil to a new 0-ring and install It in the water pump shaft housing groove.
Align the water pump shaft groove with the oil pump shaft and insert the water pump i nt.o the crankcase.
(1)
Install a new O·ring onto the water pump housing. I nstall the two dowel pins. I nstall the water pu m p cover.
Tighten the cover bolu, wi th sealing washers. Tighten the drain bolt.
Connect the lower radiator hose. Tighten the radiator hose clamp.
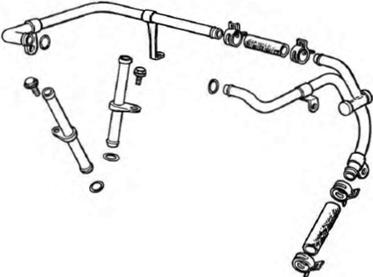
WATER PIPE REMOVAL
Loosen the water hose clamps. Remove the right crankcase cover bolts and starter motor mount bolt. R emove the righ t water pipe.
Remove the left water pipe. (1 ) DOWEL PINS
WATER PIPE INSTA LLATION
I nstall new O·ri ngs onto the water pipes and set the water pipes in place.
Tighten the pipe holder with the crankcase cover bol ts and starter mountings bol t.
Then tigh ten the hose clamps.
C L UTC H VT500C
(8.0-10.0 kg m,58-72 ft·lb)
|
Последнее изменение этой страницы: 2019-06-10; Просмотров: 230; Нарушение авторского права страницы
 VT500C
 BOLT (2) TUR N SIGNAL R ELAY (JI OVER FLOW TUBE
 MOUNTI NG BOLTS
 Disconnect the thermoswitcll and fan motor wlr• couplers.

 Remove the radiator moun ting bol t and push the radiator up until the fining tabs are free from the frame.
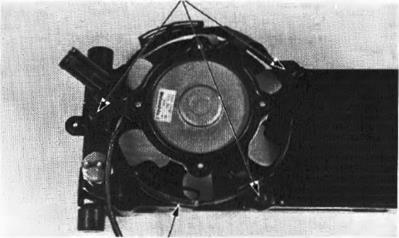

 (1) SCREWS
 (1) SCREWS (21 CLAMP


 (3) SCREW

 (41LOWER HOSE (51 COVER
 INSPECTION
 O·RING (2) PUMP SHAFT
 Loosen the hose clamp and remove the left crank· case cover bolts.
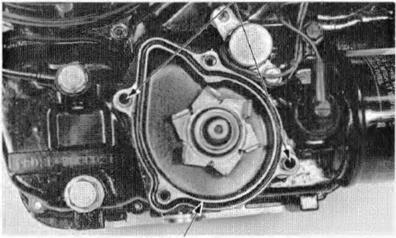
 (2) O·R ING