|
Архитектура Аудит Военная наука Иностранные языки Медицина Металлургия Метрология Образование Политология Производство Психология Стандартизация Технологии |
|
|
Архитектура Аудит Военная наука Иностранные языки Медицина Металлургия Метрология Образование Политология Производство Психология Стандартизация Технологии |
В плену проклятого города.Стр 1 из 16Следующая ⇒
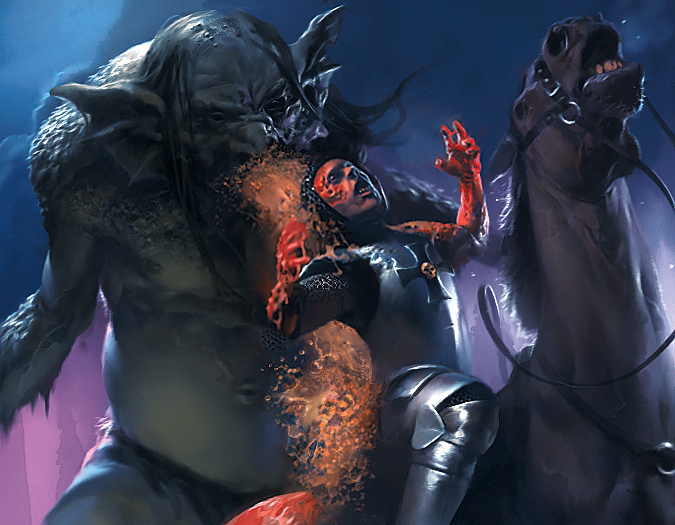
В плену проклятого города.
События последних недель всколыхнули все окрестности Мордхейма. Получивший демоничество чернокнижник, множество нанятых наемников и повысившийся курс вирдстоуна всколыхнули устоявшуюся жизнь. Графы выборщики ближайших имперских провинций направили эмиссаров в Мордхейм для сбора сведений об отрядах действующих там и местах, где они побывали. Всеми двигала разная мотивация, но сходилась она в одном, всем был нужен вирдстоун… Итак, наша очередная кампания по правилам Мордхейм, Эта компания будет отличаться тем, что у нее будет мастер игры в лице меня (Игоря Прихнева), посильную помощь окажут Игорь Легоставев(надеюсь руководитель будущей компании по Люстрии и радушный хозяин с домашним столом))) и Гаррет (Даниил, наш независимый эксперт и судья).
До начала компании хотел бы выслушать все предложения по ее изменению, дополнению, уточнению тонких моментов. Мы играем для себя и хотим получить удовольствие, так что давайте сделаем все интересно.
Основные положения кампании Место проведения: В клубах и я надеюсь будет возможность поиграть на сделанном мной столе и ландшафте у Игоря Легостаева. Формат: Стандартные 500 очков по обычным правилам. На старте нельзя покупать параметры и нанимать наёмников. Все предметы, не описанные в вашем стартовом листе, доступны к покупке только после начала кампании. Допуск к кампании: К участию допускаются лица, достигшие совершеннолетия (18+), имеющие полностью покрашенную банду и желание превозмогать тяготы, трудности, лишения, и рвать ремни. Банды можно заимствовать друг у друга. Мастер оставляет за собой право потребовать удалить модели, не соответствующие его представлениям об эстетике. Игроки, вступающие в кампанию, обязуются писать отчеты. Это не обязательно должны быть многостраничные фанфики, можно хотя бы несколько строчек, но они должны быть обязательны! Это нужно для того, чтобы поддерживать игровую атмосферу и интерес со стороны других игроков и мастера. Если ваши перлы окажут на мастера большое впечатление, то вы можете быть награждены какими- то ништяками - будь то золото, перки, очки кампании и прочее. Так что старайтесь! В дополнение, чтобы написанное ниже не легло на вас тяжким бременем, отыграем следящую ситуацию: Влиятельные особы собирают о Мордхейме доступные сведения и готовы платить за них. После каждой игры, игрок написавший бэк-отчет получает 1 золотую крону, если после следующей игры он тоже написал отчет, то получает уже 2 золотые кроны и т.д. по 1 доп. Кроне за отчет подряд. Возможно совместить в 1 бэк-отчете несколько игр, но тут будет на усмотрение мастера получите вы бонус, как за 1 бэк или 2. Соответственно вводится обратная ситуация с не написанием отчета. Это отображает то, что эмисары вредят подозрительно ведущей себя банде и компенсирует возможные бонусы. И да этот пункт мастер добавляет специально, так, как считает затею годной. Сеттинг: В кампании частично используются правила по обычному Мордхейму, но вводится карта компании и новые механики заставляющие подумать заранее о предпринятых ходах. Т.к. сам проклятый город хорошо нарисован и известен нам, вводится пожелание, которое возможно будет вам интересно. Т.к. будем играть в восточной части города и в конкретных локациях, то можно будет рассмотреть на карте и воспроизвести на столе примерную застройку поля битвы (понимая, что ландшафт ограничен все это только для интереса). Некоторые локации имеют знаковую для Мордхейма историю и награждены специальными сценариями. Также в механику игры будут внесены некоторые изменения, об этом – ниже! Внимательно прочитайте нижеследующие правила, поскольку их механика может отличаться от привычной вам по мордхеймовскому сеттингу! Банды: В кампании приветствуются те банды, что мы согласуем( так как это небольшой компейн для своих на 5-6 человек), однако их мировозрение(в части союзов) и целей(об этом ниже) будет жестко зафиксированно. Все банды в принципе тоже допущены, но главное, вы мне должны внятно объяснить, а лучше написать, что ваша банда «розовых поросей» забыла в проклятом городе. Игроки МОГУТ распускать старые и создавать новые банды, если в старой банде осталось меньше 5 моделей, и\или умерли все герои, или если они вдруг почувствовали невыносимое отвращение к банде, которой они играют, и желали бы всё видеть по-другому. Им будет дан гандикап на очки опыта и золото, если остальные варбанды уже далеко ушли. Однако заработанные Очки Кампании пропадут, помните об этом! Наёмники Допустимы наемные мечи из основной книги+ довольно большой список будет приложен. Возможных наемников для каждой банды нужно будет прописать в заявке банды(все легко увидим исходя из мировоззрения). Очень важно чтобы у вас БЫЛИ ФИГУРКИ ЭТИХ НАЕМНИКОВ, иначе по понятным причинам брать их не сможете. Цели Кампании
« Наследники Хаоса »: Неистовые последователи Тёмных Богов ищут спрятанные, по слухам, могущественный артефакта Хаоса. Если один из вождей находит один из великих артефактов, то его власть признают многие и начинают стекаться под его знамена, дабы он вёл их в битву. Он должен давать выход зловещей силе разрушения, и, если ему повезет, сможет даже стать Избранным Хаоса. Банды: Мародеры Хаоса, Одержимые, Зверолюди, Гномы Хаоса, Норска, Амазонки, Нежить и прочие Злые банды могут выбирать эту ЦК Специальные навыки При получении 5 ОК сложность поиска всех видов ядов (Черный лотос, Тёмная Отрава, Вытяжка Паука, Блевотина Мантикоры) становится равной 5. К тому же, теперь вы можете давать яд одному любому отряду ваших рядовых (при этом вы по-прежнему должны покупать отдельно один предмет для кадого рядового) При получении 15 ОК банда может покупать любой яд со скидкой в 20% от его стоимости. При получении 20 ОК банда может попытаться убить одного из лидеров других банд, или же любого члена банды, по выбору. Бросьте д6. На 1-4 лидер вражеской банды обязан бросить по таблице Серьезных Повреждений, как если бы он был выведен из игры. На 5-6 персонаж немедленно убит. Всё его снаряжение, впрочем, остаётся в банде. Этот навык может быть использован только один раз за игру.
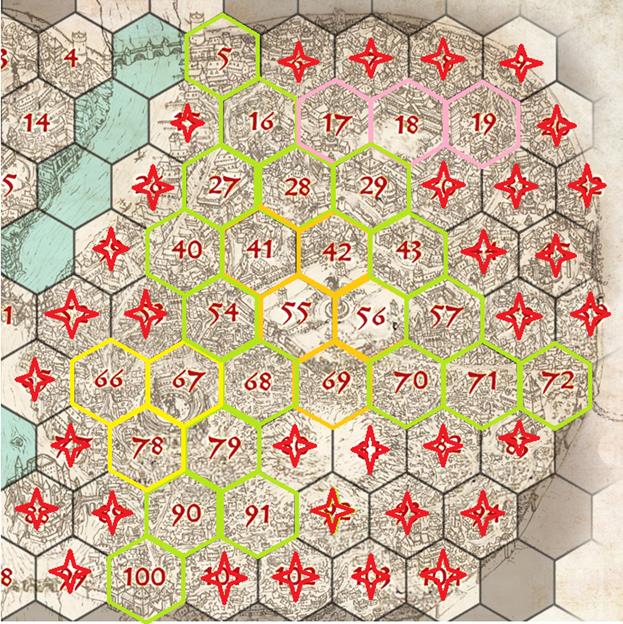
Игра в кампанию Карта: Карта представляет собой местность, на которой отмечены локации, доступные для посещения вашими бандами. Часть из них открыта с самого начала игры, часть недоступна (но будет доступна по ходу действия) Ход игры: Каждый игрок тайно заявляет мастеру, в какую локацию он хочет пойти. Если кто-то из другой банды уже появился в этой локации, то между ними происходит бой - либо по случайному сценарию, либо по сценарию, специальному для этой локации. Если игроки не встретились в локации, то мастерским произволом они сталкиваются где-то по дороге в случайной локации, либо в ближайшей от них локации. Локации: Некоторые локации содержат какие-то определенные бонусы, или пенальти, и, захватив такую локацию, вы можете пользоваться ее плюшками или недостатками. Некоторые локации, содержат монстров- НПС, которые отыгрываются мастером(если нападает сам мастер, то другим игроком). При убийстве и разорении таких локаций вы получаете какие-то определенные конкретные бонусы или артефакты. Для нападения на такие локации вам явно нужны большие силы, и будет разумно не соваться туда одному и непрокачанной бандой - ибо столкнуться, к примеру, с толпой голодных монстров. Захват локаций происходит следующим образом: вы должны не только победить в локации, но и выиграть сценарий. Если случайная битва не содержит определенного сценария, то локацию вам захватить не удалось. КАЖДАЯ локация на начало игры содержит возможность поиска магических вещей(таблица поиска ниже). Если вы выполнили цель сценария и после этого обшарили локацию, мастер помечает ее как облутанную. Большие зоны где могут кипеть Мультиплеерные битвы могут быть обысканы более 1 раза(смотри зоны по цветам). Т.к. все стремятся найти артефакты при выигрыше в Мультеплеерной игре в опасной зоне есть возможность обыскать локацию на предмет магических вещей 2 раза и выбрать из них 1 результат. Мы все понимаем, что чем больше игр сыграл отряд, тем он скорей всего сильней и тем больше у него ОК. Поскольку система парингов провалилась, а играть будет возможно нечетно количество людей, то попробуем так: Игрок А, Б и В хотят играть бой. Игрок А и В пишут мастеру одинаковые клетки компании, но у них не получается играть по времени (разные дни) Тогда игрок А играет с Б в другой локации. Мастер обязуется следить за примерным количеством игр людей, давать сократить разрыв до минимума, выдавать плюшки тем, кто просел по играм. И господа, я хочу сделать компанию для всех и поучаствовать в ней, мастер будет делать все максимально нейтрально и справедливо.
. Ландшафт
Открытая местность Нет штрафов за движение: • Луга или незасеянные поля • Покатые холмы • Мосты и броды • Лестницы вверх и вниз
Труднопроходимая местность Модели перемещаются с половинной скоростью: • Мелкие реки и ручьи (шириной не более 4”) • Россыпи камней • Засеянные поля • Руины • Заболоченная земля • Лес
Непроходимая местность Модели не могут перемещаться через этот ландшафт. Если модель по какой-то причине все же оказалась на таком ландшафте, она становится вне игры: • Высокие скалы • Глубокие реки и озера
Здания Эти правила не относятся к руинам, которые в большинстве случаев являются просто труднопроходимой местностью.
Проклятье, Заперто!: Если здание не постоялый двор, то его двери будут заперты, или кто-то просто будет держать дверь изнутри! Окна будут слишком узкими, что бы пролезть, или закрыты ставнями. И для того, что бы войти в дверь или влезть в окно, модели сначала придется открыть их. Она может попробовать выломать дверь, прорубить ее или вышибить. • Модель может пытаться выломать дверь в конце фазы движения. Это требует успешного теста на Силу с –2 штрафом. Если модель терпит неудачу, она может попробовать снова на следующий ход. Одновременно выламывать дверь может только одна модель. • Для того, что бы прорубить дверь, требуется D3+1 ходов, которые модель должна полностью потратить на это занятие. До двух дружественных моделей могут помогать ей в этом. Вычтите –1 за каждого помощника (до минимума 1). • Вышибить дверь можно в конце фазы движения. Модель должна успешно пройти тест на Силу. Если тест успешен, поместите модель помещение, в 1” от двери, отодвинув другие модели, если потребуется. Если при этом модель оказывается в базовом контакте с вражеской, считается, что она зачарджила ее. Если же тест провален, воин получает одно попадание со своей Силой и может попытать счастья в следующий ход. • Выломанные и вышибленные двери могут быть закрыты снова только на 4-6 на D6, иначе она слишком сильно повреждена. Сделайте бросок сразу после того, как дверь была «открыта». • Прорубленную дверь закрыть нельзя. • Для того, что бы открыть, закрыть или выломать дверь, модель должна быть с ней в базовом контакте. Кроме того, модель в базовом контакте с дверью мешает врагам закрыть ее (она может вставить в нее ногу и т.п.) • Внутренние двери в здании не закрываются.
Вытащите Меня Отсюда!: Модель, проникшая в здание, найдет в нем много интересного и занятного. Прежде всего это будут D3 автоматических попаданий с Силой 3 от хозяев. После этого, по желанию игрока, модель может их запугать. Для этого модель должна пройти тест на Лидерство. При успешном тесте она больше не будет получать удары от хозяев. При провале она получит вторую порцию, поскольку хозяева нашли ее аргументы малоубедительными. Как только в здании оказываются члены враждебных банд, хозяева перестают пробовать силы в мордобое и тихо сваливают.
Бардак: Снаружи обычно можно двигаться без штрафов. Другое дело внутри: столы, стулья, шкафы, кровати, шифоньеры, трюмо, комоды, полки, рундуки и прочее, и прочее… Все это делает перемещение весьма затруднительным. Внутри здания считаются труднопроходимой местностью.
Бой Через Дверь: Если одна из сторон не желает, или не может, пройти в дверь, враги могут обмениваться ударами через дверь. С каждой стороны могут сражаться все, кто одновременно может пройти в дверь плюс один. Обычно это значит, что с каждой стороны могут драться по две модели, но в двери некоторых сараев можно упихать пол банды! Как только дверь открыта, обе стороны могут переместить указанное количество моделей к дверному проему. Могут быть перемещены все модели в пределах 1” от проема, игроки сами выбирают, какие модели вступают в бой. Сторона, открывшая двери, считается чарджевшей.
Лестницы и Все Такое: В многоэтажных зданиях должен быть путь попасть наверх. Обычно это лестница, хотя они могут быть приставными и веревочными, просто веревками, пандусом и т.д. Модель, поднимающаяся по веревке (или стене!) подчиняется обычным правилам лазанья из Mordheim Rulebook. Подниматься и опускаться по обычным и приставным лестницам гораздо проще. Модель может подняться/опуститься на один этаж за одну фазу движения. В начале фазы движения модель должна находиться в пределах 1” от лестницы, что бы добраться на ее другой конец. Если в пределах 1” от лестницы есть враг, модель может чарджить его.
Бонусы на карте. Всегда приятно попробовать что-то новое. Ведь Мордхейм город где банды не только разрабатывают камень, но и ищут сокровища! В начале расстановки у Каждого игрока есть маркер сокровища (модель сундука или кучка монет) которую он располагает со следящими условиями: 1) не дальше чем в 12 от центра стола 2) маркер должен быть на втором(третьем) этаже руины, здания или находиться Внутри закрытого дома(а мы знаем как гостеприимны хозяева в Мордхейме).
Игрок нашедший сундук может попытаться его открыть и обнаружить: 1-Зомби. Из сундука появляется зомби, которого поместили туда. Он немедленно атакует вора и бьет первым. Если он убивает жертву, то движется к ближайшим мозгам (живым моделям) 2-4-сундук пуст 5-Д6 Монет 6-Киньте еще раз. На 1-2 амулет удачи, 3-4 осколок варп камня, 5-повареную книгу 6-Точную карту Мордхейма (лучший экземпляр, без броска).
Сценарии В игре применяются стандартные сценарии для двух игроков и стандартные сценарии для группы игроков. Исключения состава клетки, где заранее есть прописанный сценарий. После того, как игроки заявили мастеру в какую именно клетку они хотят попасть вскрывается рандомный конверт с миссией. Если в нем будет миссия которой нет в рульбуке, то вы найдете ее в этих правилах ниже. Некоторые миссии откроются только когда несколько банд получат 5 или 10 ОК. Смотри новые сценарии ниже. В глубине города используются свои собственные сценарии и таблица сценариев, отличная от оригинальных правил Мордхейма. Также существуют специальные сценарии для некоторых локаций. Прежде чем играть в какой-то сценарий, проконсультируйтесь с мастером! Таблица для случайных стычек
Блокада Когда сгущается ночь, и одна из банд располагается на ночлег, есть вероятность, что другая банда под покровом тьмы незаметно нападёт на не ожидающих такого расклада. Выставленные часовые и костры не всегда надежная гарантия того, что вас не застанут врасплох.
Ландшафт Отряды Начало игры
Специальные правила Покуда лидер банды находится внутри своего лагеря, банда может перебрасывать тест на Разгром каждый ход. Конец игры Опыт
Terrain Starting with the attacker, each player takes it in turn to place a piece of terrain. As the warbands are battling in a cemetery, there should be a large number of graves, mausoleums, tombs etc. Some of these can be erected on mounds and some should be open. In the centre of the battlefield should be a large statue – the image representing St. Voller. We suggest that the terrain is set up in an area roughly 4' x 4'. Set-up 1. The defending player rolls a D6 for each Hero and Henchman group in his warband, in any order he chooses. On a 1-3, they are elsewhere in the ruins and turn up later as reinforcements. On a 4-6 they are deployed at the start of the game. Note that at least one Hero or Henchmen group will be present at the start. If all roll 1-3, the last Hero or Henchmen group will automatically be deployed at the start of the battle. 2. The defender deploys his available Heroes and Henchmen on the table. No model may be closer than 8" to another model, as the warband is spread out wide to search the ruins. No model may be deployed closer than 8" to a table edge. 3. The attacker deploys his whole warband within 8" of a random table edge, as shown below. He may choose which edge to nominate as ‘1’ before rolling to see where he deploys. Starting the game The attacker always gets the first turn. However, if the warband has a Priest of Morr, they will automatically get the first turn instead. Note if both warbands have this Priest of Morr, then the attacker goes first. Special rules Reinforcements: The defender, at the start of his second and subsequent turns, may roll a D6 for each of his Henchmen groups or Heroes not yet on the table. On a 4+ they move on in the movement phase from a random table edge, roll a D6 (Starting at the table edge to nominate as ‘1’ and going clockwise for edges 2, 3 & 4. On a roll of a 5 the defending player may freely choose which edge they will deploy from, but on a roll of a 6 the attacking player may choose which edge they will deploy from) All reinforcements for that turn arrive from the same edge and may charge on the turn in which they arrive. Open graves: Open graves are treated like being on the edge of a ledge for warriors within 1" of them. If a model falls into an open grave they suffer a Strength 2 hit and must climb 2" to get out next turn. The Unquiet Dead: After each player has taken a turn and always rolling at the start player’s turn who went first, roll a D6. On a roll of 1 or 2, D3+1 zombies (these are the same as the Undead warband Henchmen on page 89 of the Mordheim rulebook) emerge from the graves. These models are be placed by the player with the lowest warband rating within 1" of any grave. The zombies don’t move and attack until the end of the second player’s turn. They will always move towards the nearest model, choosing a living one, if they are equidistant, and charging if possible. Note, they will even attack other Undead models but not if they are also the Unquiet Dead. The Statue of St. Voller: Though Mordheim is lost and a wholly depraved place, the spirit of St. Voller still exerts some guardianship over the cemetery. Any of the Unquiet Dead that rise from the graves may not move within 3" of the statue as its holy aura repels them. Ending the game The game ends when one warband fails a Rout test. The routing warband loses. Experience +1 Survives. If a Hero or Henchman group survives the battle they gain +1 Experience. +1 Winning Leader. The leader of the winning warband gains +1 Experience. +1 Per Enemy Out of Action. A Hero gains +1 Experience for each enemy (and Unquiet Dead) he puts out of action.
Scenario: Camp Assault By Ben Brissenden
After a successful day's hunting, one Warband returns to their camp on the outside of Mordheim to revel in the spoils of their victories - and drink themselves senseless. However, another, less-successful Warband has followed them, and when the moon is hidden and the fires dying, they make their move to distribute the wealth more equally… Terrain The set-up should consist of a few ruined buildings representing the outskirts of Mordheim. The camp, consisting of perhaps more ruins, tents and importantly 2-3 campfires, should be set up around 24" away from the ruins. The ground between Mordheim and the camp should be littered with ample cover, such as broken carts, rubble, and long-dead trees. Warbands Each player rolls a dice. The highest scorer can choose between being the attackers or the – I'll call them defenders, since 'Campers' doesn't quite seem right. The defenders must split their Warband into two halves. Special rules Half of the Warband, including the leader, sit round the fires in the camp eating/drinking/kicking the gobbos/re-animating the zombies/whatever it is your Warband does in its free time. Importantly, there are 6 Wyrdstone counters in possession of the attackers. Each counter must be assigned to a model, who is carrying it. If there are not enough models to carry the counters, then spare Wyrdstone is left by the campfires, and can be collected by anyone when the alarm is raised. The other half are stationed as guards (who got the short straw!) around the camp, at least 8" away from their drunken companions, and at least 5" away from another guard. At the start of the game, only the guards in the defender's Warband can move, and cannot stray more than 10" from the campfires. As soon as one of the attackers moves within 8" of a guard, make an initiative test for the guard. If passed, he spots the attackers, shouting a warning and rousing his comrades – the rest of the defenders can now act. If failed, he simply shakes his head, probably thinking something along the lines of, “I knew I shouldn't have drunk the wine when eating that cheese”, and must test again next turn (providing the attacker is still within 8"). The attackers are aiming to steal as many shards of Wyrdstone as possible! Each time an attacker takes a defender out of action who is carrying a Wyrdstone counter, the attacker collects the counter. However, the attacker must then get to the outskirts of Mordheim (where a hidden chest/helper is waiting). There s/he will deposit the Wyrdstone, and can head back into the fray! Starting the game The attackers have the first turn. Ending the game The game ends when either: a) The attackers have been routed. b) The attackers have stolen at least 4 Wyrdstone shards and got them back to the outskirts of Mordheim. Experience +1 Survives. If a Hero or Henchmen group survives the battle they gain +1 Experience. +1 Winning Leader. The leader of the winning warband gains +1 Experience. +1 Per Enemy Out of Action. Any Hero earns +1 Experience for each enemy he puts out of action. +1 per Wyrdstone Counter. If a Hero or Henchman is carrying a Wyrdstone counter at the end of the battle he receives +1 Experience. Страшный парк Ваша банда преследует отступающий в глубину леса отряд противника Но что это? Неожиданно странный сумрак окутывает все вокруг ,и деревья начинают зловеще перешептываться и двигаться. Что-то не так с этим лесом! Поражённые Хаосом деревья живут своей собственной жуткой жизнью! Ландшафт Банды
-Заражение Хаосом Лес в этой местности подвергся сильнейшему заражению Хаосом, поэтому обрел свою собственную жизнь и сознание. Вначале каждого хода каждого игрока киньте д6 за каждый кусок леса на столе и проконсультируйтесь с таблицей ниже: 1-2 Куда движется этот лес?! Лес двигается в случайном направлении на д6, вместе со всеми находящимися в нем моделями. Если лес сталкивается с другим куском террейна, он останавливается. Если лес встречается с моделями, они попадают на этот кусок леса. 3-4 Мы оттуда пришли! Разверните секцию леса на угол 180. Если это нельзя сделать, разверните так, насколько возможно. 5-6 Мы заблудились?! Поменяйте местами эту секцию с другой случайно выбранной секцией.
Конец игры: банда ,которой удалось довести по крайней мере половину от начального числа моделей до противоположного края стола, считается победившей. Если одна из банд не прошла тест на разгром, игра также заканчивается. Опыт: +1 Враг Вне Игры. Любой Герой зарабатывает +1 Опыт за каждого противника, которого он сделал вне игры.
Если вы накопили 5 ОК и почувствовали уверенность в своих силах, вам открыты несколько дополнительных зон с повышенной опасностью. Эти зоны отмечены объединены между собой и отмечены отличными от зеленного цветами, то вы запускаете случайные сценарии для этих областей:
Розовая зона: В этой зоне можно будет три раза искать магические предметы (и артефакт) играйте сценарии: 1-3 . The Writing on the Wall 4-5 The Great Library TERRAIN Each player takes it in turn to place a piece of terrain, either a ruined building, tower, or other similar item. If your terrain collection allows, a dense warren of narrow, crooked streets is ideal. In any case, the centre of the table should have two buildings, placed close together so as to form an alley, one inch wide. The map will be written in this alley. Because of the ruins, close confines of the alley, trash, etc., the alley is considered difficult terrain. We suggest the terrain is set up in an area roughly 4' x 4'. WARBANDS The warband with the lower warband rating chooses whether to set up first or last. The first player then chooses which table edge to set up on, and places all of his warriors within 8” of that edge. His opponent then sets up within 8” of the opposite edge. Because of the dense, mazelike construction surrounding Tyler Street, skills or abilities which allow special deployment may not be used. SPECIAL RULES The map on the alley wall was written by a madman, and the warriors in Mordheim will have a tough time puzzling it out in the middle of a fight! In order to understand the map, a hero must be moved into the middle of the alley, and must spend two full turns doing nothing but studying the writing. Heroes who have taken at least one Academic skill may decipher the writing in one turn rather than two. Once a warband has no further use for the map, they may ruin the wall so other warbands can't follow the directions to the treasure! The wall has 1 Wound, and a Toughness of 7. Attacks against the wall automatically hit, and any wound ruins the map. Anyone attacking the wall must be in the alley (they cannot ruin the map from the other side of the wall). The map doesn't lead to a specific treasure; rather it marks out good routes through the Poor Quarter. Warbands who have deciphered the map may add one of a kind in the next exploration phase, after rolling the dice. For example a player who rolled 1, 3, 3, 4, 5, and 6 could choose to add another 3 in order to find Prisoners (the result for a triple 3) rather than a corpse (the result for a double 3). Alternatively, the player could opt for an extra 5 or 6 in order to find something else entirely. This addition does not affect how many Wyrdstone shards the warband recovers. STARTING THE GAME The player with the lower warband rating has first turn. ENDING THE GAME If one warband is able to decipher the writing on the wall, and then ruin said writing, the scenario ends immediately, and that warband wins. If both warbands manage to decipher the writing, then the scenario ends in a draw. If one warband deciphers the writing and then routs, the game ends in a draw. If the writing is somehow ruined before it can be deciphered by either warband, the scenario ends in a draw. Alternatively, if one side routs, the other wins. The winners are assumed to decipher and orient the writing at their leisure. EXPERIENCE +1 Survives. If a Hero or a Henchman group survives the battle they gain +1 Experience. +1 Winning Leader. The leader of the winning warband gains +1 Experience. +1 Per Enemy Out of Action. Any Hero earns +1 Experience for any enemy he puts out of action. +1 for Deciphering the Writing. Any Hero who deciphers the writing during the battle (limit 1 per warband) gains +1 Experience. +1 for Ruining the Writing. Any Hero who ruins the writing (after it has been deciphered!) earns +1 Experience. Scenario: The Great Library
The North-East Quarter of Mordheim was renowned for trade and learning. When Mordheim was a living city, the crowded labyrinth of streets and market plazas were called the Merchant's Quarter, more commonly known as the District of the Flying Horse. Mordheim became known as the finest market of the city in the Empire, rivalling even the busiest ports as Marienburg. There were many traders who would claim that for the right price they could locate any object for you so desired in a day. Another notable aspect of the North-Eastern Quarter was the Great Library. During the rule of the extravagant Count Ignatius Steinhardt, the library grew extensively to become the largest building in the entire city. The Count was particularly fond of collecting mystical and religious tomes. Of course, unwittingly, The Great Library managed to collect on of the largest deposits of Daemonic and Necromantic lore in the Empire. Now after the disaster struck Mordheim Library was engulfed by flames from the comet. Only the bravest ever consider going anywhere near the ruins but the lure of ancient tomes is enough to persuade mages from across the Empire to hire warbands to retrieve any books that they can find. For enough gold, fools can find enough bravery to risk even this dark place. (Credit given to TC 25 Space McQuirk and Nick Jakos.) Terrain Each player will take it in turn to place a piece of terrain, either a small building, or other piece of terrain. If you have one piece of terrain or several that could “act” as the Library should be placed in the middle. Many of the tomes have been spewed across the many blocks close to the Library. The battle is fought in an area roughly 4' x 4'. You may want to make the table larger if this is to be a multiplayer game. Special Rules & Set Up Players should then place D3 +1 Tomes for each warband involved in the game on the tabletop to represent where the Tomes are. Each player takes it in turn to place a Tome counter. The counters must be placed more than 10” away from the edge of the table and at least 6” away from each other. Note that counters are placed before deciding which edge the warbands will play from. A warrior can carry any amount of Tomes without any penalty. Warriors cannot transfer their Tomes to another warrior. If a warrior is put OOA then the Tome is placed next to where the model was taken OOA. The Tomes cause FEAR. You must take a FEAR test to pick one up, unless you are immune to FEAR. This is to represent the great unknown on whether or not the Tomes are Evil. To represent the chaotic nature of the disaster and the many magic tomes that are scattered in the area warbands will roll on the Random Happenings. Warbands will begin rolling on the Random Happenings chart when the first model touches a tome and will continue then at the beginning of each warbands turn. Yes, the first warband that touches a Tome will roll on the Random Happenings chart even though it will already be in the middle of their turn. Please exempt rolls of 11, 45, 54, and 65 from the D66, just roll again. Warbands Players use the normal warband set-up rules (see ‘Setting up the warbands’). Starting the game Each player rolls a D6 to determine who goes first. Play proceeds clockwise around the table. Ending the game The game ends when all the warbands but one have failed their Rout Test. Warbands that Rout, automatically lose. If two or more warbands have allied they may choose to share the victory and end the game, or they may continue the game until one warband is victorious. Experience +1 Survives. If a Hero or Henchmen group survives the battle they gain +1 Experience. +1 Winning Leader(s). The leader of the winning warband(s) gains +1 Experience. +1 Per Enemy Out of Action. Any Hero earns +1 Experience for each enemy he puts out of action. +1 Per each Tome Picked Up. If a Hero or Henchmen is carrying a Tome counter at the end of the game he receives +1 Experience. +1 For the Warband with the Most Tomes. The leader of the warband with the most tomes at the end of the game gains +1 Experience. Ill Gotten Gains… You can sell the Tomes for 25 +1D6 or choose to keep the scroll. If you keep a scroll then roll on the chart below (1D6). Rolling on the chart below will represent that the Hero has decided to open the scroll and is trying to decipher its abilities. Please nominate which Hero will be opening the scroll. D6 Events 1. The Hero who keeps the scroll will set out the next game. You may come up with some creative on why he cannot play the next game from opening the scroll. 2. The Hero who keeps the scroll will gain +1 Initiative. This can take you above our racial Maximum. 3-5. The Hero who keeps the scroll will gain an Academic Skill. Those who normally cannot gain a Academic Skill can gain one (1) Academic Skill. Please note that this is for only one time and does not grant the user to gain Academic Skills through normal experience. 6. The Hero who opens the scroll will gain D3 experience.
Желтая зона: В этой зоне можно будет три раза искать магические предметы (и артефакт) играйте сценарии:
1-3 Spawn Hunting
4-6 Scenario: Executioner’s Square
Scenario: Spawn Hunting "Over there men! After it! 50 Crowns to the man who brings that chaos beast down!" shouted Captain Alkazar to his men, as they chased the twisted Chaos Spawn through the ruined streets of what was once a productive farming village. In the time after the comet fell, the streets of Mordheim were tainted by the touch of the foul gods, and the effects visible in many areas. Men and women bore twisted visages of their former selves, and much, much worse was to be found. The touch of Chaos was laid heavily on the land. Many priests of the righteous gods were trying to do what they could, but some of the more physical threats required a less spiritual touch, and more of a physical beating. In this case, a Chaos Spawn has been tracked down, and is terrorizing its way through the remains of the city, and your warband is chasing it, and trying to bring it down. Or maybe you're trying to subdue it and bring it under your control, and then use it to make it your loyal servant. Such a creature would be very, very powerful to have under your control. However, you've run into a snag. Another warband has spotted you, and is closing in to intercept you and stop the spawn themselves. What is their motive? Why are they here? Such questions are not to be answered here. Set Up The setup is for two or more warbands. The warband with a highest rating should be set up within 10" of one corner of the board, as they are the warband hunting the spawn. Place the spawn 16" from them, directly between them and the centre of the board (always place it on ground level.) Place opposing bands on the table edges opposing that player, and within 6" of the edge. The player may pick which of the two sides he starts on. Note: If the warbands taking part in this campaign are highly rated, you may be better off using multiple spawns instead of one. So once you hit around 250, try 2, or at 375-400 try 3. Etc. Alternatively, for multiple warbands, you could also do it as “Number of Warbands -1” to determine how many spawn you need. Terrain This scenario can take place in any locale. This could easily be happening in the country side for Empire in Flames, or in the ruined streets of Mordheim. Starting the Game The Spawn gets the first turn, and immediately make a move, away from the band pursuing them. Then the hunting band goes second, and roll a D6 for all other warbands taking place in this scenario, with the highest going first. This means the Spawn have their own turn, in addition to the players, so here's the rundown of turn order: Turn 1: Spawn Turn 2: Pursuing Band (Highest Rated) Turn 3-?: The remaining warbands, dice off for turn order. Special Rules Wyrdstone Necklace: Make note of which warrior(s) deliver the killing blow to each of the spawn on the table. After the fight, roll a D6 for each warrior who took a spawn OOA. Whichever rolls the highest, he found a mysterious Wyrdstone pendant around the neck of the spawn. He can either wear it or sell the pendant to a wandering wizard for 10D6 GC. Should the warrior choose to put it on, consult the following table for the result. (If the warrior in question is a henchman, remove him from his existing group and place him in his own group, which may never be added to again.). Roll D6 after the game 1 The green stone drains the warrior of his vitality. Roll on the henchman advance table, for rolls of 1-9 reduce the stat indicated by 1 and for rolls of 10-12 the warrior mutates. All bands except chaos bands kill a mutating warrior as they start to change, chaos bands (possessed, carnival of chaos, beastmen and skaven) may roll a random mutation. 2 No effect beyond dark and troubled dreams. 3-6 Roll on the henchman advance table, for rolls of 1-9 increase the stat indicated by 1 and for rolls of 10-12 the player may choose any stat to increase by 1. The stone is not powerful enough to increase a stat above a racial maximum, if this is indicated roll again. Ending the Game The game ends only after the Spawn have been taken OOA and only a single band is remaining on the table. Warbands may voluntarily rout, following the normal instructions for such in the Mordheim rulebook. Experience +1 Survival: Any Hero or Henchman group which survives the battle gains +1 experience. +1 Winning Leader: The Leader (or acting leader) of the band gains +1 experience for winning the scenario. +1 per Enemy out of action: A hero earns an additional +1 experience for each enemy they put out of action. +1 Spawn Wound: A Hero or Henchmen group earns an additional +1 experience for each wound they do to one of the Spawn. (A henchman group may not gain more than +1 experience in this way.)
By Nick Kyme and Andy Hall
One of the oldest places in Mordheim, Executioner’s Square was named for obvious reasons, the daily executions were a crowd puller making the area busy and surrounding businesses successful. Now the gallows and chopping block stand deserted amongst the rubble. Since Mordheim’s downfall the many victims of Executioner’s square – the guilty and innocent alike - have returned as restless spirits eager to scream their anger at all who pass or linger. Both warbands have come to Executioner’s Square with one purpose – to fight. Such places are often the arena for so-called ‘pitched battles’, open, bloody and vicious. Little do they realise of the latent spirits, yearning to vent their anger against them. Terrain This scenario is played on a 4' x 4' playing area as normal. No buildings can be placed in a central 2' x 2' area although they can be placed along this boundary as this represents the square. Rubble pieces and other such flotsam can be placed in around the square as normal. In the centre of the square, place a piece of terrain to represent the gallows and/or chopping block. Place terrain in the remaining gaming area as normal. The scenario works best if this is particularly dense. Set-up Each player rolls a D6. The player with the highest score decides which warband sets up first. In the case of a tie, the warband with the lowest rating may choose. The first player chooses the table edge he wants to set up on, and places all of his warriors within 8" of it. His opponent then sets up within 8" of the opposite edge. Warbands Players use the normal warband set-up rules (see ‘Setting up the warbands’). Starting the game Both players roll a D6. The player with highest score takes the first turn. If the result is a tie the player with the smaller warband, in terms of actual models, may choose to go first or second. Special rules Anger of the Damned: The restless spirits of Executioner’s Square vent their eternal anger at any who roam in or close to the square. They manifest as concentrated and violent gusts of wind; the howling is their screams of rage. At the beginning of each players turn roll a D6. On a roll of 1 the spirits stay silent and nothing happens this turn. If the result is a 2 or more a spirit attacks. If the number is even (2, 4, 6) then the player whose turn it is must choose one of his warriors to be attacked. If the number is odd (3, 5) then his opponent must choose one of the controlling player’s warriors to be attacked. Note it is always the player whose turn it is that is attacked by spirits, the only difference is whether or not he or his opponent chooses the affected model. An attacked warrior is automatically hit by a Strength 2 attack (no armour modifiers) and is blown directly backwards D6". If an attacked warrior is in an elevated position such as a gantry or an upper floor of a building then there is a good chance he may be blown off and if this is the case treat the model as falling. If a model is blown into a piece of terrain (such as a mound of rubble or the wall of a building) or blown into another warrior, friend or foe, then the warrior (or both warriors if it hits another model) is knocked down but may get up at the start of his next turn should he survive. Ending the game When one of the warbands fails its Rout test, the game ends. The routing warband loses and their opponents win. Experience +1 Survives. If a Hero or Henchman group survives the battle. +1 Wining Leader. The Leader of the winning Warband gains +1 Experience. +1 Per Enemy Out of Action. A Hero gains +1 Experience for each enemy he puts out of action. +1 Trophy from the Square. If a Hero manages to stay on the gallows (or the piece of terrain representing the gallows) at the centre of the square for one complete turn then he gains +1 Experience.
Оранжевая зона: В этой зоне можно будет пять раза искать магические предметы (и артефакт) играйте сценарии:
1- The Wizard’s Mansion 2- The West Gatehouse 3- Happy Harpy Hunting Grounds 4- The Merchant Square 5- Налёт 6-Игрок с наименьшим рейтингом выбирает из пяти сценариев выше.
By Michael Havener
Not all of the ruined buildings in the city are ordinary houses. Some notable structures were the abodes of important town leaders or rich merchants. Tales are told of hidden rooms filled with treasure in such homes. The warbands have discovered the location of one such building. Rumours abound that the former owner also dabbled in the arcane arts, which may explain why his home was almost untouched by the devastation. Terrain Each player takes it in turn to place a piece of terrain, either a ruined building, tower, or other similar item. We suggest that the terrain is set up within an area roughly 4" x 6". The first building should be placed in the centre of the table, and the objective of the scenario is to take control of this building. Warbands One player is the defender, determined as normal (see ‘Attackers and defenders’ at the beginning of the article), representing the warband that reached the mansion first. The defender is deployed first inside or within 6" of the objective building. Then the attacking warbands are set up as normal. In addition, for each attacking warband beyond the first, the defender rolls once on the table below to determine the additional equipment his warband gets to start with. Each item may only be found once. If the same number is rolled more than once, re-roll. These items represent the findings of the warband thus far and are meant to give the warband a chance against multiple opponents. D6 Item Found 1 Wooden Man 2 D3 doses of Mandrake Root 3 D3 doses of Crimson Shade 4 Lucky Charm 5 Holy (Unholy) Relic 6 Cathayan Silk Cloak All of the above are described in the Mordheim rules except for the Wooden Man. For rules on the Wooden Man, see new items opposite. Starting the game Each player rolls a D6. The player rolling the highest has the first turn and order of play proceeds clockwise around the table (based on where players placed their warbands). Ending the game The game ends when all warbands but one have failed their Rout test. The routers automatically lose. If one of more warbands have allied, they may choose to share the victory and end the game. Experience +1 Survives. If a Hero or Henchman group survives the battle they gain +1 Experience. +1 Winning Leader. The leader of the winning warband gains +1 Experience. +1 Per Enemy out of action. Any Hero earns +1 experience for each enemy he puts out of action. The Wizard’s Treasure At the end of the game the winning warband finds all of the items on the table above which were not found before the battle. In addition, roll on the following chart to see what additional items the warband finds in the mansion. Note that you’ll roll for each item separately, apart from gold crowns, which are always found. For example, you will need to roll a 4+ to find a Tome of Magic. Then roll to see if you find the Gromril Sword and so on. D6 Roll Needed 3D6 GC Automatic D3 gems worth 10 GC each 5+ Tome of magic 4+ Gromril sword 5+ Athame 4+ D3 doses of healing herbs 4+ Dispel scroll 5+ New items Wooden Man: Use the stats and special rules for a zombie with +1S and +1T. The Wooden Man is an artificial construct in the shape of a man but made of wood. It will follow the commands of the defending warband but will not leave the wizard’s mansion for any reason, even after the game. The Wooden Man may obviously not be traded. Athame: An Athame is a special silver dagger used in magical rituals. If used in combat, it will not hold its edge. For the first attack in a game, it will count as a normal dagger. However, for the rest of the game it will count as a fist attack. The Athame is worth 10 gold crowns if traded. Terrain This is another great opportunity to use your Warhammer Fortress set to use as a gatehouse and a surrounding wall section. There should be terrain but not too much to block the movement of The Great Oak. Each player takes it in turn to place a piece of terrain, a ruined building, tower, wall, or similar piece of terrain. We suggest the terrain is set up within an area of 4' x 4' or 4' x 6' if you want to use more warbands or just like more space. Leave a 6” x 6” square in the middle of the board for the Great Oak. Set-up Players use normal warband set-up rules (see 'Setting up the warbands'). Special rules The Giant Oak will be placed in the middle of the board. Each warband will roll a D3 for the amount of Dark Dryad that will be placed on the board. The Dark Dryad will be placed on the board before players roll for sides and will be placed 8 inches within the Giant Oak. The Giant Oak and Dark Dryad will always be the last “player” go move or take its turn. The profiles of the Giant Oak and Dark Dryad can be found in the Beasts, Monsters & Townsfolk section of the Rulebook. Warbands Players use normal warband set-up rules (see 'Setting up the warbands'). Starting the game Each player rolls a D6 after the terrain has been placed. The player rolling the highest roll has the first turn, and order proceed clockwise around the table (based on where players placed their warbands). The Giant Oak and evil arbours will be considered the last warband in order of play. I would suggest that players take turns playing the Evil arbours. Ending the game The game ends when all warbands but one has failed their Rout Test. If two or more warbands are left they may ally together to end the game but they must agree on how to split the hoard (if Great Oak and minions are OOA). If an agreement cannot be worked out then they will fight it out until a “gentlemen's” agreement is reached.
Сокровища. Если все деревяшки ООА то: D6 Roll Needed 3D6 GC Automatic D3 gems worth 10 GC each 5+ Tome of magic 4+ Gromril sword 5+ Athame 4+ D3 doses of healing herbs 4+ Dispel scroll 5+
Experience +1 Survives. If a Hero or Henchmen group survives the battle, they gain +1 Experience. +1 Winning Leader. The leader of the winning warband gains +1 Experience. +1 Per Enemy out of action. Any Hero earn +1 Experience for each enemy he puts out of action. +1 For wounding the Giant Oak. Any Hero or Henchman earns +1 Experience for each wound he inflicts on the Giant Oak. +2 For taking the Giant Oak out of action. The Hero or Henchman that puts the Giant Oak out of action gets a bonus +2 experience. Forest Spirits Forest Spirits inhabit the trees of the forests of the Old World. In their solid form, they resemble a miniature version of a Treeman, with soft, damp woody flesh. They are very violent if threatened and will use their branch like arms with claws of sharp thorns and twigs to their best advantage. Special Rules Forest Spirits: The following rules apply to all creatures with are Forest Spirits: * All Forest Spirits are Immune to Psychology. * All Forest Spirits are Immune to Poison. * All Forest Spirits Cause Fear. * All Forest Spirits treat all stunned as knock down. * All Forest Spirits have a special save against all attacks, (4+ for a Tree-kin / Shadow Tree-kin, & 5+ for Dryads / Shadow Dryads). * All Forest Spirits are Flammable and will take an addition S5 hit if they are hit with a flammable weapon. Large Target: The Tree-kin and Shadow Tree-kin are large and so count as a large target. Treeman (Giant Oak) Treemen have the appearance of huge trees, many times the height of a human. They are often mistaken for trees in the forest as their clawed feet look like roots, and their legs look like the trunk of the tree. Special Rules: Forest Spirits: The following rules apply to all creatures with are Forest Spirits: * All Forest Spirits are Immune to Psychology. * All Forest Spirits are Immune to Poison. * All Forest Spirits Cause Fear. * All Forest Spirits treat all stunned as knock down. * All Forest Spirits have a special save against all attacks, (3+ for a Treeman). * All Forest Spirits are Flammable and will take an addition S5 hit if they are hit with a flammable weapon. Large Target: The Treeman count as a large target. Experience +1 For wounding the Monster. Any Hero or Henchman earns +1 Experience for each wound he inflicts on the Treeman. +2 For taking the Monster out of action. The Hero or Henchman that puts the Treeman out of action gets a bonus +2 experience.
Перемещение НПС. В центре стоит тримен и не перемещается, до момента атаки. После атаки он направляется в сторону обидчика. Если обидчик скрылся из поля зрения(спрятался например) на 2 хода, тримен замирает. Если на дистанции чарджа тримена или дриад есть модели, они немедленно их атакуют. Дриады хаотично перемещаются по карте броском пары артилерийских кубиков.
Terrain Start by set one of the taller building (6" or taller) in the centre of the playing area (The top of this is where the Harpies have built their nest), then each player takes it in turn to place a piece of terrain, either a ruined building, tower, or other similar item. We suggest that the terrain is set up within an area roughly 4' x 4'. Ladders may be placed in nearby buildings, but none in the building occupied by the Harpies. Set-up The scenario is for two warbands and a third player whom would control the three Harpies. Special rules Will not rout: The Harpies have mistaken the wyrdstone in their nest for Harpy eggs and will fight to the death to protect them. Warbands Each player rolls a dice. Whoever rolls highest chooses who sets up first. The first player then chooses which table edge to set up on, placing all his warriors within 8" of that edge. His opponent then sets up within 8" of the opposite edge. If more warbands are used then uses the Players use the normal warband setup rules (see ‘Setting up the warbands’) also the amount of harpies will increase by D3 per warband. Starting the game The Harpies go first before any of the warbands. Ending the game A warband wins if all three Harpies have been taken out of action and the other warband has routed, or the Harpies win if both of the warbands rout before the Harpies have all been taken out of action. Experience +1 Survives. If a Hero or Henchman group survives the battle they gain +1 Experience. +1 Winning Leader. The leader of the winning warband(s) gains +1 Experience. +1 Per Enemy Out of Action. Any Hero earns +1 Experience for each enemy he puts out of action. Wyrdstone Roll a D3 to determine how many wyrdstone shards are included. The nest is also full of various items. The winning warband may roll on the chart provided to determine what is contained in the nest. Harpy Nest Contents Besides the wyrdstone the following items may be in the Harpy nest. Roll 1D6 per line. On the number shown, or better, the item is present. D6 Item 5+ 2D6gc 3+ Jewelled dagger 5+ Heavy armour 6+ Ithilmir sword 3+ Gems worth 30gc 6+ Wolf cloak 5+ Straggler* 3+ Lucky charm 4+ D3 shields 5+ D3 helmets 6+ D3 swords * Somehow this unfortunate sod was whisked away to the Harpy nest. What they had planned for him is unknown, but he may aid you in your Exploration phase either this game or next (see pg 217). Harpies The Harpies are jealously protective of the wyrdstone in their nest. If any model approaches within their charge range then they will charge. The Harpies will try and coordinate their attacks so at least one stays back and protects the nest. Therefore, a Harpy may disengage from a fallen enemy model if there is an opportunity for one of its companions to charge another model. Special Rules: Talons: A Harpy has talons and is accustomed to fighting unarmed so does not suffer a penalty for doing so. Fly: A Harpy may fly up to 12". After the Movement phase the model is assumed to have landed and may be charged. If on the ground, a Harpy may make a full move and then use its wings. Drop Attack: If a Harpy is successful with both attacks in the first round of combat then the Harpy has successfully grabbed on to her enemy and swoops back up in the air to drop the model allowing gravity to do the work instead. The attacks themselves do not wound, but the person controlling the Harpy immediately rolls a D6 and a Scatter dice. That is the distance and direction from the place where the attack took place that the model will rest. Next the player controlling the Harpy rolls another D6. This is the distance from which the model has been dropped. The result is the Strength of hit (Strength 1 to Strength 6). Normal falling rules apply. If a model falls into a building than count the fall to where they land and then determine if the model falls again if it is within 1" of the edge of the floor. Any model that is struck by the dropped model will suffer a S3 hit. Large targets may only be dropped D3 inches since their size and weight make them more difficult to pick up. Once its opponent is dropped the Harpy may continue flying and return to the nest, preparing for another attack. Models that are stunned or knocked down will not be charged as it is too difficult for the Harpy to fly that close to the ground and do a drop attack. Experience +1 For taking the Beast out of action. The Hero or Henchman that puts the Harpy out of action gets a bonus +1 experience. Terrain Each player takes it in turn to place a piece of terrain, either a ruined building or something similar. We suggest that the terrain is set up within an area roughly 4' x 4'. The middle area of the board should free of terrain (maybe a fountain or the like to mark the centre of the square) and to have at least a 12” inch x 12” inch square open area. This will represent the Merchant's Square. The buildings placed outside of the Merchant's Square will represent the Merchant's Homes and Shoppe's. Warbands Players use the normal warband set-up rules (see ‘Setting up the warbands’). Special rules Warbands will begin searching the buildings for common items. Each warband will roll 1D6 for each searchable building. If they roll a 4+ they found a common item. In the Merchant's Square, will be D3 crates per warband. The crates will be placed in the middle of the Merchant's Square. When a warband touches a crate they must roll a D6. Only one roll per crate. On a roll of a 1 on a D6, the Black Pegasus will appear. The Black Pegasus will appear 8” inches in on a Random Table edge. The Black Pegasus will go in the last turn and will attempt to fly down on the models in the Merchant's Square. The Black Pegasus will target the closest model in the Merchant's Square. Merchant's Square is the 12” x 12” area in the middle of the table as the streets and alleys would be too narrow for the Pegasus to fly into. The profile of the Black Pegasus can be found in the Beasts, Monsters & Townsfolk section of the Rulebook. Starting the game Each player rolls a D6. The player with the highest has the first turn and order of play proceeds clockwise around the table (based on where the players placed their warbands). Ending the game When all the crates are off the table, all but one warband has routed, or the warbands ally. Experience +1 Survives. If a Hero or Henchmen group survives the battle they gain +1 Experience. +1 Winning Leader. The leader of a winning warband gain +1 Experience. +1 Per Enemy out of Action. Any Hero earn +1 Experience for each enemy he puts out of action. +1 Per each crate taken off the board. Any Hero earns +1 Experience for taking a crate off the board. Items Common items are found in the houses surrounding the Market's Square. They are kept no matter if you win or loose. Remember you need to roll a 4+ for each house to see if you were able to locate a common item. Only one opportunity per house. Please keep track of what homes you searched so you can take them off the list. Item D6 Result Needed D3 Morning Star 1 D3 Spears 2 D3 Bows 3 D3 Crossbow 4 1 Suit of Heavy Armour 5 D3 Nets 6 Rare items can only come from the crates placed in the middle of the Merchant's Square. Rare items may only be found if the crate is taken off the table. If no crates made if off the table then no Rare Items will be found. You will be much too nervous looking out for the other warbands and a Black Pegasus to open the crate in the middle of the Merchant's Square. When the game ends, the winning warband(s) does not automatically get the crates. Item D6 Result Needed D3 Repeater Crossbow 1 D3 Handgun 2 D3 Healing Herbs 3 1 Gromril Weapon 4 1 Dose Bugman's Ale 5 1 Eleven Cloak 6
Налёт Иногда каждым отрядом овладевает желание пограбить отдельные деревни и фермы. Часто, когда деревне или ферме удается отбиться от налетчиков, жители собирают монеты, что бы заплатить наемникам, которые помогут защитить их дома и семьи.
Ландшафт Банды Взбешенные крестьяне: Как только любой враг оказывается в пределах 8" от здания, то сидящие в домах крестьяне немедленно стреляют д3+1 выстрелов из арбалета по нему. Выстрелы производятся по общим правилам и учитывают все укрытия и прочее с BS3. Точкой стрельбы считаются любые окна домов. За каждое уничтоженное здание -1 выстрел. Спалить деревню! Любой атакующий может потратить полный ход, что бы запалить здание. При этом он не может двигаться, сражаться, стрелять или колдовать, он полностью занят поджогом. Огонь охватывает здание на 4+ на D6. Конец игры: Опыт:
Торговля и найм Список товаров для покупки оставляем из основной книги+ все вещи из таункрайера 7. (кто не нашел, тому писать мне, скину). ИСКЛЮЧЕНИЕ СОСТАВЛЯЕТ ЧТО КРОЛЬЕЧЬЯ ЛАПКА НЕ МОЖЕТ БЫТЬ ИСПОЛЬЗОВАНА ПРИ РАЗРАБОТКЕ(только в процессе игры).
Намечаю список наемников. Все из основной книги, ассасин и тилейский арбалетчик из таункрайера 7.Плю ниже. Hired Sword List
Arabian Merchant By Nick Kyme
From the lands of eternal desert they come, crossing the sea to reach the Empire, in search of the city spoken of in frightened whispers and imagined in childhood nightmares; Mordheim – City of the Damned. Not all hirelings are warriors and the merchants of Araby are not known for their martial prowess. Rather they are advisers, treasure seekers and collectors of the arcane. Found within the shady bazaars of seldom trodden streets and darkened taverns, they have an uncanny knack of finding the best equipment for the best price, tapping into the vein-like underworld network of black markets and foreign traders providing for any would-be adventurers. Experts in treasure and antiques, they seek their own fortune in the forgotten artefacts buried deep beneath the city but require a warband’s protection. Reciprocal then is this relationship. Although keen to avoid conflict, their employers’ keep them close at hand, as a smooth talking merchant is not to be trusted when treasure and glory is at stake… 20 Gold Crowns +10 Gold Crowns upkeep May be Hired: The Arabian Merchant may be hired by Lawful, Lawful / Neutral and Neutral warbands. Rating: An Arabian Merchant increases a warband's rating by 10 points plus 1 point for each Experience point the Arabian Merchant has. Special Rules Haggle: As in the Academic skill in the rulebook. Pawnbroker: The Merchant is skilled in finding the best price for sold items and as such gains an extra 2D6 gold per item that the warband sells (up to its full value) if he was not taken out of action in the battle. Marketeer: The Merchant has many useful contacts in the black market underworld and foreign traders to locate many special items. After each battle (if he wasn’t taken out of action) the Merchant can visit one of three markets: the Black Market, Foreign Wares and the Fencer, in search of items for the warband. Roll a D6 on the relevant table to see what items are on offer. Black Market A den of thieves and underworld brigands the black markets of Mordheim sell and procure all manner of illicit substances and are regularly frequented by the infamous members of the Assassins guild… D6 Items 1 Nothing available. 2 Dark Venom or Black Lotus (D3 doses) 3 Crimson Shade (D3 doses) 4 Mandrake Root or Madcap Mushrooms (D3 doses) 5 Stiletto Blade (need ‘Weapons Training’ to use) +1 attack per turn at -1 strength. 6 Blow Pipe (need ‘Weapons Training’ to use) Foreign Wares Traders from across the seas can be found in the shady taverns and street corners on the outskirts of Mordheim. They have many exotic and wondrous items for sale, but at a hefty price… D6 Items 1 Nothing available. 2 Venom Ring 3 Lamp of the Djinn or Monkey’s Paw 4 Magic Carpet or Tufenk 5 Elven Cloak 6 Cathayan Silks Fencer Fencers have an eclectic range of items ‘procured’ from sources best left unspoken. Offered at incredible prices, traders should be wary for their word is not their bond and such items are often ‘flawed’… D6 Items 1 Halfling Cook Book 2 Ithilmar Weapon 3 Gromril Weapon 4 Tome of Magic 5 Hunting Rifle or Elven Bow 6 Brace of Duelling Pistols All the items purchased through the Merchant’s market contacts are at their base price (i.e., do not add the random gold modifier for items). All items bought from the Fencer are also at half price but after the item is used once roll a D6. On a roll of 1, the item breaks and is useless – an elaborate fake! Merchant Skills Stone Cutter: The Merchant has the skill to refine wyrdstone shards to increase their value. Whenever a warband sells its wyrdstone the Merchant may try to refine the source. Roll a D6 to discover how much additional gold the wyrdstone is worth. D6 Gold 1-2 Lose 2D6 gold crowns. 3-5 Gain 2D6 gold crowns. 6 Gain 3D6 gold crowns. Guardian: The Merchant has ‘acquired’ a bodyguard to protecting from harm in the coming battles. The bodyguard will only protect the Merchant and cannot fulfil warband objectives or search, loot or any function other than protecting the Merchant and as such will remain within 1" of the Merchant at all times. The bodyguard doesn’t gain experience and isn’t paid (it is assumed he has been ‘gifted’ to the Merchant as a favour from one of his contacts). Special Rules Intercept: the bodyguard will intercept any model shooting at or charging the Merchant. Any attacks will be directed at him and if charged place the bodyguard in front of the Merchant to protect him. The bodyguard will not charge unless the Merchant also charges and cannot intercept an attack if already engaged in combat.
Barbarian The Barbarians are massive men who are bred for battle from birth and use their training to inflict pain and suffering on the enemies that they consider to be weak and their prey, as well as rival tribes. 50 Gold Crowns +15 Gold Crowns upkeep May be Hired: The Barbarian may be hired by any Lawful / Neutral, Neutral, Neutral / Chaotic, and Chaotic warbands except for Skaven, Greenskins and Beastmen. Rating: The Barbarian increases a warband's rating by 15 points plus 1 point for each Experience point the Barbarian has. Special Rules Strongman: the barbarian starts with Strongman skill. See the Strength Skills section of the rulebook for more details.
Black Orc From the Nemesis Crown Black Orcs are more independent than ordinary greenskins. They were originally bred by the Chaos Dwarfs to eliminate the annoying animosity which plagues their Orc and Goblin cousins. Unfortunately the independence also made them difficult to control and many left the land of the Chaos Dwarfs to pursue a life of carnage of their own. Many join Orc waaghs where their strength and skill is much admired. A few however wander alone and will sell themselves for the opportunity to fight. 60 Gold Crowns +25 Gold Crowns upkeep May be Hired: The Black Orc may be hired by any Neutral / Chaotic, Chaotic warbands except for undead. Rating: The Black Orc increases a warband's rating by 15 points plus 1 point for each Experience point the Black Orc has. Special Rules I said 'shut it'! (Only applicable for greenskin): Whilst the Boss has this ferocious warrior in the warband the greenskins are reluctant to make trouble. Any orcs or goblins within 6” of the Black Orc do not suffer from the effects of Animosity. The rest of the warband tests as normal. Who's Da Boss!: If any Goblin leader is taken OOA during the battle, the Black Orc HS steps up to replace him. For the duration of the battle he gains the "Leader" ability. If the Goblin leader gets the "Killed" result after the battle, then the Black Orc decides to fill the new vacant position permanently. The Black Orc becomes the new warband leader, but he keeps his upkeep cost (hey, a Black Orc can't live on mushrooms and fungus alone). The Black Orc does not count towards the warband size when selling treasure. Whose Da Man? (Only applicable for greenskin): A Black Orc counts as a second leader in any warband he joins, and relays orders (much nastier) to the other warriors. Warriors within 6” of him may test off of their true leader’s Leadership minus 1 if the leader is still on the table, or at the Black Orc’s Leadership if he is not or if the Black Orc’s Leadership is higher than their leader’s Leadership-1. Independent: The Black Orc is fierce independence means that they do not have to take All Alone tests.
Bounty Hunter By Nick Kyme Villains and outlaws are rife in the Old World. In Mordheim they are as ubiquitous as the ruins that litter the streets. It is the false perception of some outlaws that the depravity and chaos within the city's walls can offer some anonymity from those men who would seek to bring them to justice and claim the price on their heads. Not so, for Bounty Hunters are determined and resourceful men who will often hire themselves out as mercenaries to roaming warbands in the hope of getting closer to their mark. Their mission is to capture at all costs and a little thing like a cursed city isn't even going to slow their stride... 40 Gold Crowns +15 Gold Crowns upkeep May be Hired: The Bounty Hunter may be hired by any Lawful, Lawful / Neutral and Neutral warbands. Rating: A Bounty Hunter increases a warband's rating by 20 points plus 1 point for each Experience point the Bounty Hunter has. Special Rules Capture: The Bounty Hunter will always be on the lookout for the outlaw he is pursuing. Such contracts are numerous, especially in Mordheim so at the start of each battle nominate one of your opponent's heroes as the Bounty Hunter's mark. The Bounty Hunter gets a +1 to hit this model and must always move towards them (if he can see them), unless he can shoot (in which case choose). If the Bounty Hunter successfully takes the hero 'out of action' he gains the hero's gold value as payment (of which he gives the warband half) +D3 experience if he survives the game and the Bounty Hunter's side wins. After the battle do not roll on the serious injury table for the hero, he simply counts as captured.
Chaos Warrior The dark warriors who dedicate themselves to Chaos are right at home in the dark streets of Mordheim, and some might be found in the company of the Possessed up to some foul ends. 70 Gold Crowns +35 Gold Crowns upkeep May be Hired: The Chaos Warrior may be hired by any Neutral / Chaotic and Chaotic warbands except for Undead. Rating: The Chaos Warrior increases a warband's rating by 25 points plus 1 point for each Experience point the Chaos Warrior has. Special Rules Fearsome: The Chaos Warrior causes fear Massive Strength: The Chaos Warrior is titanic in size and may use a double-handed weapon in one hand. This means he can use his shield while wielding his mighty double-handed Battle Axe one handed. Also, the Chaos Warrior gains no movement penalty for using heavy Armour with a shield. Upkeep: The warband leader may choose to pay the Chaos Warrior with 3 wyrdstone shards instead of Gold. [Thank to Ed Hastings & Natascha Chrobok for the idea.] Clan Eshin Assassin This black clad Skaven is a silent and deadly infiltrator belonging to Clan Eshin. It’s not uncommon for an Assassin to accept assignments that will pit them against their own clan, they are after all businessmen and see an opportunity to make more Warp tokens by hiring out their services to the other Lords. 30 Gold Crowns +15 Gold Crowns upkeep May be Hired: The Clan Eshin Assassin may be hired by any Neutral / Chaotic and Chaotic warbands. Rating: The Clan Eshin Assassin increases a warband's rating by 25 points plus 1 point for each Experience point the Clan Eshin Assassin has. Special Rules Expert Killer: All attacks made by the Assassin, wether this is shooting or close combat, have an extra -1 save modifier to represent his skill in striking at non-armoured spots. Skaven: The Clan Eshin Assassin like all Skavens, only lookout for himself and so they would stab (or shoot) you in the back if the need arose. The Clan Eshin Assassin will shoot in to combat with on care for the safely of others. For each shot roll a D6 on a 1-3 the shot hits a friendly model.
Clan Skryre Sniper There are many deadly warriors that have come to Mordheim, one of these are the Skaven snipers of Clan Skryre, armed with the clan’s Jezzail rifle which can shoot of the winds of a dragonfly at over twelve hundreds paces. 50 Gold Crowns +20 Gold Crowns upkeep May be Hired: The Clan Skryre Sniper may be hired by any Neutral / Chaotic and Chaotic warbands. Rating: The Clan Skryre Sniper increases a warband's rating by 20 points plus 1 point for each Experience point the Clan Skryre Sniper has. Special Rules Sniper: The Clan Skryre Sniper is not deployed at the beginning of the game. He is deployed at the beginning of the second turn of play within 16" of the player's table edge. He is considered Hidden after deployment. This represents the Clan Skryre Sniper spending the entire first turn looking for a good sniping position. Skaven: The Clan Skryre Sniper like all Skavens, only lookout for himself and so they would stab (or shoot) you in the back if the need arose. The Clan Skryre Sniper will shoot in to combat with on care for the safely of others. For each shot roll a D6 on a 1-3 the shot hits a friendly model. Duellist By Nick Kyme Duellists are men of the shadows, their reputations dark and bloodthirsty. They are men of iron nerve who stare unflinchingly into the face of death every time they draw their pistols. As well as expert pistoliers, dualists are master swordsmen, their close quarter fighting deadly and brief for their opponents. Those who seek the services of a duellist must frequent dark avenues and taverns to locate them, for they are enigmatic and elusive figures. However any warband who secures their skills will reap great benefit. 35 Gold Crowns +15 Gold Crowns upkeep May be Hired: The Duellist may be hired by any Lawful, Lawful / Neutral, Neutral and Neutral / Chaotic warbands. Rating: A Duellist increases a warband's rating by 18 points plus 1 point for each Experience point the Duellist has. Special Rules Darting Steel: A Duellist is like a blur in hand-to-hand combat, turning blades aside with seemingly little effort or concern. The Duellist may parry using his sword and buckler if he can roll under his weapon skill and not more than his opponent's highest hit roll as per the normal rules.
Norse Shaman Even mighty warriors fear the seers of the great Norse tribes. It is said that these seers are mighty soothsayers and can tell when a warrior will meet his death in combat, a knowledge that any warrior dreads to know. 45 Gold Crowns +25 Gold Crowns upkeep May be Hired: The Norse Shaman may be hired by any Lawful / Neutral, Neutral, Neutral / Chaotic, Chaotic warbands except for Beastmen, Dwarves, Elves, Skaven, Greenskins and Undead. Rating: A Norse Shaman increases a warband's rating by 25 points plus 1 point for each Experience point the Norse Shaman has. Special Rules Pray User: The Norse Shaman uses the Norse Runes as detailed in the Magic section and the Norse Shaman start with two Runes generated at random. See the Magic section for details. In addition the Norse Shaman may learn a new Rune instead on a new skill
Shadow Warrior Shadow Warriors are High Elves from the desolate war-ravaged land of Nagarythe, where the Witch King once held court. This leads their kin to mistrust and ostracise them. These angry lost souls are often used as scouts and skirmishers for High Elf forces, as well as wandering sell-swords looking to quench their bitter hatred of the Dark Elves. Though not as skilled a scout as the Ranger, the Shadow Warrior is as deadly with his bow and sword as any Elf. 35 Gold Crowns +15 Gold Crowns upkeep May be Hired: The Shadow Warrior may be hired by any Lawful, Lawful / Neutral warbands except for Dwarven, and Pit fighter warbands. Warbands which include Dwarfs may hire Shadow Warrior, but must pay 30 gold crowns after each battle instead of 15. Rating: A Shadow Warrior increases a warband's rating by 12 points plus 1 point for each Experience point the Shadow Warrior has. Special Rules Bitter Enemies: If the last fight was against Dark Elves or a warband containing a Dark Elf Hired Sword, the upkeep cost is waived for that game. Excellent Sight: Elves have eyesight unmatched by mere humans. The Shadow Warrior spots Hidden enemies from twice his Initiative value in inches away. Hates Dark Elves: Shadow Warriors seethe with bitterness when facing Dark Elves and follow the rules for Hatred Infiltration: A Shadow Warrior can infiltrate. See the Skaven special skill of the same name.
Witch Hunter From the Nemesis Crown
Witch Hunters are driven men who make it their job to free the Empire of the taint of chaos. Although these troubled times have often meant witch hunters operating in small groups or by requisitioning support from local authorities many still prefer to work alone. Some of course have other reasons, their excessive zeal can lead to other hunters shunning them or even their expulsion from the order, in a few cases they themselves have darker secrets they don’t want their brothers in arms investigating. These solitary witch hunters are not above joining roving bands if it suits their aims, providing they are reimbursed for the skills they bring. They care little for the morals of such groups providing that they are a human band and not tainted in any way by chaos. The threat of chaos is so great that they have even put aside their prejudices against followers of Ulric to better fight chaos. 30 Gold Crowns +15 Gold Crowns upkeep May be Hired: The Witch Hunter may be hired by any Lawful, Lawful / Neutral, Neutral, warbands, but will not stay with a Witch Hunter band for more than one battle. Rating: A Witch Hunter increases a warband's rating by 15 points plus 1 point for each Experience point Witch Hunter has. Profile M WS BS S T W I A Ld Witch Hunter 4 4 4 3 3 1 4 1 8 Weapons/Armour: Duelling or Crossbow Pistol, sword and dagger. The Witch Hunter starts every game with a vial of Holy water and garlic. Skills: The Witch Hunter may choose from Combat, Shooting, Academic, Strength, & Speed when he gains a new skill. Special Rules Burn the Witch: The Witch hunter hates all enemy magic users. He will not work for a band with a magic users, but will work with a pray user. In Sigmar’s name: The Witch hunter can call on his faith in Sigmar, he is allowed to reroll all failed fear tests. Sigmar’s reward: Doing Sigmar’s work is reward enough at times. If the band take the leader of a chaos or undead band out of action the Witch Hunter waives part of his fee, at the end of the battle he only charges 5gc upkeep. Chaotic bands only includes bands truly chaotic, not merely nonhuman, e.g. not skaven, dark elves etc. Assembled
Магические предметы.
В некоторых локациях, отмеченных мастером, есть возможность заняться поиском артефактов. После отыгрыша боя, победившая сторона бросает 2д6 и сверяется с таблицей ниже. Однажды обысканная локация в плане артефактов считается осмотренной и больше поискам не подлежит.
2-5 Магический свиток Герой находит один из магических свитков из низшей магии, забытых магами древности. Киньте еще раз д6, чтобы определить, какое заклинание написано на свитке. Свиток является одноразовым заклинанием, и после использования рассыпается в пыль. Использовать свиток может любая модель. 6-7 Ботинки из кожи скинка. Сделанные из кожи скинка ботинки позволяют своему владельцу легко ходить по любой водной поверхности. Носитель больше не замедляется болотами, реками и снегом . 8 Кольцо Удачи. Во время боя герой, носящий это кольцо, может изменить одно любое значение на любом кубике на +1\-1. Только один раз за один бой. 9 Стальная Рубашка. Рубаха, заколдованная так, что она стала крепче стали. Она может быть надета под любую другую броню и складываться с ней, давая +1 к броне. Эта вещь уничтожается, если носитель получил повреждения огненной магией или огненным оружием. 10 Ледяной Кристалл. Во время фазы стрельбы носитель может выстрелить в модель в 8” от себя д3 ударами 2 силы. 11 Огненный бес. Маленький огненный бес сопровождает вашего персонажа, имеющего этот предмет. В фазу стрельбы бес стреляет в 12” от носителя огненной стрелой силы 4 12. Артефакт! Вы нашли один из артефактов. Киньте еще раз кубик и сверьтесь с таблицей стандартных артефактов.
В плену проклятого города.
События последних недель всколыхнули все окрестности Мордхейма. Получивший демоничество чернокнижник, множество нанятых наемников и повысившийся курс вирдстоуна всколыхнули устоявшуюся жизнь. Графы выборщики ближайших имперских провинций направили эмиссаров в Мордхейм для сбора сведений об отрядах действующих там и местах, где они побывали. Всеми двигала разная мотивация, но сходилась она в одном, всем был нужен вирдстоун… Итак, наша очередная кампания по правилам Мордхейм, Эта компания будет отличаться тем, что у нее будет мастер игры в лице меня (Игоря Прихнева), посильную помощь окажут Игорь Легоставев(надеюсь руководитель будущей компании по Люстрии и радушный хозяин с домашним столом))) и Гаррет (Даниил, наш независимый эксперт и судья).
До начала компании хотел бы выслушать все предложения по ее изменению, дополнению, уточнению тонких моментов. Мы играем для себя и хотим получить удовольствие, так что давайте сделаем все интересно.
|
|||||||||||||||||||||||||||||||||||||
Последнее изменение этой страницы: 2019-04-19; Просмотров: 231; Нарушение авторского права страницы